background image


User Guide 


Document is subject to change. Please check 

www.ComSonics.com

 for updated 

information. 


CSI Doc. 101623-004 eRev. 1.0.5


Summary of Contents for QAM Marker

Page 1: ...User Guide Document is subject to change Please check www ComSonics com for updated information CSI Doc 101623 004 eRev 1 0 5...

Page 2: ...ermitted to use the Software in any manner not expressly authorized by this License You acknowledge and agree that ownership of the Software and all subsequent copies thereof regardless of the form or...

Page 3: ...el 6 Back Panel 6 Headend Hub Installation 8 DC Powering 9 Power and Alarm Indicators 10 Broadcast Insertion Considerations 11 Configuration Manager Introduction web based 13 QAM Marker Manual Level S...

Page 4: ...cause damage to the equipment which will void the warranty and may cause electric shock Clean only with a soft dry cloth AC Mains This equipment does not have a power switch It is turned on when the...

Page 5: ...ily in the cable operator s vehicles detecting system leaks in real time as the technician performs their regular duties Leak intensity and location are recorded and uploaded by cell phone GPRS techno...

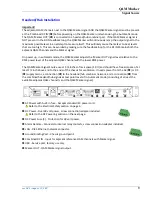
Page 6: ...Using the selector the marker can be set to 1 2 or 3 The QAM Sniffer receiver marker setting must correspond to the Marker Identifier setting on the headend QAM Marker signal source F1 for 1 F2 for 2...

Page 7: ...QAM Marker Signal Source rev1 0 5 August 15 2017 7 Marker OUT QAM Marker signal output...

Page 8: ...with the lower RMS power The QAM Marker Signal Source uses 1 3 4 inches of rack space 1 RU and should have free air space of at least 1 2 inch above and to the ends of the chassis for ventilation It n...

Page 9: ...4 STF 5 08 Each terminal connection of the Phoenix plug can only accept one 24 to 12 AWG stranded wire Do not exceed the rated capacity Use the shortest possible wire length Always use a continuous l...

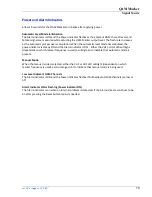
Page 10: ...and the Alarm indicator is OFF Either the VHF or UHF LED will light dependent on which marker frequency is used a solid green to indicate that Automatic mode is present Manual Mode When the manual mo...

Page 11: ...than 32 dBmV and no more than 20 dBmV1 If the feedback signal used for the RF Input is below the required power level 32 dBmV a low gain amplifier can be inserted to amplify the signal to within the...

Page 12: ...on depending upon the combining execution Operation in Automatic mode depends whether or not a RF feedback loop exists with the presence of the inserted QAM Marker signal and either or of the adjacent...

Page 13: ...t if forgotten Please be sure to record the new IP address for future reference Steps to Program the QAM Marker box Open a web browser Enter 192 168 0 50 or the changed address in the URL address bar...

Page 14: ...y Settings function is used Marker Use this section to set the Marker level When the System Mode is set to Automatic level mode the Manual Level field is grayed out and not available Enabling Manual i...

Page 15: ...l Bandwidth SBW of 5 361 MHz and 6 952 MHz respectively A Spectrum Analyzer has a number of Resolution Bandwidth RBW settings The setting selected when measuring power must be used to calculate the Ba...

Page 16: ...in three important ways 1 The measured power at the marker point is constrained to the band pass limits 2 the noise floor decreases as the band pass range is narrowed and 3 frequency signals close tog...

Page 17: ...ace averaging mode and adjust to collect 100 samples Wait a few seconds for the display to stabilize The two QAM channels adjacent to the marker signal should be within 1 dB of each other Record the p...

Page 18: ...sults If the spectrum analyzer does not have a RBW small enough to resolve the two sidebands you will see a single haystack type trace In this case all of the marker power is indicated by the single t...

Page 19: ...BW setting This is an artifact of the measuring process More accurate results are obtained if the span is set to a lower value thus increasing the number of data points used to represent the signal on...

Page 20: ...he expected level of 2 82 dBmV Note Use the Peak Search function then To Center to move center frequency to marker point Figure 4 Section 5 Modulation Error Ratio Measurements The QAM Marker installat...

Page 21: ...actor 8 MHz QAM Correction Factor 3 MHz 10 log10 5 361 3 0 2 52 dB 10 log10 6 952 3 0 3 65 dB 1 MHz 10 log10 5 361 1 0 7 29 dB 10 log10 6 952 1 0 8 42 dB 300 kHz 10 log10 5 361 0 3 12 52 dB 10 log10 6...

Page 22: ...Power 33 dB Single QAM Marker Level ______ dBmV ____ dB 2 51 dB ______ dBmV 33 dB _____ dBmV Measure MER before and after QAM Marker installation MER Adjacent Ch 1 Adjacent Ch 2 Pre QAM Marker Instal...

Page 23: ...at a level 30 dB below the adjacent QAM channel with minimum RMS Power Manual Mode 10 dBmV to 35 dBmV Output Level Accuracy 0 0 1 0 dB Carrier Suppression 52 dBc Input RF Input Combined RF Lower adja...

Page 24: ...017 24 Environmental AC Power 100 240 VAC 50 60 Hz 15 Watts IEC 350 6 foot power cord included DC Power 48 VDC 15 Watts Phoenix MSTB 2 5 4 STF 5 08 1 plug provided Operating Temperature Range 50 F to...

Page 25: ...asonably repair or replace then ComSonics may in its sole discretion refund the purchase price paid for the product Replacement products or parts may be new or reconditioned or comparable versions of...

Page 26: ...nburg Virginia 22801 United States of America www comsonics com November 30 2012 Software License Agreement Carefully read the following terms and conditions before using this product It contains soft...

Page 27: ...will also terminate if you fail to comply with any term or condition of the License Agreement Upon such termination you agree to destroy the Software and documentation together with all copies Govern...

Reviews: