background image

Unpacking and Installation

MNC-0300-070

14 of 22

Revision 1

Power and Interface Interconnections

When performing the procedures in this section refer to the 
Wiring and Interconnect Drawings for your specific amplifier. 
These drawings are located in the appendix titled 

Interconnect 

Drawings

.

Prime Power Connections

Single Phase Units

The AC Prime Power receptacle is located on the amplifier rear 
panel. See the appendix titled 

Specification

 for nominal line 

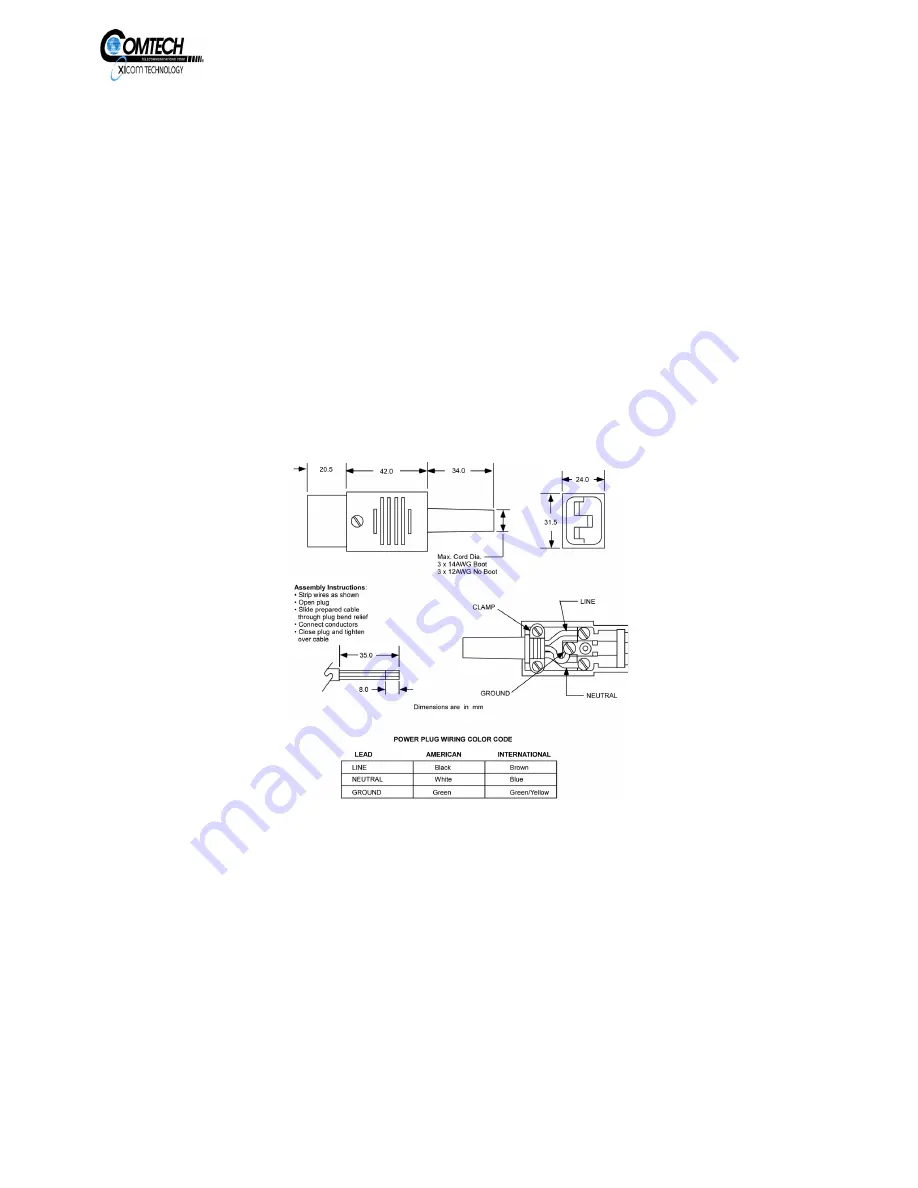
voltage and prime power connects. Figure 4 shows the plug 
wiring diagram.

Title 

Figure 4, Power Plug Wiring Diagram

Three Phase Units

Phase orientation must be verified on initial installation. If the 
phase orientation is not correct the amount of air flow will be 
greatly reduced. Three phase units have a pressure switch that 
senses the TWT air flow. If the phase orientation is incorrect the 
HPA will shut down indicating a TWT Temperature fault. Refer 
to the appendix titled 

Specifications

 for nominal line voltage and 

prime power connections. If repeated TWT Temperature faults 


EAR EXPORT CONTROLLED:  The information contained in this Manual refers or relates to a product that is subject 

to the U.S. Export Administration Regulations (EAR).  Transfer of data herein by any means to a Foreign Person, 

whether in the U.S. or abroad, may require an export license from the U.S. Department of Commerce.

Summary of Contents for XTRT-400C

Page 1: ...USA 408 213 3000 Phone 408 213 3001 Fax www xicomtech com Document Number MN5 1060 XXX Revision 1 Applicable to 305 1060 XXX EAR EXPORT CONTROLLED The information contained in this Manual refers or r...

Page 2: ...RT CONTROLLED The information contained in this Manual refers or relates to a product that is subject to the U S Export Administration Regulations EAR Transfer of data herein by any means to a Foreign...

Page 3: ...USA 408 213 3000 Phone 408 213 3001 Fax www xicomtech com Document Number MN5 1060 XXX Revision 1 Applicable to 305 1060 XXX EAR EXPORT CONTROLLED The information contained in this Manual refers or r...

Page 4: ...such revision or changes Xicom Technology makes no warranty of any kind with regard to this material including but not limited to the implied warranties of fitness for a particular purpose Xicom Techn...

Page 5: ...Four Provides the operating instructions for the power amplifier Chapter Five Provides communication protocols used with Xicom Technology power amplifiers Chapter Six Describes the preventive mainten...

Page 6: ...ent Persons using this manual should familiarize themselves with the information in the Appendices before reading the main sections EAR EXPORT CONTROLLED The information contained in this Manual refer...

Page 7: ...ted By 1 Initial Release 06 10 2011 T Tan EAR EXPORT CONTROLLED The information contained in this Manual refers or relates to a product that is subject to the U S Export Administration Regulations EAR...

Page 8: ...x A Product Specifications 305 1060 XXX Appendix B Mechanical Drawings Outline 304 0481 001 Exhaust Duct 381 1460 XXX Appendix C Interconnect Drawings RF Unit Interconnect 307 1353 XXX Logic Interconn...

Page 9: ...044 Add more abbreviations 05 15 2003 A L Crozier Jr A4 11802 Add more abbreviations 01 13 2004 A L Crozier Jr A5 12050 Add more abbreviations 03 19 2004 A L Crozier Jr A6 12808 Add more abbreviations...

Page 10: ...ontained in this Manual refers or relates to a product that is subject to the U S Export Administration Regulations EAR Transfer of data herein by any means to a Foreign Person whether in the U S or a...

Page 11: ...today s acronyms and abbreviations Boston New York Hougton Mifflin Company Franklin Covey 1999 Franklin Covey Style Guide FOR BUSINESS AND TECHNICAL COMMUNICATION THIRD EDITION Abbreviations and Acro...

Page 12: ...carrier dBI Decibels referenced to Amperes or Decibels referenced to Isotropic Gain dBm decibels referenced to one milliwatt dBW decibels referenced to Watts DC direct current DCD Date Carrier Detect...

Page 13: ...t inv inverter IPA Intermediate Power Amplifier IrDA Infrared Data Association Iw helix current k kilo one thousand K cathode kg kilogram kHz kilo Hertz KMT Klystron Microwave Tube KPA Klystron Power...

Page 14: ...oc overcurrent ODU Outdoor Unit OEM other equipment manufacturer O P Output ovv over voltage PBIT parity bit PCB printed circuit board PF power factor PFC power factor correction PS power supply PSU p...

Page 15: ...ifier TXD Transmitted Data UMBC umbilical cord undc undercurrent UPS uninterrupible power supply VAC Volts alternating current VDC Volts direct current VGA variable gain amplifier VGIPA Variable Gain...

Page 16: ...ogy Power Supply XTRD Xicom Technology Rack Mount Digital Amplifier XTRD LDA Xicom Technology Rack Mount Line Driver Amplifier XTRS Xicom Technology Solid State Rack Mount Amplifier XTS Xicom Technolo...

Page 17: ...Standards Earth Ground Fuse Input Local OFF for a part of equipment ON for a part of equipment EAR EXPORT CONTROLLED The information contained in this Manual refers or relates to a product that is sub...

Page 18: ...itted Power Monitor Symbol Definition EAR EXPORT CONTROLLED The information contained in this Manual refers or relates to a product that is subject to the U S Export Administration Regulations EAR Tra...

Page 19: ...l Release 02 07 2011 T Fisher EAR EXPORT CONTROLLED The information contained in this Manual refers or relates to a product that is subject to the U S Export Administration Regulations EAR Transfer of...

Page 20: ...f Figures Number Title Page Number Figure 1 Typical Rack Mount Amplifier Block Diagram 4 List of Tables Number Title Page Number Table 1 Environmental Specifications 5 EAR EXPORT CONTROLLED The inform...

Page 21: ...nterface may be configured for RS 422 or RS 485 operation There are hardwired summary fault and external interlock circuits available for user defined functions Refer to Figure 1 Typical Rack Mount Am...

Page 22: ...ONTROLLED The information contained in this Manual refers or relates to a product that is subject to the U S Export Administration Regulations EAR Transfer of data herein by any means to a Foreign Per...

Page 23: ...the typical rack mount amplifier environmental specifications Refer to the appendix titled Specifications for the environmental specifications unique to your amplifier Specifications Refer to the appe...

Page 24: ...nd accuracy of the documentation that is shipped with the products We also want customers to submit comments and suggestions or request assistance in solving problems with any or our products Please a...

Page 25: ...lude 2kW Amplifiers 11 20 2001 A L Crozier Jr C 9433 Change dispatching to dissipating on page 7 01 24 2002 A L Crozier Jr D 9535 Add General Warning on page 4 02 22 2002 A L Crozier Jr E 12926 Add Ge...

Page 26: ...usammenfassungen 8 Beschreibung 8 Warnungen Vorsichtshinweise und Hinweise 8 Allgemeine Warnungen und Vorsichtshinweise 10 Hochspannungsgefahren 10 Gefahren bei Leiterbenutzung 12 Gefahren durch Hochf...

Page 27: ...n these procedures to alert the user to special conditions regarding safety or correct performance of a particular step or steps They are placed immediately prior to the procedural step to which they...

Page 28: ...ury to personnel could result from improper use of a ladder WARNING This symbol denotes a GENERAL HAZARD WARNING in a procedural step and is used whenever death or injury to personnel could result fro...

Page 29: ...er supply cover is removed multiple high voltage points are exposed Use extreme care when operating the amplifier with the cover removed Failure to comply could result in serious injury or death WARNI...

Page 30: ...one hand ensure probes are not touching other contacts Failure to comply could result in serious injury or death Ladder Hazards WARNING When required to use a ladder ensure that the ground in the area...

Page 31: ...s be terminated into a load capable of dissipating full RF power Failure to comply could result in equipment damage Magnetic Field Caution A Microwave Tube has a very strong magnetic field The tube ca...

Page 32: ...n Benutzer auf besondere Bedingungen bez glich Sicherheit oder korrekte Durchf hrung eines einzelnen Schrittes oder mehrerer Schritte aufmerksam zu machen Sie befinden sich unmittelbar vor dem Verfahr...

Page 33: ...werden k nnten WARNUNG Dieses Symbol bedeutet eine WARNUNG VOR EINER ALLGEMEINEN GEFAHR bei einem Verfahrensschritt und wird stets verwendet wenn Mitarbeiter durch unsachgem es Handeln bei diesem Ver...

Page 34: ...t wird liegen mehrere Hochspannungskontakte blank Seien Sie u erst vorsichtig wenn Sie ohne Abdeckung am Verst rker hantieren Nichtbefolgen k nnte schwere Verletzungen oder Tod zur Folge haben WARNUNG...

Page 35: ...en m ssen schalten Sie das Ger t AUS benutzen Sie eine Kurzschluss Sonde zur Sicherstellung dass die Kondensatoren entladen sind stellen Sie sicher dass Mess Sonden ordentlich isoliert und f r Spannun...

Page 36: ...liche Sch den verursachen kann Stellen Sie vor der Inbetriebnahme sicher dass der mit der Wartung beauftragte Techniker keinen Schrittmacher tr gt alle Mikrowellenverbindungen sicher befestigt sind ke...

Page 37: ...er magnetischen Lagerfl che abstellen f r Aufbau Wartung oder Reparatur magnetisches Werkzeug benutzen Nichtbefolgen k nnte Besch digung des Ger tes zur Folge haben EAR EXPORT CONTROLLED The informati...

Page 38: ...rmation contained in this Manual refers or relates to a product that is subject to the U S Export Administration Regulations EAR Transfer of data herein by any means to a Foreign Person whether in the...

Page 39: ...Initiated By 1 Initial Release 02 02 2011 T Fisher EAR EXPORT CONTROLLED The information contained in this Manual refers or relates to a product that is subject to the U S Export Administration Regula...

Page 40: ...ternal Interlock 11 RF Inhibit Control 11 Summary Fault Indicators 13 Output Voltage 13 Power and Interface Interconnections 14 Prime Power Connections 14 Single Phase Units 14 Three Phase Units 17 Se...

Page 41: ...e Wye Connection NEU Neutral into Terminal Block 16 Figure 7 Three Phase Delta Connection into Amphenol Connector 16 Figure 8 Three Phase Delta Connection into MS type connector 17 Figure 9 Typical RS...

Page 42: ...Connector 17 Table 6 RS 232 Pinouts 18 Table 7 Pinouts for the COM2 Intereface 18 Table 8 Ethernet Pinouts standard RJ45 19 Table 9 W G Switch 1 Pinouts 19 Table 10 W G Switch 2 Pinouts 20 Table 11 U...

Page 43: ...pping carrier Failure to submit a report may invalidate any future claims Mechanical Installation When performing the procedures in this section refer to the appendix titled Mechanical Drawings Rack S...

Page 44: ...removed Xicom recommends the use of Kapton tape 3M Brand 92 Xicom P N 602 0001 001 Remove tape or cap prior to final installation Failure to comply could result in contamination to the internal waveg...

Page 45: ...armonics of excessive power reflected into the HPA can cause damage to the TWT It is recommended that a transition is made to rectangular waveguide and an isolator used to assure a good match to the H...

Page 46: ...artially tighten that screw Move clockwise to the next screw to be tightened 3 and partially tighten that screw Move to the screw diagonally opposite screw 3 and partially tighten that screw 4 If requ...

Page 47: ...ence EAR EXPORT CONTROLLED The information contained in this Manual refers or relates to a product that is subject to the U S Export Administration Regulations EAR Transfer of data herein by any means...

Page 48: ...duct system inlet and exhaust pressure cannot exceed 1 of water at 100 CFM 4 RU Total air duct system inlet and exhaust pressure cannot exceed 1 of water at 150 CFM For specific design requirements of...

Page 49: ...turn off high voltage eliminating the RF amplification of the input signal The amplifier can be configured via the set up menu on the front panel to inhibit RF when the connection to ground is remove...

Page 50: ...mmary Fault 2 Normally Open Closes when fault occurs 8 Summary Fault 2 Normally Closed Opens when fault occurs 9 Ground 10 Ground 11 External Interlock Return Pin 11 must be connected to Pin 13 to ena...

Page 51: ...state any time a summary fault occurs The user has the choice of a normally open or normally closed circuit Output Voltage A 24 VDC voltage is supplied that can deliver up to 100 mA This supply volta...

Page 52: ...hree Phase Units Phase orientation must be verified on initial installation If the phase orientation is not correct the amount of air flow will be greatly reduced Three phase units have a pressure swi...

Page 53: ...the three phase connections Figure 5 Three Phase Delta Connection NEU Not Used into Terminal Block Table 2 Three Phase Delta Connection Pinouts Terminal Connection A Phase A B Phase B C Phase C NEU N...

Page 54: ...Phase Wye Connection Pinouts Terminal Connection A Phase A B Phase B C Phase C NEU Neutral EAR EXPORT CONTROLLED The information contained in this Manual refers or relates to a product that is subjec...

Page 55: ...e The last command received has precedence Table 4 Three Phase Delta Connection Pinouts Amphenol Pin Connection 1 Phase A 2 Phase B 3 Phase C 4 Ground Table 5 Three Phase Delta Connection into MS type...

Page 56: ...nnection 2 RXD Received Data from Controller 3 TXD Transmitted Data to Controller 4 No Connection 5 Ground and Signal Return 6 No connection 7 RTS Request to Send Amplifier 8 CTS Clear to Send Amplifi...

Page 57: ...h 1 Pinouts Pin No Function 1 Position A command 24 V active high 2 Position B command 24 V active high 3 Command return ground 4 Position A indicator active low 5 Position B indicator active low 6 In...

Page 58: ...address required for Ethernet configuration of the system This interface 12 Ground 13 24 VDC 14 15 VDC 15 15 VDC Table 10 W G Switch 2 Pinouts Pin No Function 1 Position A command 24 V active high 2 P...

Page 59: ...its output power to compensate for rain fades See addendum included when option is installed Figure 9 Typical RS 485 2 Wire Duplex Implementation Table 11 Uplink Power Control Pinouts Pin No Function...

Page 60: ...NUNG Zur Vermeidung elektrischer Schl ge sollte der Verst rker fest mit dem Erdungsbolzen verbunden sein Nichtbefolgen kann die Verletzung oder den Tod von Menschen zur Folge haben EAR EXPORT CONTROLL...

Page 61: ...ee E 04636 03 18 2011 05 16 2011 05 27 2011 07 18 2011 T Fisher T Fisher T Fisher T Fisher EAR EXPORT CONTROLLED The information contained in this Manual refers or relates to a product that is subject...

Page 62: ...igure 10 Fault Mode 13 Figure 11 ONLINE Indication 13 Figure 12 OFFLINE Indication 13 Figure 13 Inhibiting Enabling RF 14 Figure 14 LOCAL mode 15 Figure 15 REMOTE mode 15 Figure 16 Touch screen Unlock...

Page 63: ...greater 33 Figure 33 Set Up menu firmware revision 53 and later 35 Figure 34 Setup Screen 1 37 Figure 35 Setup Screen 2 39 Figure 36 Setup screen 3 41 Figure 37 Setup Screen 4 43 Figure 38 Setup Scree...

Page 64: ...ators The amplifier is controlled by a microprocessor that responds to commands from the front panel of the amplifier LOCAL or commands from an external controller computer connected to the serial int...

Page 65: ...nd in the set up menu described in the following section Upon initial turn on an initial splash screen will be displayed momentarily as shown in Figure 2 This screen time will vary from approximately...

Page 66: ...the amplifier has been configured for single thread mode The two screens are shown in the following figures 3 and 4 EAR EXPORT CONTROLLED The information contained in this Manual refers or relates to...

Page 67: ...included in Chapter 8 SYSTEM CONFIGURATION TAB This screen is dependent on the system configuration selected in the set up menu Amplifiers configured for single thread mode will not display the syste...

Page 68: ...main menu bar will be explained in the following section and the function of the amplifier Tab in the next EAR EXPORT CONTROLLED The information contained in this Manual refers or relates to a product...

Page 69: ...period is three minutes During this warm up period the FTD indicator Blue will be indicated When the delay cycle is complete the Standby amber indicator will be shown If there is a power failure high...

Page 70: ...F attenuator may be adjusted to for example reduce the gain of the amplifier upon initial turn on not to overdrive the TWT To adjust Attenuation Touch STANDBY EAR EXPORT CONTROLLED The information con...

Page 71: ...any reason will force the power supply into the FTD mode When high voltage is ON applied to the TWT RF input signals are amplified If high voltage is selected pending high voltage before the FTD cycle...

Page 72: ...ut indication and turning the adjust knob Touch Green Power Out Indicator to adjust RF EAR EXPORT CONTROLLED The information contained in this Manual refers or relates to a product that is subject to...

Page 73: ...path to the antenna the amplifier will indicate it is routed in the RF path to the antenna by this indicator Figure 12 OFFLINE Indication OFFLINE When configured in system mode in which the amplifier...

Page 74: ...this button will be gray in color More details of the RF inhibit source are available on the Amplifier Tab described in the next section of this chapter Sources of RF inhibit are listed below RF Inhib...

Page 75: ...l parameters i e high voltage state RF power levels etc When in REMOTE mode the front panel operation is disallowed in the same fashion Touch Local Remote EAR EXPORT CONTROLLED The information contain...

Page 76: ...ch screen is inactive such that LOCAL operation is not possible Note After 3 minutes of no activity on the touch screen the lock feature will automatically be activated Touch Lock Unlock EAR EXPORT CO...

Page 77: ...plays the high voltage state and the RF state The center section of the screen allows the user control of constant power mode and attenuation Bottom right includes the Fault Reset which will reset any...

Page 78: ...e displayed on the amplifier menu There is a large capacitor in the design to back up data for approximately 12 hours such that battery service may be performed Note Firmware Revision 30 and later Two...

Page 79: ...r displayed on the Main Menu Bar will be changed with the reflected power units Figure 20 Adjusting Temperature Units Touch to change Units dBm dBw Watts Touch to change Units F C EAR EXPORT CONTROLLE...

Page 80: ...rive applied Typically Constant Power Mode will be initiated while in Transmit mode In this mode the desired RF output power has been achieved and the Constant power mode is used to lock in the desire...

Page 81: ...den reduction in drive power greater than 7 dB Figure 22 Adjusting Attenuator Attenuator Adjust Adjusting the attenuator while in FTD or Standby mode is typically used to reduce the gain of the amplif...

Page 82: ...rify proper voltage to the amplifier This is a self clearing fault such that momentary brown outs will not latch the amplifier in a non operational mode Helix Current Fault latched When the power supp...

Page 83: ...se faults excessively could cause damage to the TWT Overdrive Fault When the amplifier senses a RF overdrive condition This fault is only present in amplifiers with peak power TWT s Up converter Fault...

Page 84: ...larm Fault Indicates the RF power out has fallen below the threshold of the level selected Maximum Reverse Power Alarm Fault Indicates the reflected RF power has exceeded the threshold of the level se...

Page 85: ...ng described in the Setup Tab discussed later in this chapter Touching the event text area will toggle the time stamp between showing years and seconds Should a significant event have taken place a fe...

Page 86: ...e is entered as the newest entry in the log EAR EXPORT CONTROLLED The information contained in this Manual refers or relates to a product that is subject to the U S Export Administration Regulations E...

Page 87: ...HV Enabled FAULT A Fault condition which shut off High Voltage Tube Overtemp alarm An condition occurred which did not require HV off Maximum Power Alarm note A comment entered by the operator BEGIN D...

Page 88: ...t the parameters before and after the event The trend log has the added feature in that the faults are actually stamped into the trend data such that the detailed time the event has taken place can be...

Page 89: ...own vertical scale and range EAR EXPORT CONTROLLED The information contained in this Manual refers or relates to a product that is subject to the U S Export Administration Regulations EAR Transfer of...

Page 90: ...span The data can then either be scrolled through using the adjust knob or paged through by tapping the slider below the graph EAR EXPORT CONTROLLED The information contained in this Manual refers or...

Page 91: ...n then be scrolled through the data using the adjust knob to display the actual measurements at that point in time To deactivate the cursor mode touch the area at the bottom right that says tap to cle...

Page 92: ...when zoomed out the stamps will be abbreviated until the event has been selected and enlarged Tap a fault event to expand the event This will show the event itself bracketed by four extra data points...

Page 93: ...he two current trends being displayed will always be on the top of the list When a new analog is selected it will be pushed into the top two positions The remaining functions of the trends tab continu...

Page 94: ...inhibit polarity NO NC Redundancy Mode Set System identifiers for Ethernet connected systems Select High Voltage state at start up Cathode Current Optimization Set buzzer volume Set touch screen volum...

Page 95: ...tory Settings Factory use only Figure 33 Set Up menu firmware revision 53 and later EAR EXPORT CONTROLLED The information contained in this Manual refers or relates to a product that is subject to the...

Page 96: ...systems View sample port coupling factors Select RF power alarm and fault limits Select High Voltage state at start up Select system offset power readings Set time and date Set buzzer volume Set touc...

Page 97: ...entary summary fault condition in which the form C relay contacts on the auxiliary interface connector on the rear panel of the amplifier will change position This is generally used to test redundant...

Page 98: ...mportant to leave the Ethernet configured for fixed IP unless connecting to a DHCP server IP address Net mask and Gateway This is used for selecting the IP address for use with the amplifier Touch but...

Page 99: ...h the mode button and scroll with the adjust knob Note Some modes require waveguide switch s attached to the rear panel Absence of this switch will cause the amplifier to be RF inhibited This will be...

Page 100: ...ll be displayed on the system tab For more information on configuring systems see Chapter 8 System Operation XTRT series Amplifiers Sample Port Coupling Factors This tab displays the coupling factors...

Page 101: ...and faults Press and use the knob to adjust Reverse Power This tab is used for setting the software selectable maximum reflected RF power alarms and faults Press and use the knob to adjust EAR EXPORT...

Page 102: ...nob to adjust Offset for RF Readings This tab is used for entering an RF offset to the Forward power readings This is generally used to enter system gains or losses to be reported at the amplifier lev...

Page 103: ...e factory network Ask your IT department for more information on the use of this feature The date and time can always be input manually using the tab above Press and use keypad displayed to adjust the...

Page 104: ...he percentage of the brightness Note As an added feature manually locking the display will automatically activate the brightness control also when the lock feature takes place after its nominal time o...

Page 105: ...in CPU firmware Reboot Restarts the firmware in the main CPU Redraw On rare occasions the touch screen when touched will have a collision affect on the graphics being displayed on the front panel In t...

Page 106: ...lly measured at the factory This function is configured at the factory and can be selected with the Enable Special Note The cathode current optimization feature will automatically be disabled should t...

Page 107: ...F Min Power Trip OFF Max Reflected Power OFF Audio Alarm ON COM 1 9600 Baud 8 1 None COM 2 Address A 9600 Baud 8 1 None Ethernet DHCP Constant Power OFF Heater Standby ON HV state startup Restore Powe...

Page 108: ...erating temperature for the tube to function properly The typical warm up period is three minutes During the warm up period the FTD indicator Blue will be indicated When the delay cycle is complete th...

Page 109: ...re of the cathode is reduced to a temperature slightly below the normal operating temperature When high voltage is turned on it overrides the heater standby command and returns the heater voltage to i...

Page 110: ...nhibit RF can be inhibited from a number of sources internal and external to the amplifier RF Enable converse to inhibit is indicated by a green color of the RF button on the Main Menu Bar described e...

Page 111: ...t persists for three OFF ON cycles the fault circuit latches and the high voltage power supply stops automatically recycling High Voltage Overvoltage When the high voltage is being applied to the TWT...

Page 112: ...llator is required check integrity of the signal at the input of the amplifier This fault is only present in amplifiers with integrated up converters Interlock faults are generated by a contact closur...

Page 113: ...In the Amplifier Tab described earlier in this chapter select the attenuator tab and using the adjust knob adjust the attenuation to maximum 3 Connect an RF monitor to the output load assembly 4 Conne...

Page 114: ...scription Date Initiated By 1 Initial Release 03 01 2011 T Fisher 2 See E 04598 06 28 2011 K Sterns EAR EXPORT CONTROLLED The information contained in this Manual refers or relates to a product that i...

Page 115: ...ower in Watts 7 13 Attenuator Counts 8 14 Alarm Condition 9 14 Get Serial Configuration X 15 Advanced Query 16 Miscellaneous Set up Px 19 Amplifier Commands 20 High Voltage Off A 21 Fault Reset B 21 G...

Page 116: ...t Serial Configuration X 25 Time and Date 25 Reset Processor 26 Heater Standby 26 EAR EXPORT CONTROLLED The information contained in this Manual refers or relates to a product that is subject to the U...

Page 117: ...ist of Amplifier Queries 10 Table 7 List of Amplifier Commands 20 Table 5 Reject Codes 27 Table 6 ASCII Code Cross Reference 28 EAR EXPORT CONTROLLED The information contained in this Manual refers or...

Page 118: ...ic configuration Communication Digital HPAs Both rack mounted and outdoor digital HPAs have a built in microprocessor for handling serial communications With the exception of the Prime Power Switch al...

Page 119: ...rriage return line feed character pair CRLF RS 485 Using RS 485 a master device can maintain status and control of multiple devices which share send receive lines Slaves may transmit only in response...

Page 120: ...d or rejected For nearly all implementations the non printable protocol should be used If you send a message using the printable protocol devices will respond using the printable protocol If you send...

Page 121: ...le 1 Packet Format Start Byte Address Byte Device Selection Byte Message Byte Parameters as Required End Byte Check Byte CRLF Ethernet only Table 2 Start Byte End Byte Check Byte Protocol Packet Type...

Page 122: ...heck byte STX A 0 ETX ASCII character may be non printable thus Table 3 Check Byte Calculation Base 95 1 Take Sum all message bytes 32 C 2 Then take Modulus C Base 95 32 Result Printable ASCII charact...

Page 123: ...6 Power in Watts 7 Attenuator Counts 8 Alarm Condition 9 Get Serial Configuration X Advanced Query Miscellaneous Set up Px EAR EXPORT CONTROLLED The information contained in this Manual refers or rel...

Page 124: ...hibited through the user front panel or by serial command ID Version Command Byte 0 Response MMMMMMMVRR MMMMMMM is the amplifier model number V is the firmware version number RR is the firmware revisi...

Page 125: ...e user settable alarms for High Output Power Low Output Power and High Reflected Power respectively A High Reflected Power fault can also occur when the VSWR detec tion circuit trips 2 Byte A Bit 3 TW...

Page 126: ...PA output power in dBW as adjusted by the offset factor entered through the HPA front panel interface for digital HPAs or adjusted via Controller Command F Adjust RF Calibration Power in Watts Command...

Page 127: ...ved Bit 0 Reserved Byte C Bit 7 Reserved Bit 6 Compliment of bit 5 Bit 5 Reduce Drive Power too much drive power to get requested Power level Bit 4 Constant Power Suspended suspicious drop in output p...

Page 128: ...le 019200 P Parity N O or E D Data bits 8 or 7 S Stop bits 1 or 2 Response for R ABC A A is 4 or 2 Wire B B is T Terminated or U Unterminated C C is RS 485 address Compatibility Not available when tal...

Page 129: ...order specified by the user The syntax of an Advanced Query command is as follows start character address parameter 1 parameter 2 parameter last end character check character Note Separators are shown...

Page 130: ...1 Mode Selected Bit 0 Mode Selected Extended Fault Status ABCD Extended Alarm Status ABCD 1 Summary Status XX 3 Fault Status XX 6 Power XX X in dBW 7 Power XXXX in Watts 8 Attenuator XXXX counts C Cat...

Page 131: ...te fault D XX X in dBm disabled r Reverse Power Alarm Fault Trip point and setting A XX X in Watts generate alarm F XX X in Watts generate fault D XX X in Watts disabled T TWT Temp If you have a TWTA...

Page 132: ...1 10 where 192 168 1 10 is the IP Address of the Amplifier __ __ __ __ __ __ __ __ __ __ __ __ __ __ __ __ __ __ __ __ __ __ __ __ Query PX X Transmit Power up state Returns PXn where n is the power...

Page 133: ...RF Inhibit I Clear RF Inhibit J Set Attenuator K Low RF Trip L High RF Trip M Reflected RF Trip O Miscellaneous Setup P Redundancy Control U Set Serial Configuration X Time and Date Reset Processor H...

Page 134: ...n Filament Time Delay ends Constant Power dBW Command Byte F Function The HPA seeks the specified power level until Constant Power is terminated by Goto Power Command Byte D or E or Terminate Constant...

Page 135: ...desired power level in XXXX Watts Compatibility Attenuator required Optional Parameter M desired power in dBm Example GMxx x Terminate Constant Power Command Byte H Function If active Constant Power M...

Page 136: ...tion Sets a Low RF trip point If output power drops below the set point an alarm or fault is generated provided the HPA has processed an Enable RF Limits command R Parameter AXXXX to set an Alarm trip...

Page 137: ...hread no waveguide switch 1 is redundant system with one waveguide switch 1 1 configuration 2 is power combined system with two waveguide switches 1 1 configuration 3 is redundant system with a load s...

Page 138: ...y for a related command To configure the serial port use Parameter Format 1 To configure RS 485 use Parameter Format 2 Parameter Format 1 CBBBBBBPDS C Communications port to configure 1 COM1 2 COM2 BB...

Page 139: ...ocessor Command Byte Function Resets the processor Heater Standby Command Byte Function Enables Disables Heater Standby mode Parameters 0 Disable Heater Standby 1 Enable Heater Standby Note The XTRT S...

Page 140: ...llegal parameter or parameter out of range c System in local mode d Slow command being executed e Hardware or Software failure f High voltage is OFF g RF is inhibited h HPA Power is OFF i Invalid key...

Page 141: ...20 14 063 3F j 106 6A NAK 021 15 064 40 k 107 6B SYN 022 16 A 065 41 l 108 6C ETB 023 17 B 066 42 m 109 6D CAN 024 18 C 067 43 n 110 6E EM 025 19 D 068 44 o 111 6F SUB 026 1A E 069 45 p 112 70 ESC 027...

Page 142: ...ALCjr A 9183 Original Release 10 12 2001 ALCjr B 12737 Added English and German Language Battery Disposal Instructions 04 28 2005 RB C 15718 Add Spare Amplifier Test Operation 01 30 2008 JN EAR EXPOR...

Page 143: ...eral Information 5 Europe 5 United States 5 Wartungsverfahren 6 Anleitungen zur Batterieentsorgung 6 Allgemeine Informationen 6 Europa 6 Vereinigte Staaten 6 EAR EXPORT CONTROLLED The information cont...

Page 144: ...reform the Air Filter Removal procedure Check the integrity of all cables and connectors Air Filter Removal Procedure Use this procedure to remove clean and replace the air filter 1 Remove and retain...

Page 145: ...ved values The helix current immediately after high voltage turn on should be not greater than 2 times the reference value After 5 minutes of operation the helix current should not exceed 1 5 times th...

Page 146: ...th these directives the TL 5242 W battery contains no dangerous substances The reaction products are inorganic and do not represent environmental hazards once the decomposition or neutralization proce...

Page 147: ...p ische Gemeinschaft EG hat zwei Direktiven erlassen 91 157 EEC und 93 86 EEC Diese Direktiven werden von den einzelnen Mitgliedsl ndern unterschiedlich umgesetzt Daher sind in jedem Land die Herstell...

Page 148: ...d werden als reaktiver Sonderm ll betrachtet Sonderm ll aus verbrauchten Zellen und Batterien kann entsorgt werden wenn diese zuvor durch eine genehmigte sekund re Behandlung vor der Entsorgung neutra...

Page 149: ...formation contained in this Manual refers or relates to a product that is subject to the U S Export Administration Regulations EAR Transfer of data herein by any means to a Foreign Person whether in t...

Page 150: ...hapter 11 27 2001 A L Crozier Jr C 9395 Remove RMA Form and replace with Figure 1 01 07 2002 A L Crozier Jr D 9997 Update to include controllers 07 08 2002 A L Crozier Jr E 11096 Update to reflect mai...

Page 151: ...ation 4 Figure 1 RMA Request Form Example 5 List of Figures Paragraph Title Page Number EAR EXPORT CONTROLLED The information contained in this Manual refers or relates to a product that is subject to...

Page 152: ...necessary documents to service and repair Xicom Technology equipment Return Authorization Returned Material Authorization Before returning the equipment obtain a RMA Returned Material Authorization Nu...

Page 153: ...Mark the container with the words FRAGILE DELICATE INSTRUMENT HANDLE WITH CARE on each side of the container Ship the container to the following address XICOM TECHNOLOGY 3550 Bassett Street Santa Clar...

Page 154: ...Excluded they will be quoted on a parts and labor basis The above price will not cover units that have been damaged beyond normal wear and tear they will be quoted on a parts and labor basis if repai...

Page 155: ...tion contained in this Manual refers or relates to a product that is subject to the U S Export Administration Regulations EAR Transfer of data herein by any means to a Foreign Person whether in the U...

Page 156: ...1 Initial release 03 17 2011 T Fisher EAR EXPORT CONTROLLED The information contained in this Manual refers or relates to a product that is subject to the U S Export Administration Regulations EAR Tra...

Page 157: ...routing 10 Figure 5 Switching the VPC Amplifier B RF routing 11 Figure 6 VPC System Configured and Operating properly 12 Figure 7 One for One Redundant System 13 Figure 8 Manual Automatic Mode 14 Fig...

Page 158: ...Setup There are several important requirements for setting up Xicom s new XTRT series amplifiers for system configuration 1 The system type i e one for one redundant VPC etc must be selected properly...

Page 159: ...addresses to facilitate quick setup Once configured the hub may be connected to a customer Ethernet network if the fixed IP addresses do not clash with existing Ethernet addresses Typically the amplif...

Page 160: ...f the amplifier in the system c The power reading at the output of the amplifier icon is the current output power of the amplifier 2 Amplifier B status The amplifier B status is the same as amplifier...

Page 161: ...ber of the VPC itself such that the amplifiers may communicate and control over the Ethernet 4 Manual Automatic Mode This button controls the automatic function of the system In automatic mode an oper...

Page 162: ...d to the load The VPC icon also has the system setup i e serial number information displayed underneath NOTE If there is no communication with the VPC controller the VPC icon will be red with a in the...

Page 163: ...ation of the RF power to antenna as reported by the VPC controller EAR EXPORT CONTROLLED The information contained in this Manual refers or relates to a product that is subject to the U S Export Admin...

Page 164: ...e spit in the VPC and half of its RF power will be routed to the load effectively presenting a 6 dB loss 2 The VPC system can also be used in a one for one mode in which one amplifier is routed to the...

Page 165: ...by touching the amplifier icon The verification screen shown is displayed when either the top half of the VPC or the amplifier A icon is touched This touch will change the RF routing of the A amplifie...

Page 166: ...PORT CONTROLLED The information contained in this Manual refers or relates to a product that is subject to the U S Export Administration Regulations EAR Transfer of data herein by any means to a Forei...

Page 167: ...EXPORT CONTROLLED The information contained in this Manual refers or relates to a product that is subject to the U S Export Administration Regulations EAR Transfer of data herein by any means to a For...

Page 168: ...Amplifier B to the load 2 Amplifier B to the antenna amplifier A to the load Waveguide Switch Icon EAR EXPORT CONTROLLED The information contained in this Manual refers or relates to a product that is...

Page 169: ...maintain continuity off this mode in both amplifiers The way this is accomplished is by 1 The system will synchronize to the mode of the amplifier commanded either by the local panel input or via the...

Page 170: ...oses it is allowed to switch the waveguide switch while in automatic mode There is a confirmation screen to protect against inadvertent switches EAR EXPORT CONTROLLED The information contained in this...

Page 171: ...NGUYEN 1 07 11 1 OF 5 X INTERPRET DIMENSIONS AND TOLERANCES PER ASME Y14 5M THIRD ANGLE PROJECTION CAGE CODE FSCM XICOM TECHNOLOGY SURFACE MATERIAL FINISH ELECTRONIC APPROVAL SEE PLM SEE NOTES CHECKE...

Page 172: ...A FOREIGN PERSON WHETHER IN THE U S OR ABROAD MAY REQUIRE A U S DEPARTMENT OF COMMERCE EXPORT LICENSE OR OTHER APPROVAL THE DATA CONTAINED HEREIN CONSTITUTES PROPRIETARY INFORMATION OF XICOM TECHNOLOG...

Page 173: ...E SEE DETAIL C BAND CPRG 137 TAPPED B Ku BAND WR 75 TAPPED C AS SHOWN DBS BAND WR 62 TAPPED D 7 7 A 8 B C D 8 6 5 4 3 6 5 4 3 2 D DWG NO SIZE 1 REV A B C 2 D 1 SCALE OUTLINE XTRT 400 LCD 304 0481 001...

Page 174: ...E DEFINITION OF THE U S EXPORT ADMINISTRATION REGULATIONS EAR TRANSFER OF THIS DATA BY ANY MEANS TO A FOREIGN PERSON WHETHER IN THE U S OR ABROAD MAY REQUIRE A U S DEPARTMENT OF COMMERCE EXPORT LICENS...

Page 175: ...DEFINITION OF THE U S EXPORT ADMINISTRATION REGULATIONS EAR TRANSFER OF THIS DATA BY ANY MEANS TO A FOREIGN PERSON WHETHER IN THE U S OR ABROAD MAY REQUIRE A U S DEPARTMENT OF COMMERCE EXPORT LICENSE...

Page 176: ...N A 1 INITIAL RELEASE 6 09 03 PM BS N A 2 SEE PREVIOUS 6 17 03 DG DC N A 3 SEE PREVIOUS 6 19 03 DG DC 12402 A SEE ECO 7 29 04 RB DG 17623 B SEE ECO 10 21 11 BN TF DO NOT SCALE DRAWING 7 7 A 8 B C D 8...

Page 177: ...Manual refers or relates to a product that is subject to the U S Export Administration Regulations EAR Transfer of data herein by any means to a Foreign Person whether in the U S or abroad may requir...

Page 178: ...Manual refers or relates to a product that is subject to the U S Export Administration Regulations EAR Transfer of data herein by any means to a Foreign Person whether in the U S or abroad may requir...

Page 179: ...Manual refers or relates to a product that is subject to the U S Export Administration Regulations EAR Transfer of data herein by any means to a Foreign Person whether in the U S or abroad may requir...

Page 180: ...Manual refers or relates to a product that is subject to the U S Export Administration Regulations EAR Transfer of data herein by any means to a Foreign Person whether in the U S or abroad may requir...

Page 181: ...Manual refers or relates to a product that is subject to the U S Export Administration Regulations EAR Transfer of data herein by any means to a Foreign Person whether in the U S or abroad may requir...

Page 182: ...0 MHz Reference add paragraph about oscillator drift 10 20 2004 A L Crozier Jr D 16469 Update BUC Operation 11 17 2008 SL E 16686 Remove reference to BUC output frequency plan 06 05 2009 LD F 17332 Se...

Page 183: ...k Upconverter 3 Figure 2 Reference Frequency Phase Noise Chart 4 Figure 3 Detailed BUC Block Diagram 5 Figure 4 Drift Compensation Block Diagram 7 Figure 5 Internal Phase Locked Oscillator with Extern...

Page 184: ...signal at the IF frequency also affects the system performance and needs to be 5 to 10 dB below IESS Intelsat earth Station Standards phase noise profile for optimum performance See Figure 1 for a ty...

Page 185: ...on to the LO port of the mixer The IF frequency is filtered to eliminate unwanted harmonics and amplified to the desired gain level of the BUC and passed to the IF port of the mixer The mixer generat...

Page 186: ...source and set IF input power to 20 dBm 3 dB Verify that the reference frequency is present and at 2 5 dBm power level These power levels are specified at the input of the HPA and must be adjusted for...

Page 187: ...utput The maximum safe IF input power level is 10 dBm to avoid damage to the internal converter circuits 4 Refer to the appendix titled Protocol Addendum Block Upconvert for a description of the proto...

Page 188: ...requency through the RF sample port In the event that the frequency drifts outside the acceptable range the unit must be either re aligned by a Xicom certified maintenance center or alternatively the...

Page 189: ...nal Input EAR EXPORT CONTROLLED The information contained in this Manual refers or relates to a product that is subject to the U S Export Administration Regulations EAR Transfer of data herein by any...

Page 190: ...the factory default setting below Ext Ref Lock This feature is availalbe if the HPA includes an internal Phase Locked Oscillator PLO that is intended to improve the phase noise and or shift the frequ...

Page 191: ...Factory Default Configuration Fault Feature Description Default State Fault Event Log Abbreviation Upconverter Fault Enabled On UC Fault Auto Clear Upconverter Fault Enabled On N A External Reference...

Page 192: ...ision ECO Description Date Initiated By 1 Preliminary Release 03 01 2004 A L Crozier Jr EAR EXPORT CONTROLLED The information contained in this Manual refers or relates to a product that is subject to...

Page 193: ...541 0001 002 Terminate the IF input port with a Type N male 50 ohm termination Xicom Part Number 541 0003 002 To adjust the 10MHz reference signal to compensate for frequency drift over time do the f...

Reviews: