background image


CT-811M 
VoIP Gateway SIP 
User’s Manual 

Mar 9, 2005 

Version A2.0     


261053-017 


Summary of Contents for CT-811M

Page 1: ...CT 811M VoIP Gateway SIP User s Manual Mar 9 2005 Version A2 0 261053 017...

Page 2: ...twork administrators It covers the installation operation and applications of the CT 811M VoIP Gateway Warning Before servicing or disassembling this equipment always disconnect all power and telephon...

Page 3: ...WSER 10 2 1 IP ADDRESS 10 2 2 LOGIN PROCEDURE 11 CHAPTER 4 BASIC CONFIGURATION 12 4 1 VERSION 12 4 2 ACCESS CONTROL 12 4 2 1 Change the Password 12 4 2 2 Add User 13 4 2 3 Delete User 14 4 3 WAN SETUP...

Page 4: ...ward 33 6 1 5 Dial Plan 35 CHAPTER 7 SOFTWARE UPGRADE VIA FTP 37 APPENDIX A PIN ASSIGNMENTS AND POWER ADAPTERS 39 APPENDIX B PHONE OPERATIONS 40 NORMAL CALL HOLD 40 CONSULTATION CALL HOLD 40 CALL RESU...

Page 5: ...11 port telephone jack on the back of the CT 811M allowing calls to be routed to anywhere in the world significantly reducing or eliminating long distance charges Your PCs connected to the CT 811M do...

Page 6: ...s the Internet over your entire network Supports Caller ID Supports silence suppression Configurable through your networked PC s Web Browser Remote administration and remote firmware upgrades over the...

Page 7: ...1 3 Application 6...

Page 8: ...ory default settings Use a small object like a ballpoint pen to press the button and hold it down for over three seconds The router will reset and all parameters will return to their factory default s...

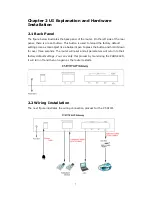
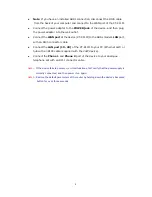
Page 9: ...with an RJ45 connector cable Connect the LAN port 1X 3X of the CT 811M to your PC Ethernet port or hub with an RJ45 cable supplied with the VoIP device Connect the Phone 1 and Phone 2 port of the devi...

Page 10: ...2x Green Blink Phone is ringing Green On An Ethernet Link is established Off An Ethernet Link is not established LAN 1x 3x Green Blink Data transmitting or receiving over LAN Green On The WAN link is...

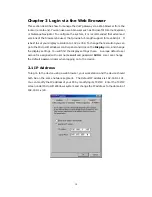
Page 11: ...to the Microsoft Windows control panel and click on the Display icon and change the display settings You will find the display settings there A unique default user account is assigned with user name...

Page 12: ...168 1 101 STEP 3 You will be prompted to enter your user name and password Type the password or if the password was not changed type the default passwords Then click OK The default USER Name is root...

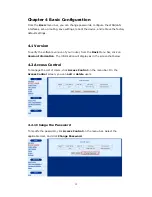
Page 13: ...e software version of your router from the Basic Menu bar click on Version Information The information will display as in the screenshot below 4 2 Access Control To manage the List of Users click Acce...

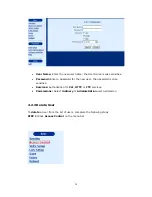
Page 14: ...ick Apply to submit the settings If you change the password make sure you keep a record of it in a safe place as you will require it the next time you log on 4 2 2 Add User To add a user entry click t...

Page 15: ...or the new user the password is case sensitive Services Authorization for CLI HTTP or FTP services Permissions Select Ordinary or Administration user permission 4 2 3 Delete User To delete a User from...

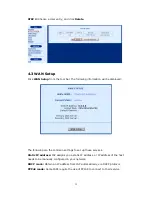
Page 16: ...e following are the common settings to set up these services Static IP address ISP assigns you a static IP address or IP address of the host needs to be manually configured in your network DHCP mode O...

Page 17: ...layed 4 3 1 Static IP address Select WAN Setup in the Basic Menu Then select Static IP address the ISP assigns you a static IP address or an IP address of the hosts needs to be manually configured in...

Page 18: ...NS Server Enter the primary DNS server IP address Secondary DNS Server Enter the secondary DNS server IP address that will be used in the event that the primary server IP address fails or is not avail...

Page 19: ...between the IAD Router and the ISP When using PPPoE the system is assigned an IP address from the Internet Service Provider as part of establishing the network connection The system can be configured...

Page 20: ...IP address is 192 168 1 101 Click LAN Setup from the menu bar to configure the LAN IP address and subnet mask The following screen will be displayed Enter select the parameters as explained below Cli...

Page 21: ...End IP Address The last IP address of the address pool in the DHCP server Note the IP address should be in the same subnet as the router s LAN IP address Click Yes to save the configuration and reboot...

Page 22: ...reset to the original default click Erase on the menu bar In the main pane of the following display click Erase Then reboot the system 4 7 Reboot To reboot the router click Reboot from the menu bar I...

Page 23: ...To set proper bandwidth for your voice communication depending on how much your network has input the number of kbps as indicated above for the link speed of the upstream 3 Click Apply 5 2 NAT Port R...

Page 24: ...P or UDP Local Address Type in the local IP address Local Port From Local Port To Type in the Local Port For example if you want to add a virtual server for FTP set parameter as follow Public Port Fro...

Page 25: ...on is displayed Interface Name The name of the interface Admin Status Indicates whether the interface is Up or Down Octets In The number of Octets bytes received Unicast PktsIn The number of unicast p...

Page 26: ...isplays the IP statistics UDP statistics TCP statistics and ICMP statistics 5 3 3 DHCP Lease Under DHCP Lease tab information regarding MAC Address mapping to Lease IP is displayed 5 4 Ping To access...

Page 27: ...Ping test screen click the Ping tab Enter the Host Name or IP address of the remote terminal and click Submit to start the ping and display the results The following is an example of the ping result T...

Page 28: ...the attributes of an end to end call Session Initiation Protocol is a peer to peer protocol There are four components in SIP standard a User Agent UA b Proxy Server c Registrar Server and d Redirect S...

Page 29: ...Forward Call forwarding configuration Dial Plan To set a particular method to filter you phone numbers in the list 6 1 1 Local The Local tab configures the local terminal parameters The page displays...

Page 30: ...number is 5060 which is a well known port for SIP protocol Use Proxy Choose YES if a Proxy or Registrar server will be used Also configure the Proxy Info and Registrar Choose No if a Proxy Registrar...

Page 31: ...User Agent PCMU u law PCMA a law G729 are the name of the codecs which can be selected by checking appropriate box Multiple items can be checked The final CODEC is up to the negotiation with the part...

Page 32: ...r has higher priority for the proxy to connect the call If the same Qvalue is used the call connection is up to the call policy of the proxy Codec The preferred codec of this user The default is PCMU...

Page 33: ...y list User Name Name of the remote SIP host which should be the name of peer SIP host Speed Dial The phone number maps to the remote party SIP URI after dialing on key phone pad This should be unique...

Page 34: ...ck Modify see the following figure After changing the parameters click Modify to submit the settings Delete Select the entry by clicking it in the Select field and click Delete 6 1 4 CallForward This...

Page 35: ...an select Prot No 1 or Port No 2 User Name Sip user name of the forwarding address where the calls will be forwarded IPv4 Addr The IP address of the SIP user name to which the phone calls will be forw...

Page 36: ...phone number Add Click Add to switch to Add Dial Plan page Click Add after you enter all parameter to submit your settings Modify Select an item and click Modify to switch to Modify Dial Plan Info pa...

Page 37: ...nimum number of prefix Max_digit The maximum number of prefix Delet_digit The number of prefix you want to delete Insert_digit Type in the prefix you want to insert Delete Select the entry by clicking...

Page 38: ...uter 192 168 1 101 STEP 2 Run an ftp program on the PC STEP 3 Start DOS and enter the menu where the new firmware is installed Example C Upgrade STEP 4 Enter the command ftp 192 168 1 101 router s IP...

Page 39: ...Example put firmware app STEP 10 After a moment the file should begin transferring after you see the message Transfer complete the upgrade process is complete 38...

Page 40: ...NDARDS AC DC Power Adapter Mode LINEAR Input Power 120V Output Power 12VDC 1A Regulatory Standards EI 48 UL CUL NORTH AMERICAN PLUG STANDARDS AC DC Power Adapter Mode SWITCHING Input Power 100 240V Ou...

Page 41: ...aced on hold Press and release the telephone switch hook or flash button to enable this feature Call Switch This feature allows users to switch between connections if there are 2 active calls at one t...

Page 42: ...ayed on the remote phone when making a call By pressing 31 and dialing a valid number followed by invokes the CLIR CFU Call Forward Unconditional This feature allows users to forward all their calls B...

Page 43: ...sion rates in excess of 64 Kbps Broadcast The simultaneous transmission to two or more communication devices Byte Eight bits arranged in sequence CHAP Challenge Handshake Authentication Protocol A PPP...

Page 44: ...lows for the generation of error messages tests packets and information messages related to IP IEEE Institute of Electrical and Electronics Engineers IEEE The Institute of Electrical and Electronics E...

Page 45: ...different manufacturers PPPoE Point to Point Protocol over Ethernet A method for establishing sessions and encapsulating PPP packets over an Ethernet specified by RFC 2516 PPTP Point to Point Tunneli...

Page 46: ...h A data switch connects computing devices to host computers enabling multiple devices to share a limited number of ports An electrical switch is a device for making breaking or changing the connectio...

Reviews: