162
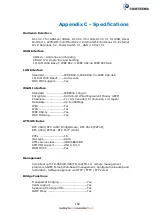
Appendix C - Specifications
Hardware Interface
RJ-14 X 1 for ADSL2+/VDSL2, RJ-45 X 4 for LAN, RJ-45 X 1 for WAN, Reset
Button X 1, WPS/WiFi on/off button x2, Internal Wi-Fi Antennas X 2, External
Wi-Fi Antennas X 2, Power Switch X 1, USB 3.0 Host X 1
WAN Interface
ADSL2+: single line and bonding
VDSL2 17a, single line and bonding
10/100/1000 Base T, IEEE 802.3, IEEE 802.3u IEEE 802.3ab
LAN Interface
Standard ......................IEEE 802.3, IEEE 802.3u, IEEE 802.3ab
10/100/1000 BaseT .......Auto-sense
MDI/MDX support ..........Yes
WLAN Interface
Standard ....................IEEE802.11b/g/n
Encryption ....................64/128-bit Wired Equivalent Privacy (WEP)
Channels ......................11 (US, Canada)/ 13 (Europe)/ 14 (Japan)
Data Rate .....................Up to 300Mbps
WEP ............................Yes
WPA ............................Yes
IEEE 802.1x .................Yes
MAC Filtering ................Yes
ATM Attributes
RFC 2684 (RFC 1483) Bridge/Route; RFC 2516 (PPPoE);
RFC 2364 (PPPoA); RFC 1577 (IPoA)
PVCs ..........................16
AAL type ......................AAL5
ATM service class ..........UBR/CBR/VBR
ATM UNI support ...........UNI 3.1/4.0
OAM F4/F5 ...................Yes
Management
Compliant with TR-069/TR-098/TR-104/TR-111 remote management
protocols, SNMP, Telnet, Web-based management, Configuration backup and
restoration, Software upgrade via HTTP / TFTP / FTP server
Bridge Functions
Transparent bridging ...............................Yes
VLAN support ........................................Yes
Spanning Tree Algorithm .........................Yes
IGMP Proxy ...........................................Yes
Summary of Contents for NexusLink 3120
Page 41: ...40 5GHz ...
Page 60: ...59 5 3 4 UPnP Select the checkbox provided and click Apply Save to enable UPnP protocol ...
Page 70: ...69 A maximum of 100 entries can be added to the URL Filter list ...
Page 87: ...86 ...
Page 123: ...122 Enter the MAC address in the box provided and click Apply Save ...
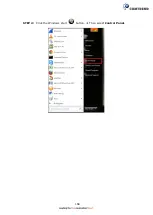
Page 167: ...166 STEP 2 Click the Windows start button Then select Control Panel ...
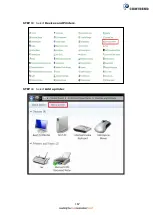
Page 168: ...167 STEP 3 Select Devices and Printers STEP 4 Select Add a printer ...
Page 196: ...195 F2 4 PPP over ATM PPPoA IPv4 STEP 1 Click Next to continue ...
Page 216: ...215 Click Next to continue or click Back to return to the previous step ...

