89
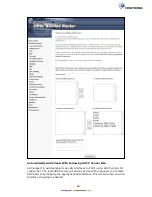
For example, imagine there are 4 PVCs (0/33, 0/36, 0/37, 0/38). VPI/VCI=0/33 is
for PPPoE while the other PVCs are for IP set-top box (video). The LAN interfaces are
ENET1, ENET2, ENET3, and ENET4.
The Interface Grouping configuration will be:
1. Default: ENET1, ENET2, ENET3, and ENET4.
2. Video: nas_0_36, nas_0_37, and nas_0_38. The DHCP vendor ID is "Video".
If the onboard DHCP server is running on "Default" and the remote DHCP server is
running on PVC 0/36 (i.e. for set-top box use only). LAN side clients can get IP
addresses from the CPE's DHCP server and access the Internet via PPPoE (0/33).
If a set-top box is connected to ENET1 and sends a DHCP request with vendor ID
"Video", the local DHCP server will forward this request to the remote DHCP server.
The Interface Grouping configuration will automatically change to the following:
1. Default: ENET2, ENET3, and ENET4
2. Video: nas_0_36, nas_0_37, nas_0_38, and ENET1.
Summary of Contents for NexusLink 3241eu
Page 1: ...261103 018 NexusLink 3241u 3241eu Bonding IAD User Manual Version A1 0 May 17 2017...
Page 16: ...15 STEP 3 After successfully logging in for the first time you will reach this screen...
Page 63: ...62 A maximum of 100 entries can be added to the URL Filter list...
Page 66: ...65 Click Enable to activate the QoS Queue Click Add to display the following screen...
Page 82: ...81 5 11 DSL Bonding This page displays the bonding status of the connected xDSL line...
Page 83: ...82 5 12 UPnP Select the checkbox provided and click Apply Save to enable UPnP protocol...
Page 103: ...102 Enter a certificate name and click Apply to import the CA certificate...
Page 115: ...114 Enter the MAC address in the box provided and click Apply Save...
Page 118: ...117...
Page 122: ...121 6 7 Site Survey 5GHz The graph displays wireless APs found in your neighborhood by channel...
Page 133: ...132 Enter the MAC address in the box provided and click Apply Save...
Page 141: ...140 6 17 WiFi Passpoint Note This function is not supported on this release...
Page 144: ...143 7 1 SIP Basic Setting...
Page 149: ...148 7 2 SIP Advanced Setting...
Page 150: ...149 7 2 1 Global Parameters This screen contains the advanced SIP configuration settings...
Page 154: ...153 7 3 SIP Debug Setting This screen contains SIP configuration settings used for debugging...
Page 187: ...186 STEP 2 Click the Windows start button Then select Control Panel...
Page 188: ...187 STEP 3 Select Devices and Printers STEP 4 Select Add a printer...
Page 214: ...213 F2 4 PPP over ATM PPPoA IPv4 STEP 1 Click Next to continue...


