8
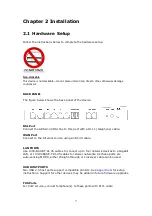
Reset Button
Restore the default parameters of the device by pressing the Reset button for 5 to
10 seconds. After the device has rebooted successfully, the front panel should
display as expected (see section
2.2 LED Indicators
).
NOTE:
If pressed down for more than 20 seconds, the VI-3223u will go into a
firmware update state (CFE boot mode). The firmware can then be
updated using an Internet browser pointed to the default IP address.
Power ON
Press the power button to the OFF position (OUT). Connect the power adapter to the
power port. Attach the power adapter to a wall outlet or other AC source. Press the
power button to the ON position (IN). If the Power LED displays as expected then
the device is ready for setup (see section
2.2 LED Indicators
).
Caution 1:
If the device fails to power up, or it malfunctions, first verify that the
power cords are connected securely. Then power it on again. If the
problem persists, contact technical support.
Caution 2:
Before servicing or disassembling this equipment, disconnect all power
cords and telephone lines from their outlets.
FRONT PANEL
The WiFi & WPS buttons are located on the left side of the front panel, as shown.
Wi-Fi Button
Press this button to enable/disable the wireless LAN (WLAN).
WPS Button
Press this button to begin searching for WPS clients. These clients must also enable
WPS push button mode. When WPS is available the WPS LED will be ON.
WiFi & WPS Buttons
Summary of Contents for VI-3223u
Page 1: ...VI 3223u Multi DSL WLAN IAD User Manual Version B1 0 July 19 2013 261099 020...
Page 7: ...6 1 2 Application The following diagram depicts a typical application of the VI 3223u...
Page 16: ...15 STEP 3 After successfully logging in for the first time you will reach this screen...
Page 26: ...25...
Page 32: ...31 Chapter 5 Advanced Setup The following screen shows the advanced menu options...
Page 67: ...66 5 11 UPnP Select the checkbox provided and click Apply Save to enable UPnP protocol...
Page 72: ...71 5 15 1 Storage Device Info Display after storage device attached for your reference...
Page 74: ...73 Automatically Add Clients With Following DHCP Vendor IDs...
Page 98: ...97 Click Apply Save to set new advanced wireless options...
Page 103: ...102 7 1 SIP Basic Setting 7 1 1 Global Parameters A common parameter setting...
Page 104: ...103 7 1 2 Service Provider This screen contains basic SIP configuration settings...
Page 106: ...105 7 2 SIP Advanced This screen contains the advanced SIP configuration settings...
Page 107: ...106 7 2 1 Global Parameters A common parameter setting...
Page 172: ...171 Click Next to continue or click Back to return to the previous step...


