background image

18

Power-On Diagnostics

Installing the Hardware

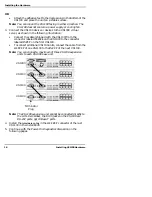
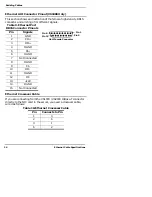
Note: If using an AUI connection to the server, you can determine 

proper polarity by using an AUI to 10Base-T converter box.

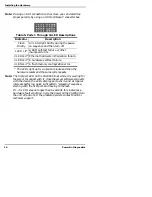
Note: The first port LED on the VS1000 blinks while it is waiting for 

the server to connect with it. Once the server software connects 
with the device, the LEDs display port activity and at regular 
intervals perform a quick light pattern “sweeping” sequence, 
starting with the first port and moving to the last.

If 1—5 LEDs stay on longer than 6 seconds, this indicates a 
hardware fault condition. Cycle the power on the VS1000 (turn 
the unit off and on). If the problem persists, contact Comtrol 
technical support.

Table 5. Ports 1 Through 16 LED Descriptions 

Indicator

Description

Flash 

Briefly

All LEDs light briefly during the power-
on sequence and then turn off.

1 LED Lit*

A RAM self-test failure or other 
mainboard error.

2 LEDs Lit* Ethernet hardware initialization failure. 

3 LEDs Lit* A hardware self-test failure. 

4 LEDs Lit* A flash memory configuration error.

* The LEDs light up for a about a minute and then the 

hardware resets and the same cycle repeats.

Summary of Contents for InterChangeVS1000

Page 1: ...InterChangeVS 1000 Series VS1000 and VS1100 Hardware Installation and Configuration Guide ...

Page 2: ...rManager and Intranetware are registered trademarks of Novell Inc NetWare Connect NetWare Loadable Module NLM NetWare MultiProtocol Router NetWare Directory Services and NDS are trademarks of Novell Inc Citrix and WinFrame are registered trademarks of Citrix Systems Inc WanderLink is a registered trademark of Funk Software Inc FAXserver is a trademark and Computer Associates is a registered tradem...

Page 3: ...ing a VS1000 10 Hot Swapping a VS1100 10 Obtaining Software or Document Updates 11 Comtrol Corporate Headquarters 11 Comtrol Europe 11 Technical Support 12 Installing the Hardware 13 Hardware Installation Overview 13 Installing the VS1000 Hardware 13 Installing VS1100 Hardware 15 Power On Diagnostics 17 Connecting Devices 19 Replacing Units in Service Hot Swapping 20 Building Cables 21 Serial Cabl...

Page 4: ...ck Plugs 25 InterChangeVS Specifications 27 Hardware Conditions 27 Hardware Specifications 27 Electromagnetic Compliance 28 Power Supply Requirements 29 Notices 31 Radio Frequency Interference RFI FCC 15 105 31 Labeling Requirements FCC 15 19 31 Modifications FCC 15 21 31 Serial Cables FCC 15 27 32 Underwriters Laboratory 32 Important Safety Information 32 Index 33 ...

Page 5: ...Table 5 Ports 1 Through 16 LED Descriptions 18 Table 6 RJ45 Connector Pinouts for RS 232 21 Table 7 Ethernet Cabling Specifications 23 Table 8 Ethernet Port RJ45 Connector Pinouts 23 Table 9 Ethernet Port DB15 Connector Pinouts 24 Table 10 Ethernet Crossover Cable 24 Table 11 Operating Conditions 27 Table 12 Specifications 27 Table 13 VS1000 1100 Electromagnetic Compliance 28 ...

Page 6: ...6 List of Tables ...

Page 7: ...network server running one of the following operating systems Microsoft Windows NT 3 51 4 0 or higher Note Windows NT 4 0 or higher is required to support Multilink PPP Note RAS or RRAS is required to support Remote Access Service Citrix WinFrame 1 7 or later Novell NetWare 3 12 4 11 or IntranetWare Note Contact Novell for information regarding Multilink PPP support for NetWare Your choice of oper...

Page 8: ... the VS1000 to the network hub or server 5 Power up the new VS1000 and verify that it passes the power on diagnostics B Software Installation 1 Unzip the VS Link distribution file 2 Install the VS Link software 3 Configure VS Link to support the VS1000 VS1100 4 Configure serial ports to support the RS 232 devices 5 Shut down and restart the server Installing VS Link Software Updates A Hardware Ins...

Page 9: ...rver Adding a VS1100 to an Existing Installation A Hardware Installation 1 Install the VS1100 2 Power down the VS1000 base unit to which you are attaching the VS1100 expansion unit 3 Connect the VS1100 cable from the VS1100 port on the VS1000 base unit to the Input port on the VS1100 expansion unit 4 Install the terminator plug in the Output port on the last VS1100 in the chain 5 Install RS 232 se...

Page 10: ... new VS1000 to the network hub or server 6 Power up the new VS1000 and verify that it passes the power on diagnostics B Software Installation 1 Change the VS1000 VS Link configuration to reflect the network address MAC of new VS1000 base unit 2 No port reconfiguration is needed 3 Do not shut down and restart the server Hot Swapping a VS1100 A Hardware Installation 1 Power down the VS1000 base unit...

Page 11: ...s stored in the VS1000 directory If a newer version has reached the beta testing stage it can be found in the BETA directory Beta software is made available on an as is basis and users of beta software assume all risks and liabilities relating thereto Note Downloadable driver software files are stored in either zipped filename zip or self extracting zip filename exe format You must extract the zip...

Page 12: ...bel with each InterChangeVS unit which you can use to record the serial number and network address If the VS1000 VS1100 unit is not in a readily accessible location check to see if this label has been filled out and posted elsewhere for example near the server console Table 1 Support Call Information Item Information Hardware Type VS1000 VS1100 Hardware Serial Number Network Address 00 C0 4E ____ ...

Page 13: ...itled Building Cables Installing the VS1000 Hardware Follow this procedure to connect the VS1000 to your network 1 Write down the serial number and Network MAC address of the VS1000 in the event that you need to call technical support The identification tag is located on the back panel of the unit The VS1100 has a serial number only If the VS1000 VS1100 is to be mounted in a remote location you ca...

Page 14: ...cable from the appropriate Ethernet connection 10Base T or AUI on the VS1000 to your server or Ethernet hub Notes Do not connect two VS1000 base units directly to each other If connecting the VS1000 directly to the server an Ethernet adapter NIC card is required This is not supplied by Comtrol If connecting the VS1000 directly to the server an Ethernet crossover cable is required See Building Cabl...

Page 15: ...ling VS1100 expansion units go to the Power On Diagnostics discussion which follows the subsection below Installing VS1100 Hardware Use the following procedure to attach InterChangeVS 1100 expansion units to the VS1000 base unit 1 Record the serial numbers of the VS1100 units 2 Optionally mount the VS1000 into the rack using the enclosed mounting brackets or mount the rubber feet Warning If mounti...

Page 16: ...nector labeled VS1100 on the VS1000 to the connector labeled INPUT on the first VS1100 To connect additional VS1100 units connect the cable from the OUTPUT of one VS1100 to the INPUT of the next VS1100 Note You can connect a maximum of three VS1100 expansion units to each VS1000 base unit Note The VS1100 expansion unit cannot be connected directly to the LAN Remember the RJ45 jacks on the VS1100 a...

Page 17: ... the VS1000 is waiting for the server to initiate VS Link communications 5 The upper 10Base T LED flashes briefly as the server acquires control of the VS1000 6 The port LEDs begin flashing in a sweeping sequence to indicate that the unit is operating normally The following figures and tables illustrate LED patterns for diagnosing hardware problems Table 4 10Base T LED Descriptions LED Indicator D...

Page 18: ...moving to the last If 1 5 LEDs stay on longer than 6 seconds this indicates a hardware fault condition Cycle the power on the VS1000 turn the unit off and on If the problem persists contact Comtrol technical support Table 5 Ports 1 Through 16 LED Descriptions Indicator Description Flash Briefly All LEDs light briefly during the power on sequence and then turn off 1 LED Lit A RAM self test failure ...

Page 19: ...r each VS1000 1100 RJ45 to DB25 cables are available from Comtrol Note Use the modem manufacturer s hardware installation documentation if you need help with modem pinouts If you need information about VS1000 VS1100 connectors see the section titled Building Cables 2 Install or reconfigure VS Link using the instructions for your operating system VS1000 COM5 COM20 VS1100 COM21 COM36 VS1100 COM37 CO...

Page 20: ... of this guide for more information Under Novell NetWare this is done through the vs1man program See the Novell NetWare section of this guide for more information Note Do not use hot swapping to add or remove VS1100 expansion units The VS1000 VS1100 combination being swapped in must have the same total number of ports as the VS1000 VS1100 combination being taken out of service Provided the number ...

Page 21: ...tions If building your own serial cables use shielded cable Serial RJ45 Connector Pinouts Use the following tables and figures for pinout information for the RJ45 connectors on the VS1000 and VS1100 Table 6 RJ45 Connector Pinouts for RS 232 Pin RS 232 Signals 1 RTS 2 DTR 3 GND 4 TxD 5 RxD 6 DCD 7 DSR 8 CTS Pin 1 Pin 8 Receptacle Pin 1 ...

Page 22: ...r a DTE to DCE modem cable Modem Cable RJ45 Pin 1 2 3 4 5 6 7 8 Signal RTS DTR GND TxD RxD DCD DSR CTS DB25 Pin 4 20 7 2 3 8 6 5 Signal RTS DTR GND TxD RxD DCD DSR CTS DTE to DCE Modem Cable Can be ordered from Comtrol RJ45 Pin 4 5 1 8 7 6 2 3 Signal TxD RxD RTS CTS DSR DCD DTR GND DB25 Pin 2 3 4 5 20 8 6 7 Signal TxD RxD RTS CTS DTR DCD DSR GND General Purpose DTE to DTE Null Modem Cable ...

Page 23: ...ollowing table illustrates UTP cable specifications Ethernet 10Base T Connector Pinout Table 7 Ethernet Cabling Specifications Cable Specification Type 100 UTP with two pairs Maximum length 100 meters or 328 feet Minimum length 0 6 meters or 23 feet Table 8 Ethernet Port RJ45 Connector Pinouts Pins VS3000 10Base T 1 TxD 2 TxD 3 RxD 4 and 5 Not Used 6 RxD 7 and 8 Not Used Pin 1 Pin 8 Receptacle Pin...

Page 24: ...f you are connecting from the VS1000 VS2000 10Base T connector directly to the NIC card in the server you need a crossover cable wired as follows Table 9 Ethernet Port DB15 Connector Pinouts Pin Signals 1 GND 2 CI1 3 DO 4 DGND 5 DI 6 DGND 7 Not Connected 8 DGND 9 CI 10 DO 11 DGND 12 DI 13 12V 14 DGND 15 Not Connected Table 10 Ethernet Crossover Cable Pin Connects to Pin 1 3 2 6 3 1 6 2 DB15 Female...

Page 25: ...ed together as shown that are used in conjunction with the diagnostic software to test serial ports The VS1000 and VS1100 are shipped with a loopback plug This information can help you build additional plugs or replace a missing loopback Use the following information to build loopback plugs Pins 4 to 5 Pins 1 to 8 Pins 2 to 6 to 7 Note Do not insert the serial port loopback plug into the 10Base T ...

Page 26: ...26 Building Loopback Plugs Building Cables ...

Page 27: ... BTU Hr 34 1 BTU Hr Air temperature System on System off 0 to 40o C 20 to 85o C Altitude 0 to 10 000 feet Mean Time between Failures InterChangeVS 1000 InterChangeVS 1100 7 8 years 20 9 years Humidity non condensing System on System off 8 to 80 20 to 80 Table 12 Specifications Topic Specification Maximum base units per server Dependent on operating system Maximum VS1100 port extenders per VS1000 b...

Page 28: ...0 mA 300 mA Power Consumption VS1000 VS1100 15 0 W 10 0 W Line Voltage 100 240 VAC Ethernet Host Interface AUI or 10Base T 10 mbs Weight VS1000 VS1100 8 0 lbs 6 75 lbs Dimensions without feet 16 75 x 11 x 1 75 Table 13 VS1000 1100 Electromagnetic Compliance Topic Specification Canadian EMC requirements Yes FCC Class A certification Yes UL Listed Yes Surge protection Extended ESD surge protection e...

Page 29: ...itching power supply that automatically senses the line voltage and cycle rate and sets itself accordingly No manual switching is required However depending on the model you purchase you may receive one or more AC power cords and it may be necessary to determine and select the appropriate power cord for use in your area ...

Page 30: ...30 Power Supply Requirements InterChangeVS Specifications ...

Page 31: ... equipment off and on the user is encouraged to try and correct the interference by one or more of the following measures Reorient or relocate the receiving antenna Increase the separation between the equipment and the receiver Connect the equipment into an outlet on a circuit different from that to which the receiver is connected Consult the dealer or an experienced radio TV technician for help L...

Page 32: ...nt is Underwriters Laboratory UL listed Important Safety Information To avoid contact with electrical current Never install electrical wiring during an electrical storm Never install the power plug in wet locations Use a screwdriver and other tools with insulated handles Warning If mounting the unit into a rack mount configuration make sure that the rack mount is not top heavy ...

Page 33: ...des 18 maximum number 7 connecting serial devices 19 connectors Ethernet AUI 24 Ethernet RJ45 23 Remote 25 RJ45 serial RS 232 21 customer support before you call 12 Ethernet error codes 17 port error codes 18 D DB25 to RJ45 cables 22 diagnostics 17 Ethernet LEDs 17 port LEDs 18 DTE to DCE modem 22 DTE to DTE null modem 22 E Ethernet cables 24 connecting to VS1000 14 connector 23 24 error codes 17 ...

Page 34: ... O overview 7 P phone numbers 12 pinouts DB15 Ethernet 24 Remote 25 RJ45 Ethernet 23 RJ45 serial 21 port extender VS1100 how to connect cables 16 installing 15 ports diagnostic codes 18 diagnostic LEDs 18 maximum number 7 number of per Novell system 7 power up sequence LEDs 17 prerequisites 7 product overview 7 R rack mounting into 13 15 Remote connector 25 RJ45 connector pinouts 21 RJ45 to DB25 c...

Page 35: ...chnical support 11 U S A technical support 11 updates how to obtain 11 URL 12 user guide electronic 11 UTP cable specifications 23 V VS1000 connecting Ethernet 14 installing hardware 13 mounting in a rack 13 product overview 7 terminator plug 14 VS1100 installing hardware 15 mounting in a rack 15 product overview 7 terminator plug 16 VS Link obtaining upgrades 11 W Web support 12 Windows NT maximu...

Page 36: ...36 Index ...

Page 37: ......

Page 38: ...Part Number 6610D April 8 1998 ...

Reviews: