AVVERTENZE
Il presente manuale di installazione è rivolto esclusivamente a personale professionalmente competente.
Tutto quello che non è espressamente previsto in queste istruzioni non è permesso
In particolare è importante prestare attenzione alle seguenti avvertenze:
• Verificare che la tensione di alimentazione sia uguale a quella presente nei morsetti della scheda.
• Togliere tensione prima di effettuare i collegamenti elettrici.
DESCRIZIONE DEL PRODOTTO E DESTINAZIONE D’USO
Le fotocellule DART ADJUSTABLE sono fotocellule da parete con portata fino a 20 m. La codifica del segnale
trasmesso, da impostare al momento dell’installazione, rende possibile l’installazione di 2 coppie dello stesso
modello senza nessuna interferenza fra loro.
VERIFICHE PRELIMINARI
• Verificare che il prodotto all’interno dell’imballo sia integro ed in buone condizioni.
• Verificare che il luogo di posizionamento delle fotocellule consenta una corretta installazione e fissaggio
delle fotocellule stesse.
INSTALLAZIONE
• Aprire le fotocellule e collegare i cavi alla morsettiera secondo schema del paragrafo “collegamenti elettrici”.
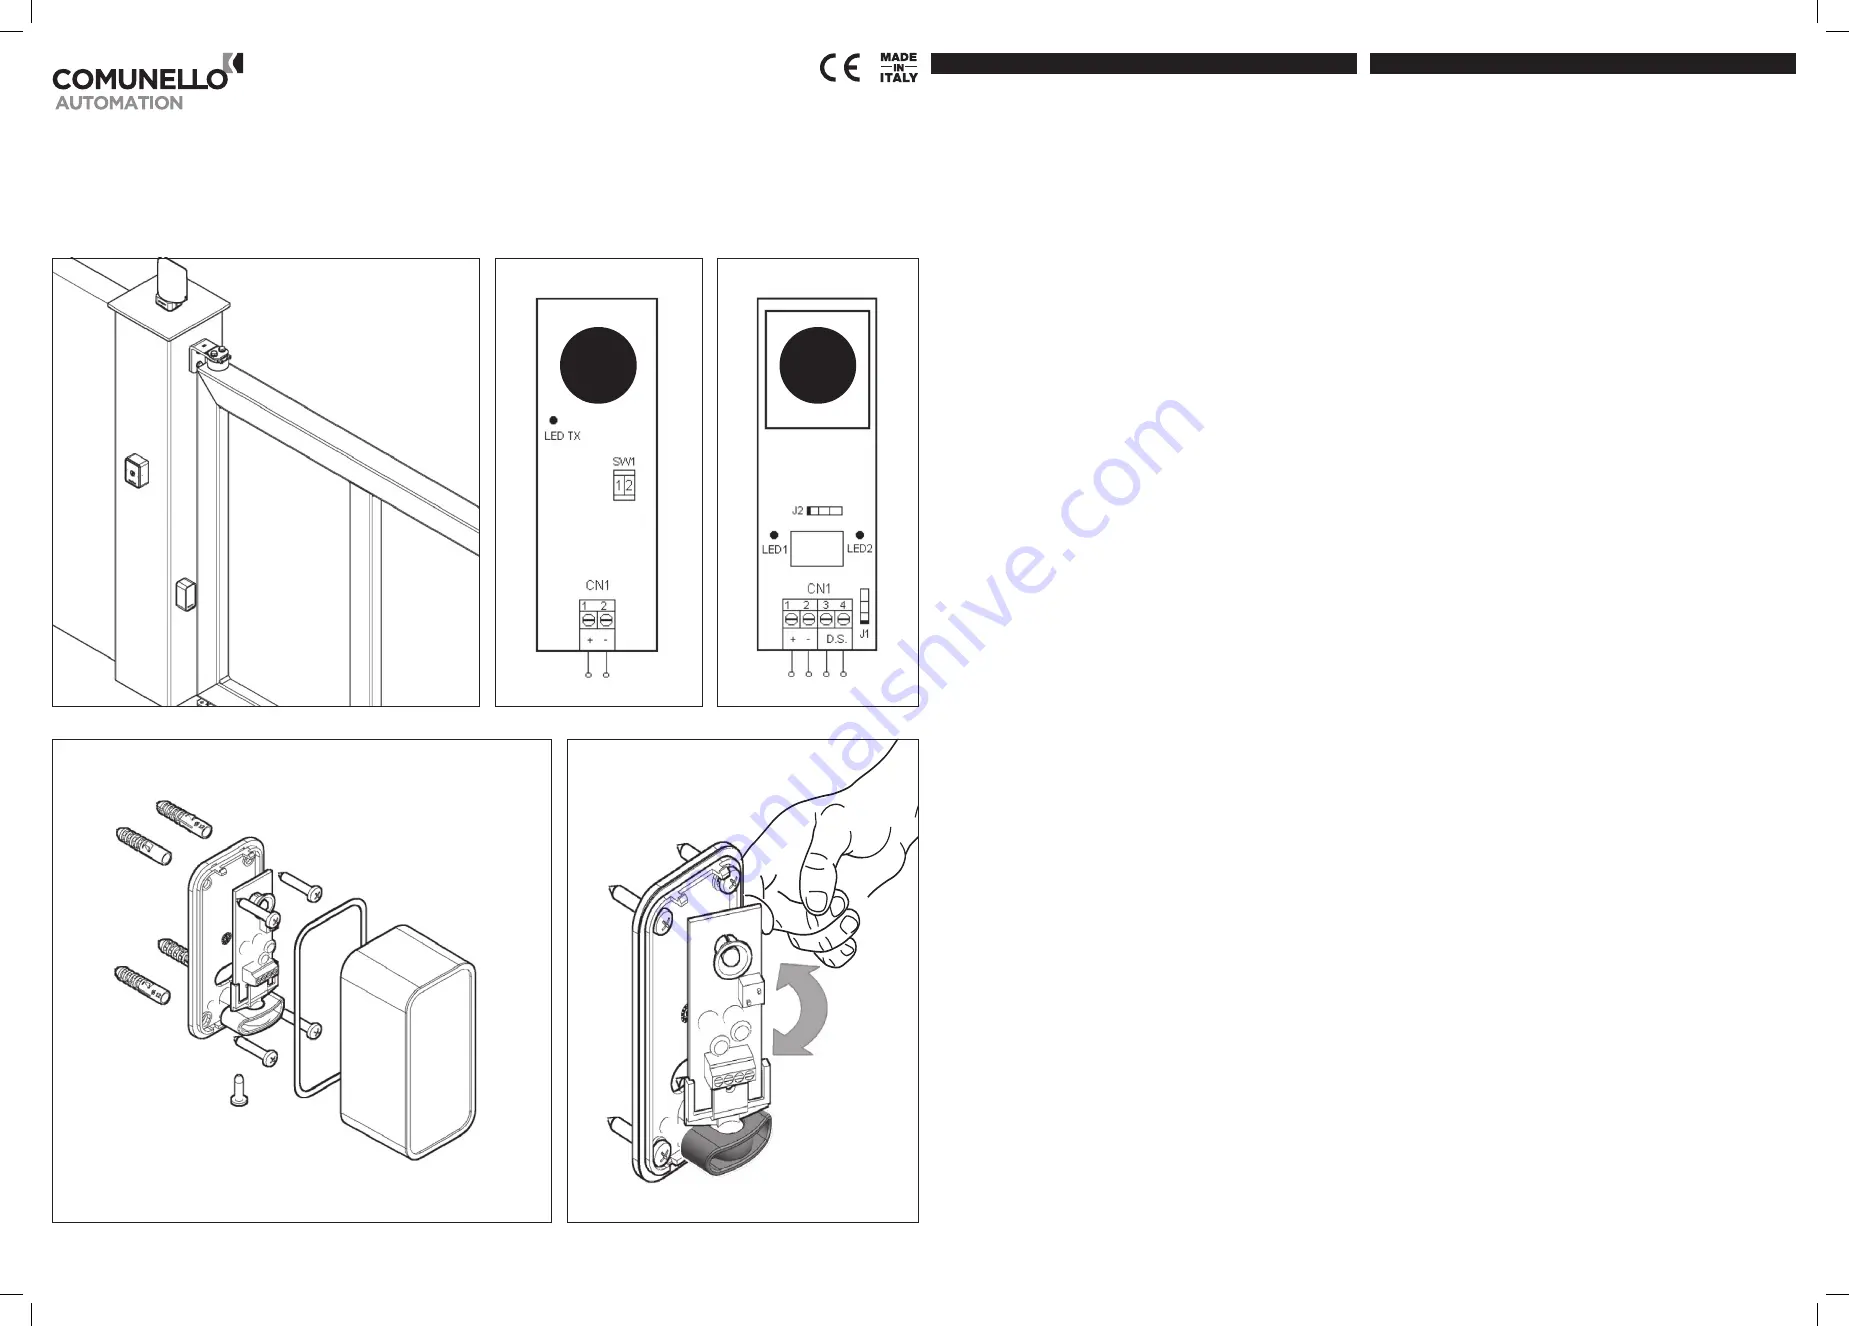
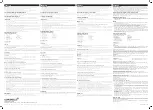
• Dopo aver forato la scatola ai quattro angoli fissare le fotocellule alla parete (FIG. 1).
• Utilizzare sistemi di fissaggio adeguati al tipo di montate (fissaggi non inclusi).
• Prima Assicurarsi che trasmettitore e ricevitore siano collegati.
• Prima di chiudere la fotocellula se necessario orientare la scheda del trasmettitore e del ricevitore in modo
da metterli in cominicazione. Il ricevitore è munito di una spia interna rossa che si accende quando le due
fotocellule sono in comunicazione.
• Per orientare la fotocellula svitare la vite nella parte inferiore e ruotare la scheda fino a mettere in comunicazione
il trasmettitore con il ricevente. Ad allineamento avvenuto il led 1 del ricevitore si accende (FIG.3).
• Riavvitare la vite e chiudere il coperchio della fotocellula.
COLLEGAMENTI ELETTRICI
CARATTERISTICHE TECNICHE:
• Portata max.:
20 metri
• Alimentazione TX:
12-24V AC-DC
• Alimentazione RX:
12-24V AC-DC
• Assorbimento TX:
10 mA Max.
• Assorbimento RX:
25 mA Max.
• Portata contatto relè:
1A max a 30 VDC
• Temperatura d’esercizio:
-10 ÷ 55 °C
Collegamenti CN1:
1 – 12/24 Vac-dc
2 – 0V
TRASMETTITORE:
• Il prodotto è fornito con una distanza di funzionamento massima di circa 10 metri con potenza normale
(Dip Switch n° 1 OFF).
• Spostando il dip-switch in posizione ON si ottiene una distanza massima di 20 metri.
Sincronizzazione fotocellule:
La fotocellula dispone di due canali codificati “A” e “B” di funzionamento. In questo modo è possibile installare
2 coppie dello stesso modello senza nessuna interferenza fra loro. Il prodotto è fornito con la codifica “A” (Dip
Switch n° 2 in posiziopne “OFF”). Per ottenere la codifica “B” spostare il dip-switch in posizione “ON”. Entrambe
le codifiche devono essere opportunamente selezionate allo stesso modo, al momento dell’installazione, sia
sulla parte trasmittente che sulla parte ricevente.
RICEVITORE:
Alimentazione:
Il ricevitore può essere alimentato con 12 o 24 Volt sia in corrente continua (rispettare polarità)
che in corrente alternata.
Collegamenti:
1 - Alimentazione 0 Vac-Vdc
3 - Contatto fotocellula NA/NC (J1 selezione)
2 - Alimentazione 12-24 Vac-Vdc
4 - Contatto fotocellula NA/NC (J1 selezione)
Selezione Contatto Relè NA/NC (tramite Jumper J1):
E’ possibile scegliere la tipologia del contatto relè NA (Normalmente Aperto) o di tipo NC (Normalmente Chiuso).
J1 posizione 1- 2: Contatto relè NA.
J1 posizione 2-3: Contatto relè NC (configurazione di fabbrica).
Selezione Codifica “A” e “B“di Funzionamento (tramite Jumper J2):
La fotocellula dispone di due canali codificati “A” e “B” di funzionamento. Fare molta attenzione che siano state
opportunamente selezionate le codifiche allo stesso modo, sia sulla trasmittente che sulla ricevente.
La codifica di funzionamento “A” o “B” si effettua grazie allo di-switch J2:
J2 posizione 1- 2: Funzionamento codifica B.
J2 posizione 2-3: Funzionamento codifica A (configurazione di fabbrica).
Verifica allineamento Trasmettitore-Ricevente:
Sul ricevitore è presente il Led 1 che stà ad indicare quando la coppia di fotocellule è allineata.
Il Led 1 sarà acceso fisso quando il raggio infrarosso è allineato e si spegnerà all’interruzione del raggio infrarosso.
Verifica qualità del segnale ricevuto:
Sul ricevitore è presente il Led 2 che lampeggia in funzione della qualità del segnale ricevuta da parte del
trasmettitore abbinato. Il numero di lampeggi è proporzionale all’intensità del segnale ricevuto:
quattro lampeggi=segnale al massimo,
un lampeggio= segnale insufficiente.
IMPORTANTE PER L’INSTALLATORE
• Nel caso di installazione multipla di dispositivi, si consiglia di creare dei fasci incrociati (cioè trasmettitore A
e ricevitore B a sinistra e trasmettitore B e ricevitore A a destra), quando questo non è possibile mantenere
comunque una distanza (soprattutto fra i ricevitori) di almeno un metro.
• Impostare sempre la potenza minima necessaria per coprire la distanza di applicazione: questo consente
di aumentare la durata della batteria e diminuire la possibilità di interferenza con altri dispositivi esistenti.
• Il dispositivo non deve essere utilizzato da bambini o da persone con ridotte capacità psico-fisiche, a
meno che non siano supervisionati o istruiti sul funzionamento e le modalità di utilizzo.
• Non consentire ai bambini di giocare con il dispositivo e tenere lontano dalla loro portata i radiocomandi.
•
ATTENZIONE:
conservare questo manuale d’istruzioni e rispettare le importanti prescrizioni di sicurezza in
esso contenute. Il non rispetto delle prescrizioni potrebbe provocare danni e gravi incidenti.
• Esaminare frequentemente l’impianto per rilevare eventuali segni di danneggiamento. Non utilizzare il
dispositivo se è necessario un intervento di riparazione.
SMALTIMENTO
Alcuni componenti del prodotto possono essere riciclati mentre altri come ad esempio i componenti elettronici
devono essere smaltiti secondo le normative vigenti nell’area di installazione.
Alcuni componenti potrebbero contenere sostanze inquinanti e non devono essere dispersi nell’ambiente.
PRESCRIPTIONS
This installation manual is addressed exclusively to professionally skilled personnel.
Any operations that are not expressly set down in these instructions are to be considered prohibited.
It is especially important to comply with the following requirements:
• Check that the power feeding voltage is identical to the voltage on the board terminals.
• Disconnect power before making electrical connections.
PRODUCT DESCRIPTION AND INTENDED USE
DART ADJUSTABLE are wall-mounted photocells with a range of up to 20 m. Encoding of the transmitted
signal (the code is defined at the time of installation) makes it possible to install 2 pairs of the same model
without any risk of interference.
PRELIMINARY CHECKS
• Check that the product in the pack is intact and in good condition.
• Check that the place in which the photocells are to be installed is such as to allow a properly executed job
and secure fixing of the devices.
INSTALLATION
• Open the photocells and connect the wires to the terminal strip in accordance with the diagram in the
heading “electrical connections”.
• Drill through the four corners of the box and then fix the photocells to the wall (FIG. 1).
• Use a suitable fixing system in relation to the type of support (fasteners not included).
• Ensure the transmitter and receiver are connected.
• Before closing the photocells angle the transmitter and receiver boards in order to place them in communication.
The receiver is equipped with an internal red LED that comes on when the two photocells are in communication.
• To orient the photocell undo the screw at the bottom and turn the board until the transmitter is in
communication with the receiver. When the photocells are aligned receiver LED 1 will switch on (FIG. 2).
ELECTRICAL CONNECTIONS
TECHNICAL CHARACTERISTICS:
• Max range:
20 metres
• TX power supply:
12-24V AC-DC
• RX power supply:
12-24V AC-DC
• TX current draw:
10 mA Max.
• RX current draw:
25 mA Max.
• Relay contact rating:
1A max at 30 VDC
• Working temperature:
-10 ÷ 55 °C
CN1 connections:
1 – 12/24 Vac-dc
2 – 0V
TRANSMITTER:
• The product is factory set with a maximum operating range of approximately 10 metres with normal power
(dip-switch n° 1 OFF).
• Setting the dip-switch to ON gives a maximum operating range of 20 metres.
Photocells synchronization:
The photocell has two operating channels with codes “A” and “B”. This makes it possible to install two pairs of
the same model with no risk of reciprocal interference. The product is factory set with code “A” (dip-switch n°
2 set to OFF). To set code “B” set the dip-switch to “ON”. Both codes must be selected in the same manner
at the time of installation on both the transmitter and receiver.
RECEIVER:
Power supply:
The receiver can be supplied with 12 or 24 Volts either direct current (observe correct polarity)
or alternating current.
Connections:
1 - 0 Vac-Vdc power supply
3 - NO/NC photocell contact (J1 selection)
2 - 12-24 Vac-Vdc power supply
4 - NO/NC photocell contact (J1 selection)
Relay Contact NO/NC selection (by means of Jumper J1):
The contact type can be selected between N.O. (normally open) or N.C. (normally closed).
J1 position 1-2: N.O. relay contact.
J1 position 2-3: N.C. relay contact (factory setting).
Selection of operating code “A” and “B” (by means of jumper J2):
The photocell has two operating channels with codes “A” and “B”. Take care to ensure the same code is
selected on both the transmitter and the receiver.
Setting operating code “A” or “B” is performed using jumper J2:
J2 position 1-2: Code B operation.
J2 position 2-3: Code A operation (factory setting).
Transmitter-Receiver alignment check:
The receiver is equipped with LED 1 which lights when the pair of photocells is aligned.
LED 1 is steady on when the infrared beam is aligned and switches off when the beam is broken.
Received signal quality check:
The receiver is equipped with LED 2, which blinks in accordance with the quality of the signal received from the
matching transmitter. The number of blinks is proportional to the strength of the signal received:
four blinks = maximum strength signal,
one blink = poor signal strength.
IMPORTANT INFORMATION FOR THE INSTALLER
• If multiple devices are installed it is good practice to set up opposite direction beams (i.e. Transmitter A
and receiver B on the LH side and transmitter B and receiver A on the RH side). If this is not possible it
is anyway important to leave a minimum distance of one metre between adjacent photocells (especially
important in the case of receivers).
• Always set the minimum power required to cover the distance of your application: this will increase battery
life and reduce the risk of interference with other devices.
• The device must not be used by minors or psychologically-physically differently-abled persons unless they
are supervised or duly instructed on the operation and methods of use.
• Do not let children play with the device and keep the remotes out of their reach.
•
IMPORTANT:
keep this instruction manual and comply with the safety prescriptions set down herein.
Failure to comply with the prescriptions may cause damage and serious accidents.
• Inspect the system frequently to identify any signs of damage. Do not use the device if repairs are required.
DISPOSAL
Some components of the product can be recycled while others, such as electronic components, must be
discarded in compliance with the regulations in force in the place of installation.
Certain components may contain pollutant substances and must not be released into the environment.
ENGLISH
ITALIANO
INSTALLATION AND USER’S MANUAL
Safety accessories
FIG. 1
FIG. 2
180 °
DART ADJUSTABLE
FRATELLI COMUNELLO S.P.A. AUTOMATION GATE DIVISION
Via Cassola, 64 - C.P. 79 36027 Rosà, Vicenza, Italy | Tel. +39 0424 585111 Fax +39 0424 533417 | info@comunello.it
comunello.com
Rev. 00 - 10.12.13


