22
COMUNELLO
®Copyright 2021 - All rights reserved
5.1 SETTINGS AND CONNECTION OF ACCESSORIES
5.1.1 CONTROL AND ADJUSTMENT PANEL REFERENCES
F1: 230V
~
mains power supply fuse (F3.15A250V).
F2: 24V operator power supply fuse (F15A250V).
FORCE (TR1): FORCE control (clockwise for maximum force).
AUTO (TR2):
Auto closing time (time increase in clockwise direction).
P1:
Remotes acquisition button.
P2:
Maximum travel learning button.
S1:
Auto (open-close) or step-by-step mode (open-stop-close) key selector switch.
S2:
CONDOMINIUM FUNCTION selector.
POWER LED: 2W LED courtesy light.
LED1:
Power indicator LED (feedback).
LED2:
Maximum travel programming indicator LED (feedback).
LED3:
Remotes save/delete indicator LED (feedback).
5.1.2 ACCESSORIES CONNECTION TERMINALS (CN1)
1: GND (common).
2: Open/Close Pushbutton input (NO).
3: Stop Pushbutton input (NC).
4: Photocells Safety Input (NC).
5: 24V + Power Supply for Photocells Safety (max 300mA).
6: 24V – Power Supply for Photocells Safety.
7: 24V + Power Supply for Flashing Light (max 5W).
8: 24V – Power Supply for Flashing Light.
9: Antenna Input (signal pole).
10: GND (common).
11: 8K2 Safety Input.
5.1.3 MAXIMUM TRAVEL LEARNING (OPENING LIMIT SWITCH)
To set the Opening Limit Switch the operator must be coupled to the door via the track and the sliding runner must be attached to the
drive chain or belt. In addition, at least one pushbutton control must be connected to the system (or a saved remote must be available)
and activated secutiry devices (photocells and STOP enter) and N.C. (normally closed)
To acquire the Opening Limit Switch position:
power the operator, bring the door to a "nearly closed" position (approximately 500 mm from the closing stop)
by means of the
pushbutton or button on the remote. Press and hold down button P2 on the control panel until LED2 comes on; release button P2 (LED2
starts blinking). The door will perform a closing movement until reaching the end stop. Once the door is closed (Zero position acquisition)
it will start the opening movement at low speed. During the opening phase it is possible to decide the starting point of deceleration during
opening. To achieve this, press the button of a previously saved radio control, then you can decide the FEA point by pressing the radio
control button again. Subsequently, the sectional door starts the reclosing phase at an average speed and it is possible to decide the
deceleration start point in closing by pressing the button of a radio control, then the closing ends automatically by pressing the mechanical
stop. Alternatively, the entire process can be left to run automatically with the sectional door reaching the limit switches on the mechanical
stops (if fitted in the guide track) and still acquire the Opening Limit Switch position (FIG. 17). In this case, a slowdown will be inserted
in the last 20 cm both in opening and closing. LED2 will stop blinking and then switch off, thereby confirming that the maximum travel
position has been saved.
The Opening Limit Switch acquisition procedure can be repeated, if necessary, only with the operator powered in the stop
position.
NOTE:
At the end of each closing manoeuvre, the motor releases the tension on the belt to preserve the mechanics.
5.1.4 SAVING / DELETING A REMOTE
To save a remote (Comunello radio transmitter) simply press button P1 on the control panel. Management logic is as follows:
Channel 1: Press button P1 once, LED3 blinks once. Press the remote button to which you wish to assign the OPEN-CLOSE
function.
Channel 2: Press button P1 twice, LED3 blinks twice. Press the remote button to which you wish to assign the STOP function.
Reset:
Press button P1 four times, LED3 will switch on steady. Press and hold down button P1, LED3 blinks rapidly; keep
button P1 pressed until LED3 stops blinking (confirmation that the saved remotes have been deleted).
5.1.5 AUTOMATIC CLOSING
The operator features a selectable Automatic Closing function. To enable or disable Automatic Closing set the Trimmer TR2 as follows:
AUTO CLOSING TIME SELECTION
0%
= Auto closing disabled
50%
= 3"
75%
= 30"
100% = 60"
Note= Increase in clockwise direction
Factory setting: Automatic Closing enabled.(30")
5.1.6 AUTOMATIC OR STEP-BY-STEP MODE
There are two movement control modes available: Automatic Mode (each time the Open-Close button or Remote button is pressed
the operator reverses its direction of run) or Step-by-Step (each time the Open-Close button or Remote button is pressed the operator
Summary of Contents for RAMPART 1000
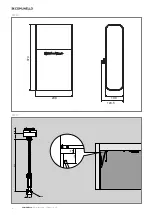
Page 2: ...2 COMUNELLO Copyright 2021 All rights reserved FIG 1 FIG 2 40 400 0 400 2800 mm 500 mm...
Page 3: ...3 COMUNELLO Copyright 2021 All rights reserved FIG 3 FIG 5 FIG 6 FIG 4...
Page 4: ...4 COMUNELLO Copyright 2021 All rights reserved FIG 8 A FIG 7 FIG 9 FIG 11 FIG 10 FIG 10...
Page 5: ...5 COMUNELLO Copyright 2021 All rights reserved FIG 14 FIG 12 FIG 13 FIG 15...
Page 6: ...6 COMUNELLO Copyright 2021 All rights reserved FIG 16 FIG 17 FIG 18...
Page 50: ...NOTES...
Page 51: ...51 COMUNELLO Copyright 2021 All rights reserved NOTES...

