background image

IP HIGH SPEED DOME SERIES QUICK START GUIDE

5

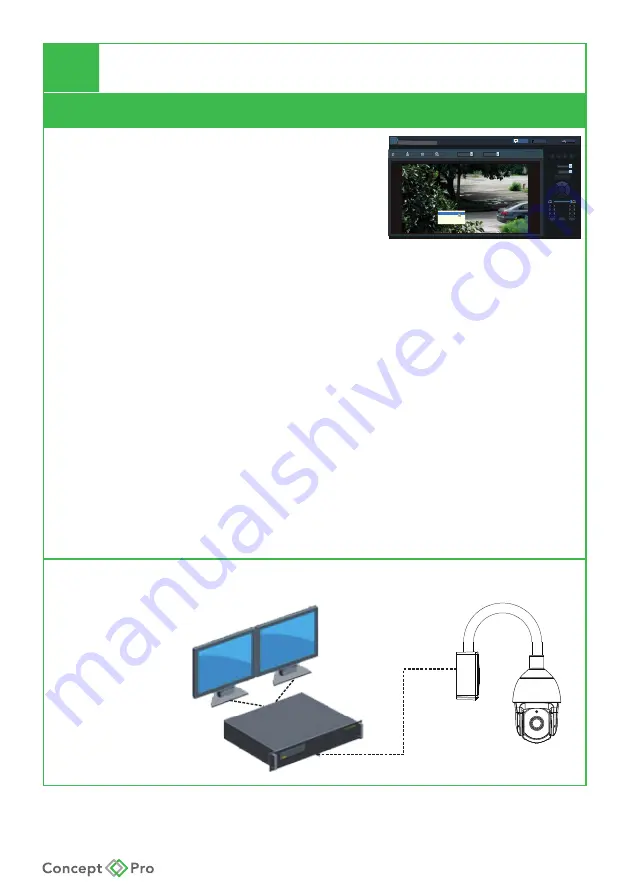
HOW TO OPERATE ON IE WEB PAGE

How to connect and operate the camera via IE

3

Changing  

Camera 

Settings

• 

Using the cameras web browser it 

is possible to configure the IP PTZ 

camera with ease. From changing 

stream settings to adjusting the 

image settings or even applying pri-

vacy masks using the click and drag 

function. All the network settings 

associated with a network camera 

for example; sending emails, taking 

snapshots of live images, device 

information, IP settings, firmware 

version, and maintenance options 

can be configured.

• 

When applying settings to the CP-

HSD10/20/30-IP, only use the web 

browser for configuring image qual

-

ity settings and any other settings 

within the camera options. While 

the IP camera supports RS485 with 

access to the OSD menu (via preset 

95), when editing the camera from 

the OSD menu the settings may not 

change, therefore synchronisation is 

not possible using the web browser. 

However, when changes are made 

from the web browser these are 

synchronised to the OSD menu.


I

I

P

P

Camera Web Service


Alarm Out


Listen


Talk 

Snapshot 

Record


Streaming


Player Mode


2017 05 15 02:30:26 Tues


PTZ >>


Type: 

Name:


PTZ


Call 

Setup 

15

PTZ 

Zoom 

+


Focus 

+


IRIS 

+


1280x1024 7793 Kbps 25 fps


314 / 0 / x0


3D 

Wipers 

Light


Setup 


   Exit 


   View


Preset


Preset1


Strram1


Real time first


Restore  panorama 

Original 

Adaptive


Full  screen


4

Connect to NVR

To connect this product to an NVR, please make sure the NVR and PTZ 

are on the same network segment.

NVR

Monitor

Summary of Contents for CP-HSD20-IP

Page 1: ...IP HIGH SPEED DOME SERIES QUICK START GUIDE CP HSD20 30 IP IP PTZ QUICK START GUIDE ...

Page 2: ...eet to drill holes in the mounting surface then affix the included bracket to the surface 2 Connect the safety lanyard between the camera and bracket then connect all required cables to the camera 3 Twist the camera into the bracket and tighten the fixing screws 3 WALL MOUNT INSTALLATION 1 Drill holes and affix wall bracket to surface and pass cable through to junction box 2 Configure DIP switches...

Page 3: ...IDEO OUTPUT BNC1 Analogue CVBS Output 2 Address ID Switch 1 2 3 4 5 6 7 8 ON ON OFF ON ON ON ON OFF OFF OFF OFF ON ON OFF ON ON OFF ON OFF OFF OFF OFF ON ON ON ON ON OFF OFF OFF OFF OFF OFF ON OFF OFF ON OFF OFF OFF OFF OFF ON OFF OFF OFF OFF OFF OFF OFF OFF ON OFF OFF OFF OFF OFF OFF OFF OFF ON OFF OFF OFF OFF OFF OFF OFF OFF ON OFF OFF OFF 1 2 3 5 7 4 255 6 8 1 1 2 3 4 5 6 7 8 2 DIP 4 8 16 32 64...

Page 4: ...15 16 for additional details Note If the plug in could not be successfully installed one possibility is that the operating system and the browser are not compatible For example if the operation system is 64 bits but the browser is 32 bits then the 32 bit plug in will need to be installed 4 CONFIGURING THE CAMERA Camera Connections 3 SET SWITCHES DIP No 1 and 2 configures the baud rate as follows 1...

Page 5: ... for configuring image qual ity settings and any other settings within the camera options While the IP camera supports RS485 with access to the OSD menu via preset 95 when editing the camera from the OSD menu the settings may not change therefore synchronisation is not possible using the web browser However when changes are made from the web browser these are synchronised to the OSD menu I IP PCam...

Page 6: ...ow to connect and operate the camera via IE 5 Input Output This product supports audio in out analogue CVBS output and up to 64GB Micro SD card Audio in GND Audio out Speaker Mic 6 Power Supply Only use recommended power supply adapters with this camera AC24V DC12V PoE Optional ...

Page 7: ...IP HIGH SPEED DOME SERIES QUICK START GUIDE NOTES ...

Page 8: ...IP HIGH SPEED DOME SERIES QUICK START GUIDE ...

Reviews: