68
EN
OPK5160bc / OPK5160wh
EN
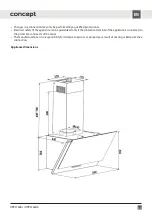
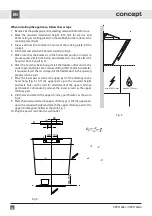
When installing the appliance, follow these steps:
1. Remove all the packaging and marketing materials before first use.
2. Mark the required installation height (650 mm for electric and
650 mm for gas cooking plates) on the wall behind the cooker or the
cooking plate (Fig. 3).
3. Draw a vertical line to mark the centre of the cooking plate (of the
cooker).
4. Drill holes and attach the hood according to Fig. 4.
5. Make sure that the bracket is in the horizontal position in order to
prevent grease (fat) from being accumulated on one side after the
hood has been hung (Fig. 5).
6. After the hood has been hung, install the flexible outlet duct to the
outlet opening (Fig. 6). Use a reducer fitting 150/120 mm in diameter,
if required. Insert the second part of the flexible duct in the opening
prepared in the wall.
7. Place the lower part as well as the upper part of the chimney on the
hood hung (Fig. 4). Lift the upper part up to the required height
and mark holes on the wall for attachment of the upper chimney
part bracket. Subsequently remove the lower as well as the upper
chimney part.
8. Drill holes and attach the upper chimney part bracket as shown in
Fig. 4.
9. Place the lower as well as the upper chimney part. Lift the upper part
up to the required height and attach the upper chimney part to the
upper chimney part holder as shown in Fig. 7.
10. Plug the power cord into the wall outlet.
Fig. 3
Fig. 4
6565
min 650-750 mm
6565
min 650-750 mm
100 100
80
80
650-750
A
C
(2)
(1)
(3)
B
Summary of Contents for OPK5160bc
Page 2: ...2 OPK5160bc OPK5160wh CZ ...
Page 4: ...4 OPK5160bc OPK5160wh CZ ...
Page 16: ...16 OPK5160bc OPK5160wh SK ...
Page 18: ...18 OPK5160bc OPK5160wh SK ...
Page 30: ...30 OPK5160bc OPK5160wh SK ...
Page 32: ...32 OPK5160bc OPK5160wh PL ...
Page 44: ...44 OPK5160bc OPK5160wh LV ...
Page 46: ...46 OPK5160bc OPK5160wh LV ...
Page 58: ...58 EN OPK5160bc OPK5160wh EN ...
Page 60: ...60 EN OPK5160bc OPK5160wh EN ...


