EN
30
OPERATING INSTRUCTIONS
WARNING!
• The touch control is activated by putting your finger on the required symbol on the control panel. Therefore,
keep the control panel clean and dry.
• Each time you press a symbol, a beep can be heard. The response time for pressing a symbol is 1 second, for
which period it is necessary to hold your finger on the symbol.
• The sensors do not respond to matte, dark colours (do not use black gloves).
• Make sure the unit is not accidentally switched on, e.g. during cleaning!
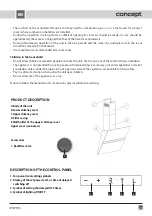
• Filter casing (D) opens and closes automatically using the motor! D not handle it manually, risk of
damage to the unit!
Before the first use
Prior to operating a new unit for the first time wipe it with a wet and then a dry cloth.
Airing mode
In this mode the vapors are ventilated through the output pipe into the shaft and out of the room. If there are
carbon filters installed in the unit, remove them (see the Cleaning and Maintenance section).
1. Select the required fan power level by pressing the „+“ and „-“ symbols (1 – 4).
2. The motor will open the filter casing.
3. After use, switch the unit off by setting the fan power level to „0“.
4. The motor will close the filter casing.
Re-circulation mode
If you have no possibility to ventilate the air out of the room, the re-circulation mode can be selected. In this mode
the vapors are filtered through metal and carbon filters. Active carbon in these filters absorbs smells, and the clean
air flows back to the room through holes in the upper chimney cover. For this mode, it is necessary to
buy and
assemble
the corresponding carbon filters (see the Cleaning and Maintenance paragraph).
1. Select the required fan power level by pressing the „+“ and „-“ symbols (1 – 4).
2. The motor will open the filter casing.
3. After use, switch the unit off by setting the fan power level to „0“.
4. The motor will close the filter casing.
Switching the lighting on and off
Switch the light on by pressing the L symbol. Switch the light off by repeatedly pressing the L symbol.
Delayed OFF function
1. Select the required fan power level (1 – 4).
2. Press the „T“ symbol to activate the delayed off function. A dot symbol will blink on the display.
3. Set the required delayed off time by repeatedly pressing the „+“ and „-“ symbols in the range of 10 – 90 minutes.
Tens of minutes are displayed, i.e. 1 = 10 minutes, 2 = 20 minutes etc. Confirm by pressing the „T“ symbol (the
fan power level will be displayed, and the dot symbol will blink).
Note:
If you don‘t confirm the delayed off settings within 20 seconds, the settings will be erased, and the
delayed off function will be deactivated.
4. The unit will switch off automatically after the preset time runs out.
Note:
If you press the „T“ symbol during the countdown, or switch off the fan manually before the time runs out,
the delayed off function will be deactivated.
OPK7790

