


EN
29
OPO 5342N
EN
25
OPO5342
OPERATING INSTRUCTIONS
Before first use
Prior to the start of use of a new unit, wipe it with a wet and then a dry cloth.
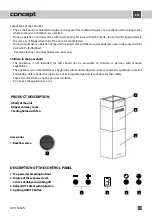
Airing mode
In this mode the vapors are ventilated through the output pipe into the shaft and out of the room. If there are
carbon filters installed in the unit, remove them (see the Cleaning and Maintenance paragraph).
1. Select the required fan power level by pressing the „+“ and „-“ symbols (1 – 4).
2. After use, switch the unit off by setting the fan power level to „0“.
Re-circulation mode
If you have no possibility to ventilate the air out of the room, the re-circulation mode can be selected. In this mode
the vapors are filtered through metal and carbon filters. Active carbon in these filters absorbs smells, and the clean
air flows back to the room through holes in the upper chimney cover. For this mode, it is necessary to buy and
assemble the corresponding carbon filters (see the Cleaning and Maintenance paragraph).
1. Select the required fan power level by pressing the „+“ and „-“ symbols (1 – 4).
2. After use, switch the unit off by setting the fan power level to „0“.
Switching the lighting on and off
Press the button to turn on the light. Switch the light off by repeatedly pressing the symbol.
The lighting direction can be adjusted by tilting the lights.
Delayed OFF function
1. Select the required fan power level (1 – 4).
2. Press the symbol to activate the delayed off function. A dot symbol will blink on the display.
3. Set the required delayed off time by repeatedly pressing the „-“ and „+“ symbols in the range of 10 – 90 minutes.
Tens of minutes will be displayed, i.e. 1 = 10 minutes, 2 = 20 minutes etc. Confirm by pressing the symbol
(the fan power level will be displayed, and the dot symbol will blink).
Note:
If you don‘t confirm the delayed off settings within 20 seconds, the settings will be erased, and the
delayed off function will be deactivated.
4. The unit will switch off automatically after the preset time runs out.
Note:
If you press the symbol during the countdown, or switch off the fan manually before the time runs out,
the delayed off function will be deactivated.
Automatic fan power regulation
The unit is equipped with an odor sensor that detects an increased volume of odors in the air.
This function enables the automatic regulation of fan power depending on the volume of odors in the air.
After connecting to electric power, the fan shall not be switched on for about 5 minutes, so that the sensor can
be calibrated.
The function is activated by pressing the „–“ symbol for a longer time. „A“ will be displayed.
To deactivate the function, press the „–“ symbol for a longer time.
Filter replacement signal function
This function is only indicative; it reminds you when the filters should be cleaned or replaced under standard use.
The function counts hours of operation, i.e. the unit does not detect whether you have already performed the
EN
25
OPO5342
OPERATING INSTRUCTIONS
Before first use
Prior to the start of use of a new unit, wipe it with a wet and then a dry cloth.
Airing mode
In this mode the vapors are ventilated through the output pipe into the shaft and out of the room. If there are
carbon filters installed in the unit, remove them (see the Cleaning and Maintenance paragraph).
1. Select the required fan power level by pressing the „+“ and „-“ symbols (1 – 4).
2. After use, switch the unit off by setting the fan power level to „0“.
Re-circulation mode
If you have no possibility to ventilate the air out of the room, the re-circulation mode can be selected. In this mode
the vapors are filtered through metal and carbon filters. Active carbon in these filters absorbs smells, and the clean
air flows back to the room through holes in the upper chimney cover. For this mode, it is necessary to buy and
assemble the corresponding carbon filters (see the Cleaning and Maintenance paragraph).
1. Select the required fan power level by pressing the „+“ and „-“ symbols (1 – 4).
2. After use, switch the unit off by setting the fan power level to „0“.
Switching the lighting on and off
Press the button to turn on the light. Switch the light off by repeatedly pressing the symbol.
The lighting direction can be adjusted by tilting the lights.
Delayed OFF function
1. Select the required fan power level (1 – 4).
2. Press the symbol to activate the delayed off function. A dot symbol will blink on the display.
3. Set the required delayed off time by repeatedly pressing the „-“ and „+“ symbols in the range of 10 – 90 minutes.
Tens of minutes will be displayed, i.e. 1 = 10 minutes, 2 = 20 minutes etc. Confirm by pressing the symbol
(the fan power level will be displayed, and the dot symbol will blink).
Note:
If you don‘t confirm the delayed off settings within 20 seconds, the settings will be erased, and the
delayed off function will be deactivated.
4. The unit will switch off automatically after the preset time runs out.
Note:
If you press the symbol during the countdown, or switch off the fan manually before the time runs out,
the delayed off function will be deactivated.
Automatic fan power regulation
The unit is equipped with an odor sensor that detects an increased volume of odors in the air.
This function enables the automatic regulation of fan power depending on the volume of odors in the air.
After connecting to electric power, the fan shall not be switched on for about 5 minutes, so that the sensor can
be calibrated.
The function is activated by pressing the „–“ symbol for a longer time. „A“ will be displayed.
To deactivate the function, press the „–“ symbol for a longer time.
Filter replacement signal function
This function is only indicative; it reminds you when the filters should be cleaned or replaced under standard use.
The function counts hours of operation, i.e. the unit does not detect whether you have already performed the
EN
26
OPO5342
replacement or not; it just reminds you that a check-up, cleaning or replacement should be carried out.
„F“ – signal to clean the fat filters will be displayed after 100 hours of operation.
„C“ – signal to replace the carbon filters will be displayed after 220 hours of operation.
You may reset the counter by pressing the symbol for 10 seconds; the display will go off.
CLEANING AND MAINTENANCE
• Before any maintenance and cleaning, disconnect the power cord from the mains or switch off the circuit
breaker of the mains outlet of the unit.
•
Do not immerse the power cord, plug, or appliance in water or any other liquid.
• Set all controls in the OFF position.
• Clean the outer surface of the unit with a wet cloth, or use a neutral detergent.
• Do not use coarse sponges, abrasive cleaners, solvents or aggressive detergents.
• Do not use an autoclave to clean the unit!
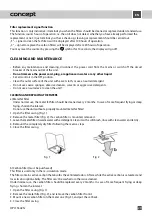
CLEANING AND REPLACING THE FILTERS
a) Metal fat filter
Under normal use, the metal fat filter should be cleaned every 2 months. In case of more frequent frying or deep
frying, shorten the interval.
Do not use the unit without a properly mounted metal fat filter!
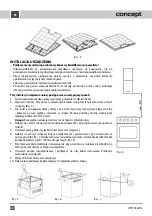
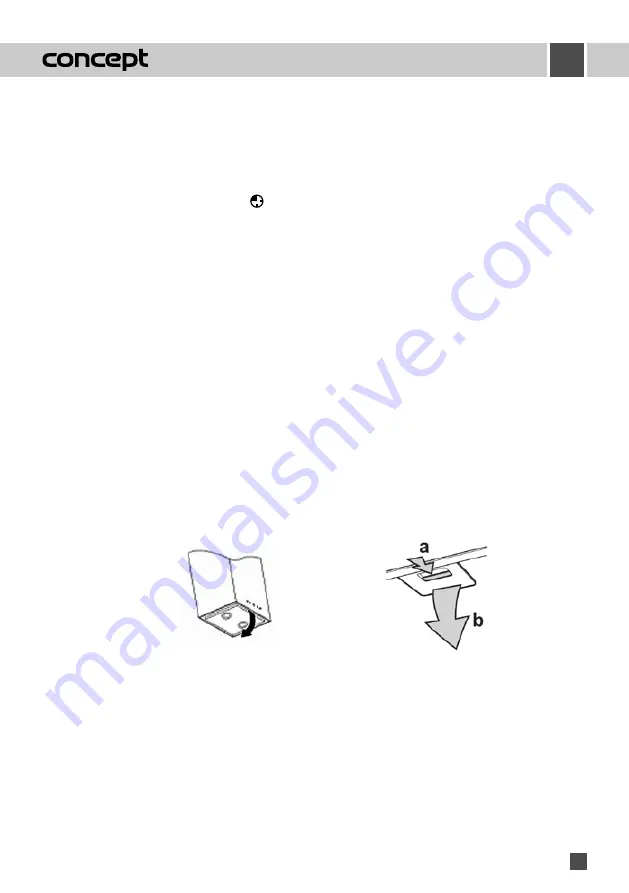
1. Open the filter casing (Fig. 1).
2. Remove the metal filter (Fig. 2). If a carbon filter is mounted, remove it.
3. Leave the metal filter in warm water with a detergent. Clean it with a soft brush, rinse with clean water and let dry.
4. Remount the completely dry filter following the reverse steps.
5. Close the filter casing.
Fig. 2
Fig. 1
b) Carbon filter (must be purchased)
This filter is used only in the re-circulation mode.
The filter contains active carbon that absorbs the ventilated odors. After a while the active carbon is saturated, and
loses its absorption ability. The filter can‘t be washed or otherwise cleaned.
Under normal use, the carbon filter should be replaced every 2 months. In case of more frequent frying or deep
frying, shorten the interval.
1. Open the filter casing (Fig. 1).
2. Remove the metal filter (Fig. 2), and remove the carbon filter from it.
3. Mount a new carbon filter on the metal one (Fig. 3), and put the set back.
4. Close the filter casing.
EN
26
OPO5342
replacement or not; it just reminds you that a check-up, cleaning or replacement should be carried out.
„F“ – signal to clean the fat filters will be displayed after 100 hours of operation.
„C“ – signal to replace the carbon filters will be displayed after 220 hours of operation.
You may reset the counter by pressing the symbol for 10 seconds; the display will go off.
CLEANING AND MAINTENANCE
• Before any maintenance and cleaning, disconnect the power cord from the mains or switch off the circuit
breaker of the mains outlet of the unit.
•
Do not immerse the power cord, plug, or appliance in water or any other liquid.
• Set all controls in the OFF position.
• Clean the outer surface of the unit with a wet cloth, or use a neutral detergent.
• Do not use coarse sponges, abrasive cleaners, solvents or aggressive detergents.
• Do not use an autoclave to clean the unit!
CLEANING AND REPLACING THE FILTERS
a) Metal fat filter
Under normal use, the metal fat filter should be cleaned every 2 months. In case of more frequent frying or deep
frying, shorten the interval.
Do not use the unit without a properly mounted metal fat filter!
1. Open the filter casing (Fig. 1).
2. Remove the metal filter (Fig. 2). If a carbon filter is mounted, remove it.
3. Leave the metal filter in warm water with a detergent. Clean it with a soft brush, rinse with clean water and let dry.
4. Remount the completely dry filter following the reverse steps.
5. Close the filter casing.
Fig. 2
Fig. 1
b) Carbon filter (must be purchased)
This filter is used only in the re-circulation mode.
The filter contains active carbon that absorbs the ventilated odors. After a while the active carbon is saturated, and
loses its absorption ability. The filter can‘t be washed or otherwise cleaned.
Under normal use, the carbon filter should be replaced every 2 months. In case of more frequent frying or deep
frying, shorten the interval.
1. Open the filter casing (Fig. 1).
2. Remove the metal filter (Fig. 2), and remove the carbon filter from it.
3. Mount a new carbon filter on the metal one (Fig. 3), and put the set back.
4. Close the filter casing.


