OPERATING INSTRUCTIONS
MIXER
Important
• IF YOU USE THIS APPLIANCE WITHOUT THE BLENDER,THE APPLIANCE WILL NOT FUNCTION IF THE BACK COVER
HAS NOT BEEN LOCKD IN PLACE.
• DO NOT TRY TO ATTEMP TO USE THIS FUNCTION TOGETHER WITH MINCING OR BLENDING.
1. Place the mixing bowl into its holding device and turn the bowl until it locks into place.
2. In order to lift the arm, push the rise button (2) down. The arm will now move upwards.
3. Mount the desired mixing accessories in place by inserting and turning it into the output shaft.
4. Mount the mixing bowl in place by turning in direction with the arrow.
5. Now fi ll in your ingredients.
Do not overfi ll the machine - the maximum quantity of ingredients is 1.1 kg.
6. Lower the arm pushing the rise button (2).
7. Insert the mains plug into a safe power socket properly installed at 220-240V 50-60Hz.
8. Switch on the machine at a desired speed between 1 and 6 (corresponding to the mixture) by turning the speed
knob.
9. For “Pulse” setting (kneading at short intervals), turn the speed knob to the “Pulse” position. The appliance works
only at the speed knob has to be held in this position ,when the knob is released ,it returns automatically to the
“0” position.
10. After kneading/stirring, turn the speed knob (3) back to the “0” position to switch off the appliance as soon as the
mixture is completed or has formed a ball. Then remove the mains plug.
11. Push the rise button (2) downwards and the arm will be raised.
12. The mixture can now be released with the help of a spatula and removed from the mixing bowl.
13. The mixing bowl can now be removed.
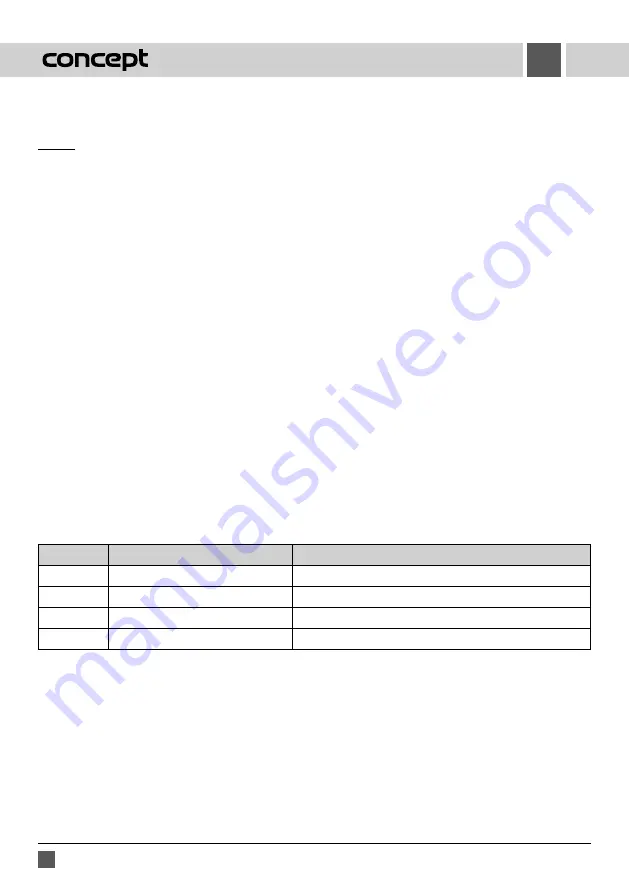
Adjusting the Levels and Using the Hook for not more than 1.1 kg of Mixture.
Levels
Use
Type of Mixture
1-4
Dough hook
Heavy mixtures(e.g. bread, pizza or sourdough pastry)
3-4
Beater
Medium-heavy mixtures(e.g. crepes or sponge mixture)
5-6
Whisk
Light mixtures (e.g. cream, egg white, blancmange)
Pulse
Whisk/blender
Interval (e.g. for mixing under sponge)
NOTE:
Operation time: With heavy mixtures, do not operate the machine for more than 6 minutes, and then allow it
to cool down for a further 20 minutes.
32
RM4420 RM4421
EN
Summary of Contents for RM-4420
Page 2: ......
Page 46: ......
Page 50: ...48 RM4420 RM4421...
Page 54: ...52 RM4420 RM4421...
Page 58: ...56 RM4420 RM4421...


