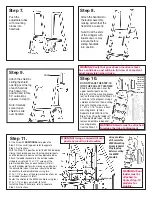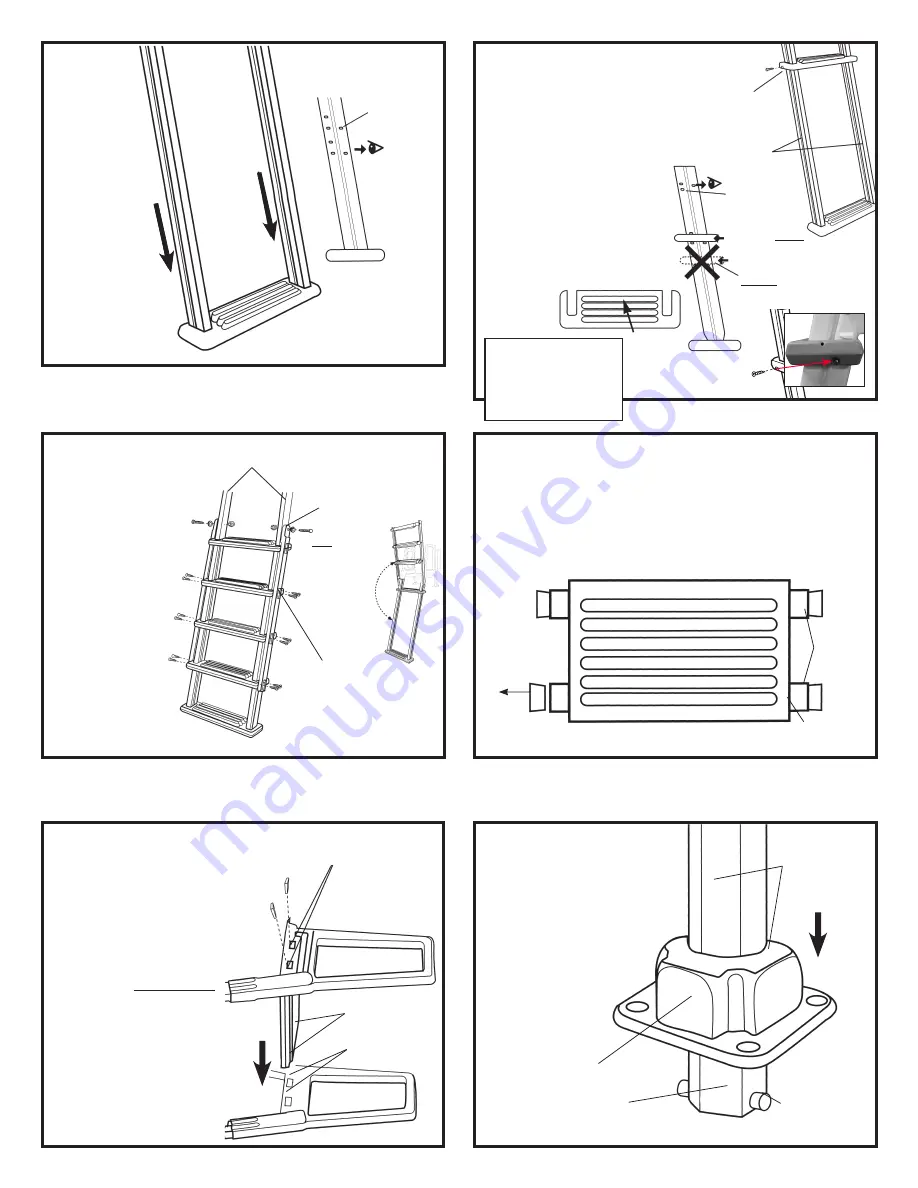
Step 4.
Detach the 4 wedges from the end
of the protrusions by twisting them
off and save for use in step 5. (It
may be necessary to use a utility
knife to assist in removal).
Detach
Wedges
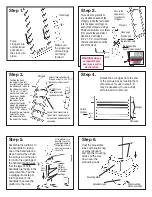
Step 1.
Force
stringers into
bottom tread
pockets so
they lock into
place.
Make sure
the single row
of tread lugs
are facing
forward.
Tread Lugs
Step 3.
Secure tread connectors to
stringers using 1/4-20 x 3-1/2”
bolt washer and nylon nut
Do NOT secure
tread connectors
to uppermost step
Secure Tread connectors to
Treads. Note: Treads should
be in position on ladder before
connecting.
Stringers
Position the tread
connectors (One left,
one right) on the ends of
the treads and fasten to
the stringers using the
1/4-20 x 3-1/2” bolt,
washer and nylon nut.
Do not over-tighten.
Fasten the tread
connectors to the
ends of the treads,
except the uppermost
tread, by driving two
#10 x 1-1/4” screws
through the pre-formed
holes in the tread
connector and into
the end of the treads.
Wedges
Protrusion
Step 2.
Two sets of Lug locations
are provided on each of the
stringers. Slide the four treads
into the upper set of lugs on
each of the stringers. Using a
Phillips screwdriver or cordless
drill, secure the uppermost
tread only, by driving a
#10 x 1-1/4” screw through
the recessed location on the
end of the tread.
Position all 4
treads in upper
lug locations only.
Do not
position
tread in lower location.
x4
Secure the
uppermost
tread only to
stringers
Stringers
Tread Lugs
WARNING! Using a
corded drill near
pool may result in
electrocution.
Step 5.
Assemble the platform to
the handrails by laying
one of the handrails on a
clean hard surface. Push
the protrusion of the plat-
form into the openings of
the handrail making sure
that the legs of both
handrails are facing in the
same direction. Tap the
4 wedges (from step 4)
into the sides of the
handrails to secure the
platform to the rails.
After platform is in
position, tap in the
supplied wedges at
the bottom of each
opening to ensure a
secure fit.
Match
Platform
protrusions
to Handrail
openings
Push
down
Step 6.
Coat the adjustable
tubes with liquid soap
or spray lubricant
and slip the mounting
blocks all the way
down over the
protruding nubs.
Slide mounting
blocks over nubs
Mounting Block
Adjustable tube
x2
Summary of Contents for 8000X
Page 6: ......


