Connect-Tek Over IP
8
Step 7
. Follow the instructions on the screen. For example, simply type “
I
” for setting your IP, type “
M
” for
changing the machine name, and so on. Here is a reminder for you, please type “
W
” after you made
any change.
B. Initial Setting Procedures
Before installing your
CTIP-01
, please refer to the “
Contents
” section of
Chapter 1
to ensure that you have
all of the necessary items for the following proper installation.
Just choose either one method of assigning an IP address. There are
3 available methods
of assigning an
IP address to the
CTIP-01
:
1. DHCP
Step 1
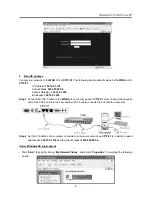
: Connect your network to the
LAN
Port of
CTIP-01
. The first time the unit is booted, it will perform
DHCP
lease request to get an IP address. Therefore, you’d better connect it to the network before
turning it on.
Step 2
: Please have your
MAC address
. You can find it on a white sticker on the bottom of the
CTIP-01
.
Here is an example,
00-0E-C5-00-08-1A
.
Step 3
: Power on the
CTIP-01
and connected to the network via
WAN
port on the rear panel. The
DHCP
will
automatically assign an IP address to the
CTIP-01.
Step 4
: Access the
DHCP log
from your
file server
. A simple
DHCP
log
looks similar to the following:
Step 5
: From the above
DHCP
log, you can easily find the
DHCP
assigned an IP to the
CTIP-01,
192.168.22.4
. Once you have located this IP address, do NOT power off the
CTIP-01
or your
DHCP
server
since it might lease a different IP address.
Step 6
: Simply open a web browser and type
https://192.168.22.4
to access your
CTIP-01
. Login by using
“
admin
” for both username and password.
NOTE
:
Please remember to type “s” after http
. And,
you will see a
Lock
on the lower right corner of your screen. That means all of your information is
under the protection of
128-bit SSL Encryption
.


