Connect-Tek Over IP
5
d
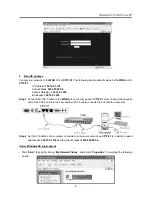
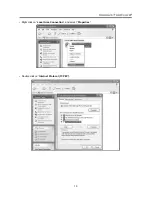
. Click “
Advanced…
”, then click “
Add…
” to add up the IP address of “
192.168.1.124
”, and the Subnet
mask of “
255.255.255.0
”.
Step 3
. From that computer, open a web browser and go to
https://192.168.1.123
. Login using “
admin
” for
both username and password.
Step 4
.Click on the
Admin/Setup
button then
Network configuration (IP address, netmask, gateway)
.
From here you can set the IP address as needed.
2.
If you have DHCP (Dynamic Host Configuration Protocol)
Step 1
. Please have your
MAC address
. You can find it on a white sticker on the bottom of the
CTIP-01
.
Here is an example,
00-0E-C5-00-08-1A
.
Step 2
. Power on the
CTIP-01
and connected to the network via
WAN
port on the rear panel. The
DHCP
will
automatically assign an IP address to the
CTIP-01.
Step 3
. Access the
DHCP log
from your
file server
. A simple
DHCP log
looks similar to the following:
Step 4
. From the above
DHCP
log, you can easily find the
DHCP
assigned an IP to the
CTIP-01,
192.168.22.4
. Once you have located this IP address, do NOT power off the
CTIP-01
or your
DHCP
server since it might lease a different IP address.
Step 5
. Simply open a web browser and type
https://192.168.22.4
to access your
CTIP-01
. Login using
“
admin
” for both username and password.
3.
Using the HyperTerminal via Serial Port
Step 1
. Connect the
DB9 RS-232 Null Modem cable
(optional) to the
DTE
serial port on the rear panel of
CTIP-01
. And, connect the opposite end of the cable to the serial port (
COM1, COM2
… ) of your
computer.


