background image


KVM Switch 


The connectors (keyboard, mouse and monitor) at the 

Local

 port on the 

rear of the KVM module are not applicable wh en the module is connected 
to the drawer by the C-36 connector.  When its C-36 connector is not 
connected to the drawer, the KVM module acts as a rear-mount 
stand-alone KVM switch.


Initial Power-Up 

 
Make sure all computers and  the StreamLine KVM switches  are 
powered down during installation.   You must power up the Master 
StreamLine before turning on any other devices.


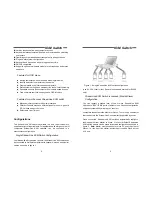
For single StreamLine KVM switch: 

1)  Apply a power adapter to the 

Master

.  

2)  Turn on computers.  


 For cascaded StreamLine KVM switches:  

1)  Apply a power adapter to the 

Master

.   

2)  Apply power adapters to all 

Slaves

.   

3) 

Turn on computers. 


Note:


You may hot plug additional powered-down computer or a slave 

StreamLine KVM switch without turning any existing StreamLine or 
computer off after initial power up

.


------------------------

------------------------


Operation

Operation   

 
Front Panel Push Buttons 


A  computer  may be selected by pressing the front panel push button 
directly, by issuing hot-key commands or by activating the OSD window. 
The front panel indicator changes to reflect the computer port selected 
(red). The indicator flashes red when it is in either 

Auto Scan

 or 

Manual 

Scan

 mode.   


K/M RESET 


K/M RESET

 solves most problems developed by keyboard, mouse, 

device replacement or change of configuration.  Press down both the 
front-panel number 

1

 and 

2

 push buttons for 2 seconds to re-configure 

the whole system without  turning either  the StreamLine Switch or  any 


KVM Switch 


computer off. 
 

AUTO SCAN 

 
StreamLine KVM switches provide an easy to use feature to start 

Auto 

Scan

ning. You can press down both the front-panel number 

7

 and 

8


buttons for 2 seconds to start Auto Scanning.   

 
OSD (On-Screen-Display) Operation 


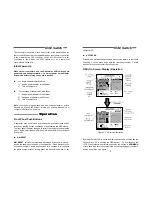
Figure 7: OSD screen illustration 


By hitting the left <CTRL> key twice within two seconds, you may see the 
'Hotkey Menu' if it  is enabled (an OSD option).  Or, by hitting the left 
<CTRL> key three times within two seconds, you will see a '

KVM MENU

screen showing a list of the computers with corresponding port numbers, 
names and status, see figure 7. 

Summary of Contents for Master-IT StreamLine SL-18

Page 1: ...tch you can name your computers switch to a computer from a list configure settings with easy to use menus view the name of the selected computer on screen with programmable time interval The OSD menu displays the system status throughout operation Automatic Mouse Conversion The StreamLine KVM Switch enables you to connect computers with PS 2 or serial mouse ports using adapters supplied with the ...

Page 2: ...to support a variety of requirements For applications with a large number of computers StreamLine KVM switches can be cascaded in a master slave configuration Single StreamLine KVM Switch Configuration Combined with a StreamLine Console the StreamLine KVM switch can be connected to multiple computers with keyboard mouse and monitor cables as shown in figure 1 KVM Switch 4 Figure 1 A single StreamL...

Page 3: ...pectively as shown in figure 4 Repeat this step for PC 1 to PC 8 KVM Switch 6 Figure 4 Master computer connection For computers using serial mouse connect the DB 9 to mini DIN 6 adapter included with the switch to the computer mouse port then use PS 2 cables to connect the mouse to the StreamLine see figure 5 Connect the computer s monitor cable to the HD DB 15 VGA connector Note This function is ...

Page 4: ...r may be selected by pressing the front panel push button directly by issuing hot key commands or by activating the OSD window The front panel indicator changes to reflect the computer port selected red The indicator flashes red when it is in either Auto Scan or Manual Scan mode n K M RESET K M RESET solves most problems developed by keyboard mouse device replacement or change of configuration Pre...

Page 5: ...ters will be displayed sequentially in Scan mode KVM Switch 10 Function key F3 To lock a device a computer or a Slave from unauthorized access use Security Security is effective for only one device a computer or a Slave To lock adevice use the UP and DOWN arrow keys to highlight it then press F3 Now enter up to 4 characters A Z 0 9 followed by ENTER as new password A Security enabled device is mar...

Page 6: ...ed inAuto Scan mode The options are3 seconds 8 seconds 15 seconds and 30 seconds The non volatile memory stores the Scan Rate setting n Keyboard Speed StreamLine s offer keyboard typematic settings that override the similar settings in BIOS and in Windows Available speed options are Low Middle Fast and Faster as 10 15 20 and 30 characters sec respectively The non volatile memory stores the Keyboar...

Page 7: ... can be connected to a Slave Left Ctrl left Ctrl 7 Selects a computer connected to port 7 of the Master Left Ctrl left Ctrl 6 C Selects a computer connected to port C of a Slave connected to port 6 of the Master KVM Switch 14 g To start Auto Scan automatically scan power on computers one by one at a fixed interval Left Ctrl left Ctrl F 1 When Auto Scan detects any keyboard or mouse activity it sus...

Page 8: ...ff the device The Master must have equal or more PC x ports than that of the Slave i e if SL 18 is the master SL 18 can be a Slave but not the SL 216 The ports labeled PC 1 PC 8 can be connected to either a computer or aSlave s CONSOLEport as shown in figure8 The ports PC A PC H can only be connected to a computer Figure 8 Slave console connection The maximum number of computers controlled by a ma...

Page 9: ...uter port number 8 8 16 Cascade control PC number Up to 64 Up to 64 Up to 136 On screen display OSD Yes Front panel button control 8 available when connected to a KVM drawer Hot plug and play Yes Hot key control Yes Rack mounted Yes 19 industry standard Automatic scan interval 3 8 15 30 seconds Programmable scan pattern Yes 30M 100ft at CONSOLE Cable length Max 30M 100ft at PC ports VGA bandwidth ...

Page 10: ...itch 20 Remove any possible power supply to the slave unplug all cables before connecting it to the Master Keyboard strokes shifted The computer was in shifted state when last switched Press both SHIFT keys Theé é and ê êkeys do not work in Manual Scan All PCs are off or only one PC is turned on Scan mode works for power on computers only Scan type is eye mark selected but no PC is eye mark select...

Page 11: ...L LOSS WHICH MAY BE CAUSED BY THE USE OF THE PRODUCT EXCEEDS THE PRICE PAID FOR THE PDOCUDT ConnectPRO makes no warranty or representation expressed or implied with respect to the contents or use of this documentation and especially disclaims its quality performance merchantability or fitness for any particular purpose ConnectPRO also reserves the right to revise or update the product or documenta...

Reviews: