background image

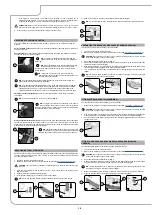
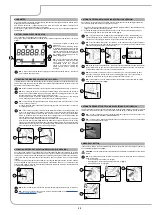
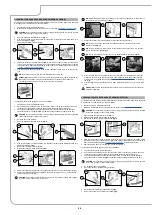
ADJUSTMENT OF DRIVING POSITION

The proper adjustment of the driving position provides a greater sense of comfort when using the 

machine.

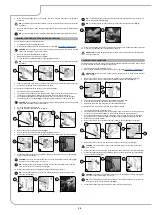
Correct position on the seat

: make sure you sit upright and that your back and that your lower back 

and spine are at 90°.

Seat adjustment

: The seat should always be positioned using the pedals as a reference. To adjust 

the seat use the lever (1) under it (

Fig.1

).

N.B.:

 The distance should be adjusted so that with the 

pedals fully pressed to the floor the knees are slightly bent 

(about 120°).

N.B.:

 Adjust the distance of the seat so that when pressing 

the brake pedal it goes as far as it can. This operation 

should be done with the machine running so as to pressurise the 

braking system.

N.B.:

 If the knee is not bent enough, it is too far from the 

steering wheel, if however the knee is bent almost 90°then it is 

too close to the steering wheel.

N.B.:

 The feet should be positioned keeping the heels on the footrest, the sole of the foot 

directly below the fingers should push the pedals.

N.B.:

 The ideal position is that which allows you to grip the steering wheel correctly with the 

palms slightly lower than the shoulders. With a good grip on the steering wheel, the elbows 

should be bent by about 120°. They should be at least 30 cm between the middle of the 

steering wheel and our breastbone. In any case, this distance should be no more than 45 cm.

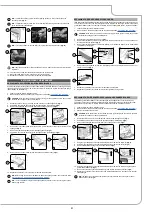
Adjusting the armrests (optional):

 the armrests should be inclined to make using the machine 

comfortable.

N.B.:

 To adjust the armrest use the runner (2) under it (

Fig.2

).

N.B.:

 Taking the right armrest as a reference, if the wheel is 

turned outwards the inclination of the armrest is increased.

Taking the left armrest as a reference, if the wheel is turned inwards 

the inclination of the armrest is increased.

Wear the seatbelt correctly (optional):

 The machine has a sub-abdominal safety device that allows 

the operator to be anchored to the driver's seat. To secure the safety belt, first of all you need to be 

sitting in the drier's seat, take the mobile part (3) of the belt, wrap it round the abdomen and insert the 

mobile part (3) in the slit in the fixed part (4) (

Fig.3

).

N.B.:

 Adjust the horizontal part of the belt so it is as tight 

as possible on the pelvis. The belt should be pulled and 

put as low as possible on the pelvis bone, and not on the belly.

1

1

1

2

1

3

4

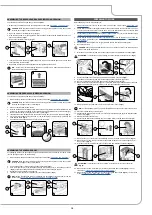
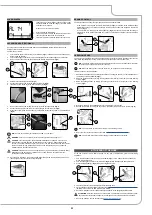
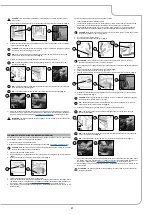
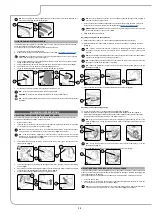
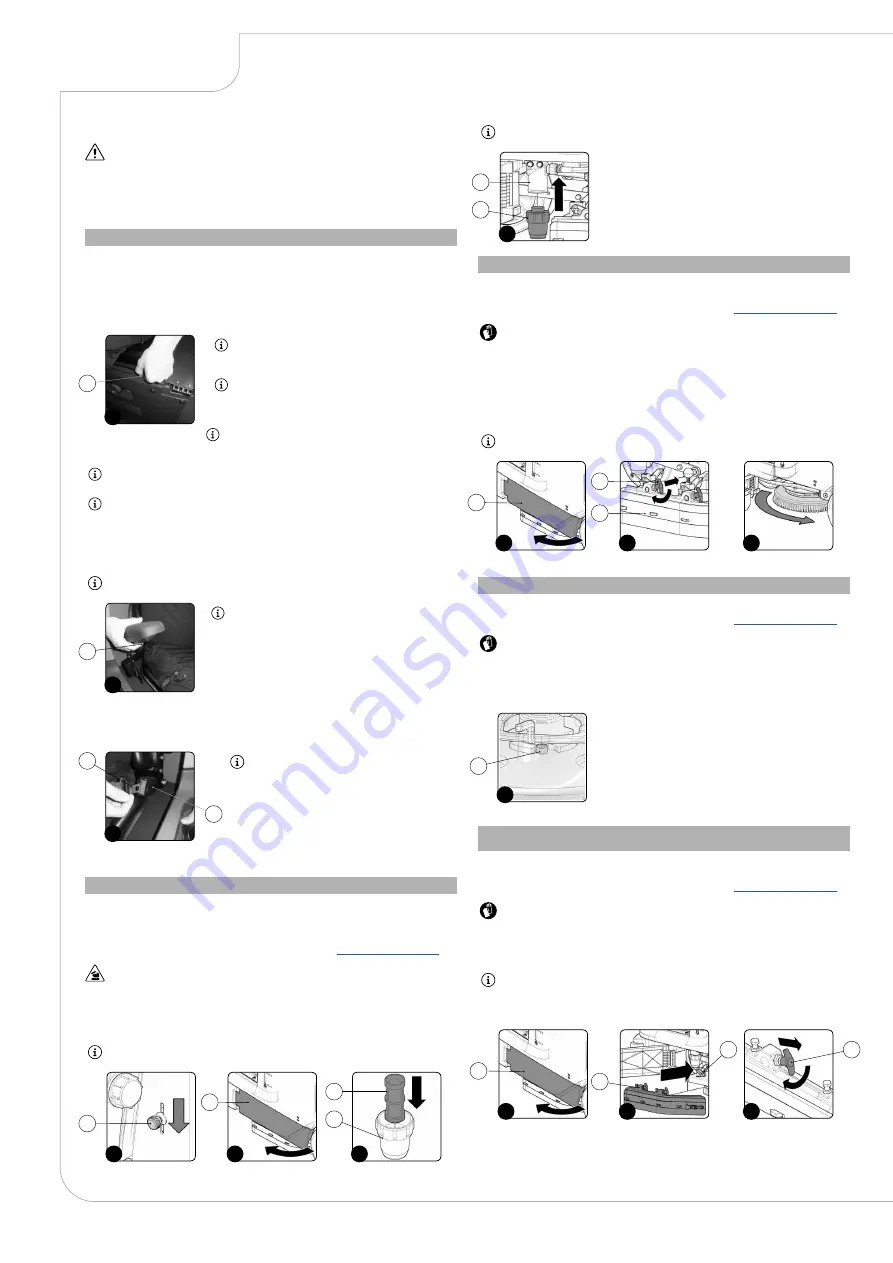
INSERTING WATER SYSTEM FILTER

Before using the machine for the first time the water system filter needs to be reset, for shipping reasons 

the filter cartridge and the cap have been removed. To insert the filter cartridge in the water system 

filter body proceed as follows:

1. Take the machine to the maintenance area.

2. Make sure the machine has been secured (see the section titled “

SECURING THE MACHINE

”).

CAUTION

: users are advised to always wear protective gloves, to avoid the risk of serious injury 

to hands.

3.

Close  the  tap's  output  flow,  and  shift  the  knob  (1)  on  the  left  hand  side  of  the  steering  column 

(

Fig.1

) downward.

4. Open the machine's left lateral hatch (2) (

Fig.2

).

5. 

Insert the filter cartridge (3) in the housing on the cap (4) (

Fig.3

).

N.B.:

 The O-ring gasket in the filter cartridge should be inserted into its seat in the cap.

2

3

1

1

2

3

4

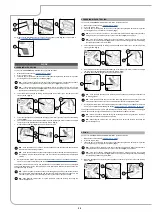
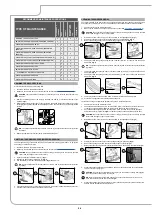
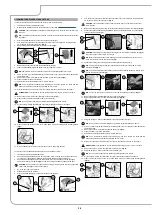
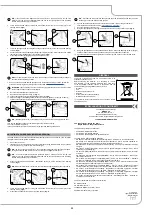
ASSEMBLING THE BRUSH HEAD BRUSHES (SCRUBBING VERSION)

To fit the brush on the brush head body, proceed as follows:

1.  Take the machine to the maintenance area.

2.  Make sure the machine has been secured (see the section titled “

SECURING THE MACHINE

”).

CAUTION

: these operations must be carried out using protective gloves to avoid any possible 

contact with the edges or tips of metal objects.

3.  Open the machine's left lateral carter (1) (

Fig.1

).

4. 

Remove the left-hand splash guard (2) and move the fixing anchors (3) on the brush head body 

into the maintenance position (

Fig.2

).

5.  With the brush head UP, insert the brush in the plate housing underneath the brush head, turning 

it until the three buttons engage with the niches on the plate itself.

6.  Turn in increments until the button is pushed towards the coupling spring and is locked in place 

(

Fig.3

).

NB

: The image in 

Fig.3

 indicates the direction of rotation for coupling the left brush; the right 

brush must be turned in the opposite direction.

3

1

2

1

2

3

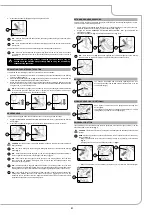
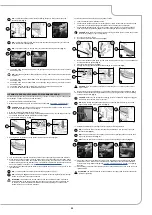
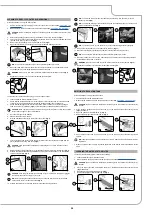
FITTING THE BRUSH HEAD BODY SIDE SPLASHGUARDS (WASHING 

VERSION)

To fit the side splash guards on the brush head body, proceed as follows:

1.  Take the machine to the maintenance area.

2.  Make sure the machine has been secured (see the section titled “

SECURING THE MACHINE

”).

CAUTION

: these operations must be carried out using protective gloves to avoid any possible 

contact with the edges or tips of metal objects.

3.  Open the machine's left lateral carter (1) (

Fig.1

).

4. 

With the brush head raised from the floor, position the side splash guard  casing on the brush head 

body, insert the pins (2) in the brush head in the slots (3) in the casing (

Fig.2

).

N.B.


: Before inserting the pins (2) in the slots (3) remember to put the fixing anchors (4) in the 

brush head body in the maintenance position (

Fig.3

).

5.

When the side splash guard  casing is in position turn the fixing anchors (4) to the work position.

6. Close the left side casing (1) and repeat everything for the right side casing.

3

1

2

1

2

4

3

FITTING LATERAL BRUSH 1SL (SCRUBBING )

To fit the side brush on the brush head body, proceed as follows:

1. Make sure the machine has been secured (see the section titled “

SECURING THE MACHINE

”).

CAUTION

: these operations must be carried out using protective gloves to avoid any possible 

contact with the edges or tips of metal objects.

2. With the brush head in its resting position, insert the brush into the plate housing underneath the 

brush head, and turn it until the two buttons engage with the niches on the plate itself (

Fig.1

).

3.  Push the brush until the stopper spring on the brush itself has engaged with the niche present on 

the gear motor’s pin

.

1

1

if the system is not used daily. The system can be excluded. In case of sporadic use of 

detergents with pH between 1-3 or 11-14, use the floor scrubbing machine in the traditional way 

by adding the detergent in the clean water tank and excluding the dosing circuit.

ATTENTION: 

always use low-foam detergent. To avoid the production of foam, put a minimum 

quantity of anti-foam liquid in the recovery tank before starting to clean. Do not use pure acids.

4.  Close the cap (1) correctly to prevent liquid coming out when working.

6. 

Screw on the cap (4) to the body of the detergent solution filter (5) (

Fig.4

).

N.B.:

 For the sweeping versions, the water system filter is located on the right of the machine.

4

5

4

18

Summary of Contents for Magna BS 2SL Basic

Page 1: ...CONQUEST MAGNA FLOOR SCUBBER OPERATOR MANUAL T 1800 826 789 E support conquestequipment com au W conquestequipment com au FIMAG OM V01...

Page 2: ...Drive pedal 22 Horn button 23 Button for activating the automatic dosing system or the automatic recycle system optional 24 Lateral brush control button optional 25 Emergency button 26 Operator seat 2...

Page 3: ...E DETERGENT SOLUTION 21 REVERSE GEAR 21 EXTRA BRUSH HEAD PRESSURE 21 BUZZER 21 WORKING HEADLIGHTS OPTIONAL 21 EMERGENCY BUTTON 21 HOUR METER 22 BATTERY CHARGE LEVEL INDICATOR 22 ACTIVATING THE SIDE BR...

Page 4: ...S DANGER If the battery charger power cable is damaged or broken it should be replaced by the manufacturer by authorised service personnel or else by a qualified person in order to protect against haz...

Page 5: ...should be carried out by the user should not be done by unsupervised children In the event of danger take prompt action by pressing the emergency button near the operator s seat Never collect gases e...

Page 6: ...l vibrations Use the machine only in the way described in this manual Do not pick up anything that is burning or smouldering like cigarettes matches or glowing embers Reduce speed on slopes and danger...

Page 7: ...jewellery loose clothing do not get entangled in the machine s moving parts Only use the machine in well lit areas DEACTIVATION OF THE MACHINE WARNING Always protect the machine against sunlight rain...

Page 8: ...ovement operations have been completed the electro magnetic brake must be re engaged Never use the machine with the electro magnetic brake disengaged If the machine needs to be pushed for maintenance...

Page 9: ...MAP or by FIMAP service centres Wear personal protective equipment as required and as suggested in the manual TRANSPORT WARNING Drain both tanks before transport Bring both the squeegee and the brushe...

Page 10: ...ccidents that happen either in the workplace or whilst moving are caused by failure to respect the most basic safety rules An attentive careful operator is most effective guarantee against accidents a...

Page 11: ...on the central brush head rpm 180 180 Lateral brush head unit motor voltage nominal power rating V W 36 200 Lateral brush head brush rotations rpm 140 Side brushes number external bristles Nr mm 1 29...

Page 12: ...voltage nominal power rating V W 36 90 Lateral brush head brush rotations rpm 75 Side brushes number external bristles Nr mm 2 450 Maximum weight exerted upon the central brush head kg 60 60 Maximum w...

Page 13: ...ters of its capacity Solution tank filling symbol Located on the left side of the machine s solution tank to indicate the amount of water or detergent solution in the tank The symbol on the side indic...

Page 14: ...f the machine CAUTION when getting down from the machine do not place your foot on the scrubbing brush head or side brush head brush 19 Grip the back of the seat 3 and turn the seat support plate to t...

Page 15: ...attery terminals The various phases for inserting the batteries in the battery compartment are as follows 1 Make sure the solution tank is empty If this is not the case empty it read EMPTYING THE SOLU...

Page 16: ...rking position 1 2 3 1 3 2 10 Grip the handle 4 and lower the recovery tank to the maintenance position Fig 4 ATTENTION to prevent the recovery tank from rotating grip the handle 5 on the safety stop...

Page 17: ...eat in the cap 2 3 1 1 2 3 4 ASSEMBLING THE BRUSH HEAD BRUSHES SCRUBBING VERSION To fit the brush on the brush head body proceed as follows 1 Take the machine to the maintenance area 2 Make sure the m...

Page 18: ...he machine CAUTION when getting down from the machine do not place your foot on the scrubbing brush head or side brush head brush 7 Grip the back of the seat 2 and turn the seat support plate to its m...

Page 19: ...the main switch to its I position by turning the key 1 a quarter turn clockwise Fig 1 N B As soon as the machine turns on the control board will perform a diagnostics procedure during which the red L...

Page 20: ...in its working position once the drive pedal is pressed the machine will begin to move in reverse and the squeegee body will be raised into its resting position N B If the reverse gear is engaged with...

Page 21: ...the detergent solution to be recycled so that productivity can be increased since the number of stops needed to empty and fill the tanks is reduced As a result less water and detergent are used there...

Page 22: ...achine brakes decelerating softly until it stops the encoder Only when the encoder has stopped is the electric brake engaged If the machine is moving and the brake pedal 2 Fig 2 is pressed the machine...

Page 23: ...with a jet of water and then with a damp cloth Fig 4 N B the place designated for this operation must comply with current environmental protection regulations 7 Thoroughly clean the squeegee body s r...

Page 24: ...formed bristles it is better to reassemble them in the same position the right hand one on the right and the left hand one on the left to prevent the different inclination of the bristles producing an...

Page 25: ...eyes 2 3 1 2 3 3 1 4 3 1 2 3 1 2 5 4 5 6 4 5 NB Before starting the optional tank cleaning kit check the level indicator 8 to see how much solution there is in the solution tank Fig 9 11 Activate the...

Page 26: ...After checking to make sure that the brush is clean reassemble it and move on to the one on the left hand side 2 2 1 1 To clean the brush with the spray gun kit proceed as follows 1 Take the machine t...

Page 27: ...ng protective gloves to avoid any possible contact with the edges or tips of metal objects 4 Go to the front right of the machine 5 Stand at the back of the machine 6 Grip the moulded handles 3 on the...

Page 28: ...you are advised to always wear goggles to avoid any risk of serious injury to your eyes N B Before starting the optional tank cleaning kit check the level indicator 8 to see how much solution there i...

Page 29: ...in the opposite order to reassemble all the parts N B For the sweeping versions the water system filter is located on the right of the machine N B to adjust the intensity of the solution jet from the...

Page 30: ...s the squeegee therefore the splash guard rubber blades need to be checked To replace the brush head splash guards proceed as follows 1 Take the machine to the maintenance area 2 Make sure the machine...

Page 31: ...essed the brush head body and the squeegee body will begin to descend into their working positions 7 As soon as the brush head and the squeegee have reached their working positions perform the procedu...

Page 32: ...sition carry out the procedures for securing the machine see the section SECURING THE MACHINE 7 Go to the right side of the machine 8 Using the right equipment not supplied with the machine loosen the...

Page 33: ...Function Main Contactor Faulty CC X AL_46 Function Overcurrent Outputs Brushes 1 2 3 X AL_47 Function Overcurrent Outputs vacuum Cleaner 1 2 X AL_48 Function Overcurrent Outputs Water Pumps X AL_49 F...

Page 34: ...is an issue on the drive pedal Contact your nearest service centre INSUFFICIENT DETERGENT SOLUTION ON THE BRUSHES The quantity of detergent solution in the water system is not sufficient for the work...

Page 35: ...36...

Page 36: ......

Reviews: