5
■
Do not touch the heating element. The heating element becomes very hot during use and leads to
burns when touched.
■
Let attachments cool down after using with hot air. Hot air heats up attachments and that can cause
burns when touched.
■
The heating element of the appliance can ignite highly flammable and combustible materials. Use the
appliance away from explosive, highly flammable and combustible materials.
■
Only use accessories that were supplied with the appliance. Accessories that are not compatible with
the appliance increase the risk of injury.
5.6.3 LED light
■
Do not look directly into the LED light!
■
Do not look into the beam directly or with optical instruments!
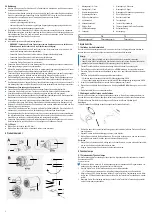
6 Product overview
1
2
3
4
5
7
8
9
10
12
13
14
15
16
19
20
18
6
11
17
1
Massage head - U-head
2
Massage head - Spiral
3
Massage head - Flat
4
Massage head - Ball
5
Body massager attachment
6
Scalp massager head
7
Scalp massager attachment
8
Hair dryer nozzle
9
Hair dryer diffuser
10
Hair dryer attachment
11
Power unit
12
Flashlight
13
Battery indicator
14
Flashlight button
15
On/Off button
16
Gear button
17
Power indicator
18
Attachment mount
19
Charger
20
Power supply socket
A
B
C
Body massager
Scalp massager
Hair dryer
7 Getting started
7.1 Charging the power unit
Before you can use the power unit to operate attachments, you must charge it.
Important:
– Fully charge the battery before using the product for the first time.
– Do not charge immediately after use. Let the power unit rest for at least 30 minutes before char-
ging.
1. Insert the attachment mount of the power unit into the charger.
2. Rotate the power unit towards
LOCK
until it locks.
3. Connect the round plug of the power supply cable into the power supply socket on the charger.
4. Connect the power adaptor to a suitable mains socket.
à
The battery indicator flashes GREEN while charging.
à
The battery indicator is lit GREEN when the battery is fully charged.
5. When the battery is charged, disconnect the plug from the charging socket.
6. Rotate the power unit towards
UNLOCK
to unlock it.
à
The power unit is ready for use.
7.2 Attaching and removing attachments
Before you can use attachments (example: body massager), you must attach them to the power unit. All
attachments are attached and removed in the same way.
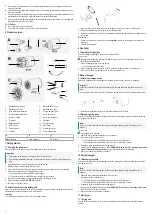
Attaching
The below figure outlines the process of attaching attachments.
1. Align the arrow on the attachment mount of the power unit with the arrow on the attachment.
2. Insert the attachment mount into the bottom of the attachment.
3. Rotate the power unit in the direction of the
<lock>
symbol on the attachment until the attachment is
fully locked.
Removing
1. Rotate the power unit in the direction of the
<unlocked>
symbol on the attachment to release the
power unit.
2. Remove the power unit.
8 Flashlight
8.1 Operating the flashlight
You can operate the flashlight in two modes: constant and SOS.
P
RECONDITIONS
:
a
No attachment (example: massager) is attached to the power unit. The flashlight does not work in
combination with attachments.
1. Push the flashlight button to turn the light on.
à
The constant mode is activated.
2. Push the flashlight button to activate the SOS mode. Push again to return to constant mode.
3. After use, hold down the flashlight button until the light switches off.
9 Body massager
9.1 Attaching massage heads
Before you massage, attach a massage head suitable for the body part you want to massage.
Important:
Consult a professional if you are unsure about which massage heads are suitable for which body
parts.
The below figure outlines the procedure of attaching massage heads to the body massager attachment.
1. Insert the massage head into the body massager attachment until it locks.
9.2 Massaging body parts
After you have attached a suitable massage head, switch the massager on, select a suitable speed and
start massaging body parts.
Note:
After 15 minutes of uninterrupted use, the motor switches off automatically. Restart the motor if
needed.
P
RECONDITIONS
:
a
A massage head is attached.
1. Attach the body massager attachment to the power unit.
2. Press the on/off button to switch on.
à
The battery indicator is lit GREEN if the power unit has sufficient power.
à
The battery indicator flashes RED if the power unit is discharged. Charge it.
3. Repeatedly press the gear button to change speeds.
4. Gently apply the massage head to your body.
WARNING! Risk of injury! Do not apply to sensitive
areas or areas with little muscle tissue.
If you feel unwell, stop use immediately.
5. After use, press the on/off button to switch off.
10 Scalp massager
10.1 Massaging the scalp
After you have attached the scalp massager, switch the massager on, select a suitable speed and start
massaging the scalp.
Note:
After 15 minutes of uninterrupted use, the motor switches off automatically. Restart the motor if
needed.
1. Attach the scalp massager attachment to the power unit.
2. Press the on/off button to switch on.
à
The battery indicator is lit GREEN if the power unit has sufficient power.
à
The battery indicator flashes RED if the power unit is discharged. Charge it.
3. Repeatedly press the gear button to change speeds.
4. Gently apply the massage head to your scalp.
WARNING! Risk of injury! Do not apply with force.
If you feel unwell, stop use immediately.
5. After use, press the on/off button to switch off.
11 Hair dryer
11.1 Drying hair
Use the hair dryer attachment to dry your hair. Attach the nozzle or the diffuser to the attachment as
needed.

