µ
F
10
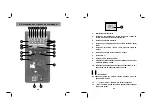
1.
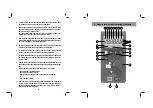
power On / Off
2.
key to change DC and AC between Volts
3.
key for manual range change
4.
key for MIN-MAX recording function
5.
key "HOLD" to freeze a measuring value
6.
rotary function switch
7.
Com (-) - input socket (Com or negative terminal)
8.
V-Ohm-(+)-input socket (= positive terminal)
9.
LC-Display (4 1/2 digit, maximum display value 19999)
10.
Overflow - Display
If "OFL" is displayed this means exceeding of range
Attention!
Don’t exceed the maximum input ratings.
11.
"-" minus sign or sign for negative polarity
12.
BAT = battery symbol
If this symbol is displayed it is time to change the battery
13.
"R" MIN-MAX reording-function on
13a
recording of maximum values
13b
recording of minimum values
14.
"STBY" This symbol appears, when the multimeter is set to the
Standby mode
15.
acoustic continuity check
16.
diode test
17.
"HOLD" If this symbol is displayed the measuring value is stored.
It won’t change even if you remove the measuring cables from the
measuring object or from the measuring unit.
18.
measurement units
19.
analog bargraph display with 41 segments = tendency display
(twice the speed of the digital display)
19a
polarity display of the bargraph
19b
overflow display of the bargraph
4. Operation of the Multimeter
4.1 Changing the Battery
To guarantee precise measurement, insert a 9 V battery. If the battery
symbol appears in the display, it is time to change the battery.
Proceed as follows:
Separate your measuring unit from the measuring circuit. Remove the
test leads from the measuring unit and turn off the power. Carefully
remove the rubber holster from the measuring unit.
Switch off the DMM and remove the screws on the reverse side of the
cabinet (bottom part of the cabinet) with a suitable screw driver. Now
carefully lift the bottom part of the cabinet (cover of the compartement).
Separate the old battery from the battery snap and fasten a new one
of the same type (see technical data).
After the battery has been changed reinsert the battery into the
7
8


