


Intended use
The product is a wrist watch displaying hours and minutes. Displaying the time is realized by LEDs.
The watch is not suitable for showering, bathing, swimming or diving, during these activities remove it for
protection.
No part of the product should be modi
fi
ed or reassembled.
Read the user manual carefully and fully before using the product for the
fi
rst time, pay attention to all the
safety instructions and information in this user manual.
This product complies with the national and european statutory requirements. All names of companies and
products are the trademarks of the respective owner. All rights reserved.
Package Contents
• Wrist watch with battery inserted
• Operating Instructions
Safety Instructions
Please read all the instructions before using this device, they include important informa-
tion on its correct operation. The warranty will be void in the event of damage caused
by failure to observe these safety instructions! We do not assume any liability for any
consequential damage!
Nor do we assume any liability for material and personal damage caused by improper use
or non-compliance with the safety instructions! The warranty will be void in such cases.
The unauthorized conversion and/or modi
fi
cation of the product is inadmissible for reasons of
safety and approval (CE).
The product is not a toy and should be kept out of the reach of children. The product contains
glass parts (the display). Moreover, it contains small parts that can be swallowed, and a battery.
Do not carelessly leave the packaging material lying around since it could become a dangerous
plaything for children.
Handle the product with care; knocks, blows or even a fall from a low height can damage it.
Battery notes
• Batteries should be kept out of children’s reach.
• Do not leave batteries lying around in the open; there is a risk of them being swallowed by children or
domestic animals. If swallowed, consult a doctor immediately. This presents a danger to life!
• Leaking or damaged batteries can lead to caustic burning of the skin. Therefore, use suitable protective
gloves.
• Ensure that the batteries are never short-circuited, taken apart or thrown into a
fi
re. There is a risk of
explosion!
• Replace a discharged battery as soon as possible with a new one, or remove the used battery from the
watch. A discharged battery may leak and damage the watch!
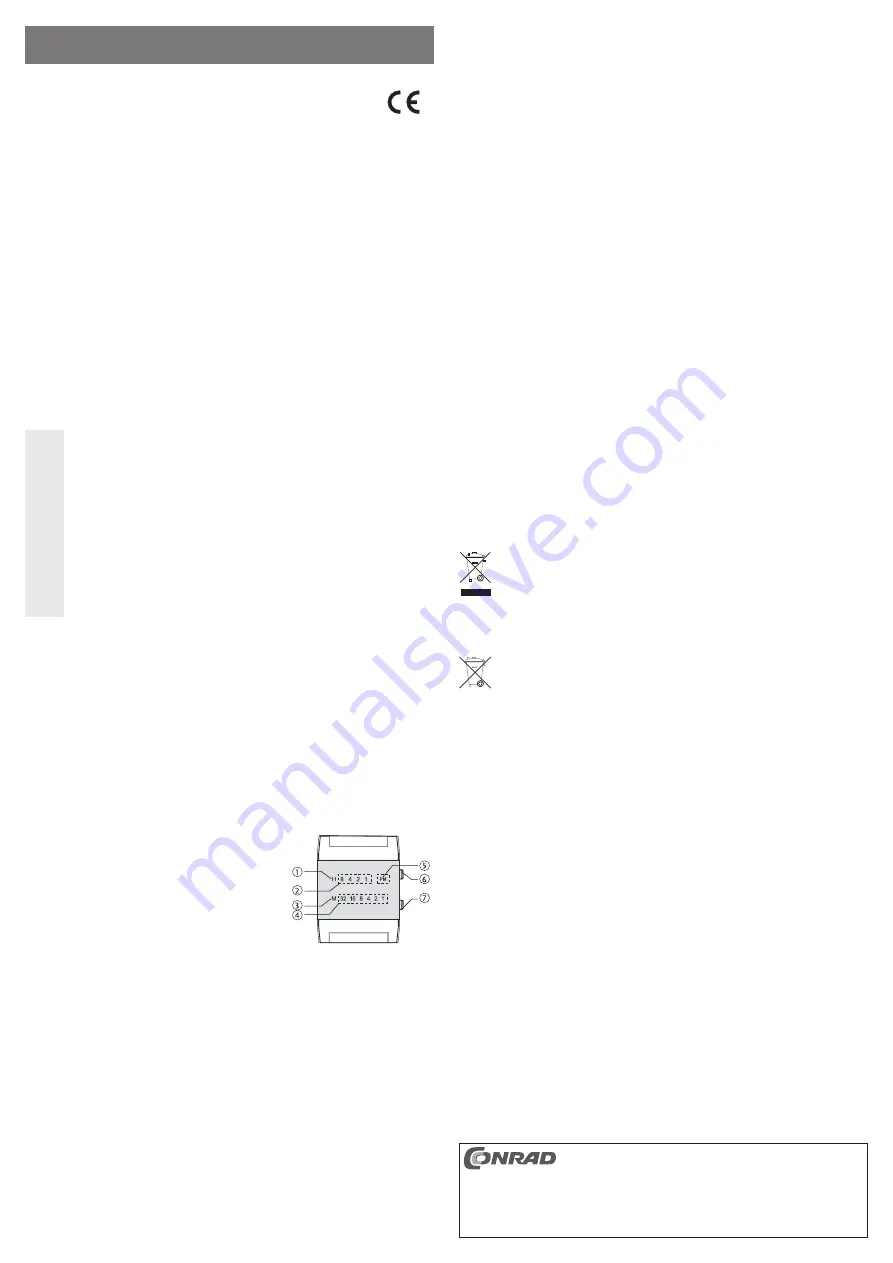
Controls
1 LED ”H“
2 LEDs for the hour display of “8”, “4”, “2”, “1”
3 LED “M”
4 LEDs for the minute display of “32”, “16”, “4”, “2”, “1”
5 LED “PM” for the second half of the day
6 “MODE” button
7 “ADJ” button
Displaying the time
Press any key brie
fl
y to turn it on (“MODE” or “ADJ”). The LEDs of hours and minutes will light up for a few
seconds (in the second half of the day the “PM” LED will light up, too) and will then be extinguished.
In order to see the correct time of the day add each of the lit up numbers.
Example:
In the upper line “H” the LEDs “8”, “2” and “1” are lit: Hours = 8+2+1 = 11
In the lower line “M” the LEDs “32”, “8” and “2” are lit: Minutes = 32+8+2 = 42
Result: 11.42 o’clock
Setting the Time
• Brie
fl
y press any button to display the time.
• Keep the button “MODE” (6) impressed for about 2 seconds until the LED “H” (1) is
fl
ashing.
• Set the hours by using the “ADJ” button (7) (keep it pressed in order to start the fast skip mode). For the
correct hours the respective LEDs have to light up, like, e.g. the three LEDs “8”, “2” and “1” for 11 o’clock.
☞
The LED “PM” will light during the second half of the day.
• Brie
fl
y press the “MODE” button (6) and the LED “M” (3)
fl
ashes.
• Set the minutes by using the “ADJ” button (7) (keep it pressed in order to start the fast skip mode). For
the correct minutes the respective LEDs have to light up, like, e.g. the three LEDs “32”, “8” and “2” for
42 minutes.
• Press the button “MODE” (6) brie
fl
y again and the setting will be saved and the settings mode is closed.
☞
Please
note:
If there is no button pressed for about 30 seconds the settings mode is closed automatically;
possible settings will not be saved!
Replacing the Battery
If the LEDs no longer light up when pressing any button the battery has to be replaced.
Replacing the battery should be done by a specialist, using special clockmaker tools and professional know-
ledge.
To replace the battery, the bottom of the housing is removed (
fi
xed by screws). The battery can then be
removed from its holder and be replaced.
Water and shock tightness
This watch is designed for normal use only. It must not be exposed to extreme shocks and impacts. Doing so
the electronics can be damaged; furthermore the display is damaged or even destroyed.
The watch is designed so that everyday contact with water spray (e.g., rain drops, etc.) has no adverse
effect.
The watch is not suitable for swimming, showering or diving. The watch must not be dunked into
water; it must not be cleaned under running water!
Disposal
a) In general
When disposing of an unserviceable product, do so in keeping with the relevant statutory regu-
lations.
b) Disposal of used batteries/rechargeable batteries
As the end user, you are required by law (Battery Ordinance) to return all used batteries/rechargeable batte-
ries; disposal of them in the household waste is prohibited.
Batteries/rechargeable batteries containing harmful substances are marked with the following
symbol, which points out that disposal in the domestic waste is prohibited. The symbols for the
relevant heavy metals are: Cd = cadmium, Hg = mercury, Pb = lead.
You can return used batteries/rechargeable batteries free of charge to any collecting point of your local
authority, to our stores or to any other store where batteries/rechargeable batteries are sold.
You thus ful
fi
l your statutory obligations and contribute to the protection of the environment.
Technical Data
Battery type: .......................1x CR2032
Battery life: ..........................About 1 year (depending on the use of the LEDs)
Weight: ...............................Approx. 37g
O P E R A T I N G I N S T R U C T I O N S www.conrad.com
LCD Wristwatch
Item no. 67 20 06 (red)
Item no. 67 27 04 (blue)
Version 03/12
These operating instructions are a publication by Conrad Electronic SE, Klaus-Conrad-Str. 1,
D-92240 Hirschau (www.conrad.com).
All rights including translation reserved. Reproduction by any method, e.g. photocopy, micro
fi
lming,
or the capture in electronic data processing systems require the prior written approval by the editor.
Reprinting, also in part, is prohibited.
These operating instructions represent the technical status at the time of printing. Changes in
technology and equipment reserved.
© Copyright 2012 by Conrad Electronic SE.


