These operating instructions are a publication by Conrad Electronic SE, Klaus-Conrad-Str. 1,
D-92240 Hirschau (www.conrad.com).
All rights including translation reserved. Reproduction by any method, e.g. photocopy, micro
fi
lming,
or the capture in electronic data processing systems require the prior written approval by the editor.
Reprinting, also in part, is prohibited.
These operating instructions represent the technical status at the time of printing. Changes in
technology and equipment reserved.
© Copyright 2011 by Conrad Electronic SE.
Maintenance and Care
Apart from replacing the battery, the device requires no maintenance. Clean the exterior of the product only
with a soft, dry cloth or brush.
Never use caustic cleaning agents or chemical solutions, as they could damage the surface of the case.
Do not press on the sensitive display surface.
Disposal
Dispose of the product at the end of its service life in accordance with the current statutory
regulations.
Disposal of used batteries/storage batteries
As the end user, you are required by law (Battery Ordinance) to return all used batteries/re-
chargeable batteries; disposal of them in the household waste is prohibited.
Contaminated batteries/rechargeable batteries are labelled with these symbols to indicate that
disposal in the domestic waste is forbidden. The symbols for the relevant heavy metals are: Cd
= Cadmium, Hg = Mercury, Pb = Lead. You can return used batteries/rechargeable batteries free
of charge to any collecting point of your local authority, to our stores or to any other store where
batteries/rechargeable batteries are sold.
You thereby ful
fi
l your statutory obligations and contribute to the protection of the environment.
Technical Data
Operating voltage.............. ...................3 V/DC
Batteries............................ ................... 2 x 1.5 V Mignon batteries (AA)
Order No: 65 25 02 (order 2x)
Battery life.......................... ...................approx. 2 years
Time protocol..................... ...................DCF
Temperature measuring range .............0 °C to +50 °C
Resolution.......................... ...................0.1 °C
Dimensions........................ ...................204 x 204 x 32 mm
Weight............................... ...................374 g
Declaration of Conformity
We, Conrad Electronic, Klaus-Conrad-Straße 1, 92240 Hirschau, hereby declare that this product adheres to
the fundamental requirements and the other relevant regulations of Directive 1999/5/EC.
☞
You
can
fi
nd the conformity declaration for this product at www.conrad.com.
☞
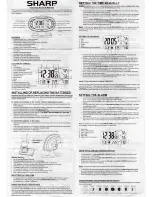
The languages available for the weekday display are:
English (EN), German (GE), French (FR), Spanish (ES), Italian (IT), Dutch (NE) and Danish
(DA).
• Press the MODE/SET (B2) button again to save the settings.
• The time zone setting needs to be adjusted only if the time zone differs from the DCF time zone. Other-
wise, leave the time zone at the value 00.
12/24 hour display
• Press the +(12/24) (B3) button to switch between the 12h and the 24h display.
Thermometer
The clock is equipped with a thermometer that shows the room temperature in the temperature display (A5).
• Press the –(°C/°F) (B5) button to switch between the display in °C und °F.
• If the temperature lies outside the measurement range, the temperature display (A5) shows “LL.L” (tem-
perature too low) or “HH.H” (temperature too high).
Alarm function
The clock features an alarm function.
Programming the alarm time
• Press the button MODE/SET (B2) once, until the display shows the alarm time (AL).
• Press and hold the MODE/SET button (B2) until the hour display of the alarm time blinks.
• Set the hours by using the b(12/24) (B3) and –(°C/°F) (B5).
• Press the button MODE/SET (B2) again. The minute display blinks.
• Set the minutes by using the b(12/24) (B3) and –(°C/°F) (B5).
• Press the MODE/SET (B2) button again to save the settings.
Activating the alarm function
• Push the ALM ON/OFF (B6) button once to activate or deactivate the normal alarm function.
• The alarm symbol appears on the display.
• Push the ALM ON/OFF (B6) button twice to activate the alarm with snooze function.
• The alarm symbol appears on the display, together with the snooze symbol “Z
z
”.
• Press any button to switch off the alarm tone when the alarm goes off.
• To interrupt the alarm tone when the alarm goes off and the snooze function is activated, press the
SNOOZE button (B4). The alarm tone then resumes after 5 minutes.
• To turn off the alarm tone entirely when the snooze function is activated, press any button except SNOOZE
(B4).
Troubleshooting
By purchasing this radio wall clock, you have acquired a product with state-of-the-art design that is opera-
tionally reliable.
Nevertheless, problems or faults may occur.
Therefore, we would like to describe here how to solve any problems:
The clock does not synchronise or only has temporary reception:
• The distance to the DCF transmitter is too great or restricted by geographical conditions.
• Relocate the product; switch off interfering devices such as TV sets, computers or microwave ovens.
• Avoid a location in the vicinity of large metal surfaces, which may shield the radio signals. Windows with a
vapour-deposited metal layer can also in
fl
uence the signal reception.
• Place the clock near a window for synchronisation, and align the front or rear side in the direction of
Frankfurt (Germany).
• Leave the clock switched on over night to avoid atmospheric interference.
The displayed temperatures are not correct:
• The clock is exposed to direct sunlight.
• The clock is located too close to a heat source (heater, electronic device, etc.)
The display shows confused symbols or nothing is displayed at all:
• Press the RESET button (B1). The built-in microprocessor is reset and the clock goes back into the DCF
reception mode.
The device does not react when buttons are pressed:
• During DCF synchronisation the buttons are disabled. Wait until the synchronisation has completed or stop
it manually. To do this, press and hold the b(12/24) (B3) and –(°C/°F) (B5) at the same time for
about 3 seconds.