


These operating instructions are a publication by Conrad Electronic SE, Klaus-Conrad-Str. 1,
D-92240 Hirschau (www.conrad.com).
All rights including translation reserved. Reproduction by any method, e.g. photocopy, micro
fi
lming,
or the capture in electronic data processing systems require the prior written approval by the editor.
Reprinting, also in part, is prohibited.
These operating instructions represent the technical status at the time of printing. Changes in
technology and equipment reserved.
© Copyright 2011 by Conrad Electronic SE.
The radio projection clock searches each night for the DCF that is present with the fewest disturbances.
When no DCF reception is possible at the installation site (e.g., in basements, or in buildings with steel structures,
etc.), then you can also set the time and date manually; see below.
Manual search for DCF signal
A DCF reception search can be started manually by pressing the “SET/WAVE” button (A) brie
fl
y.
In the lower display, the symbol “ ” resp. “
” starts blinking. The latter indicates that a DCF signal is being
received. This process lasts approx. 10 minutes. In case of successful reception, the symbols “
” and “
” are
indicated, and a short tone is emitted.
If the symbol “
” does not appear and only “ ” for the symbol strength icon, then no DCF signal is recognized.
Then, set the time and date manually; see the next section.
Setting the time zone, the language for the day of the week, the date and time
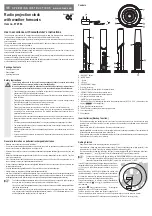
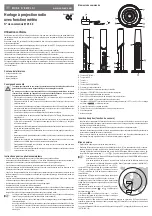
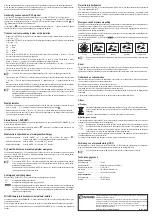
• Hold the “SET/WAVE” button (A) in until the time zone blinks on the display. Set the time zone with the “+“ (D) and
“-“ (C) buttons.
•
Brie
fl
y press the “SET/WAVE” button (A); the language for displaying the day of the week blinks. Set the language
with the “+“ (D) and “-“ (C) buttons.
“EN” = English
“GE” = German
“IT” = Italian
“FR” = French
•
Brie
fl
y press the “SET/WAVE” button; the year blinks. Set the year using the “+” (D) resp. “-” (C) button (keep it
pressed to enter the quick adjustment mode).
•
Brie
fl
y press the “SET/WAVE” button (A); the date blinks (“M” = Month, “D” = Day). Set the date using the “+” (D)
resp. “-” (C) button (keep it pressed to enter the quick adjustment mode).
•
Brie
fl
y press the “SET/WAVE” button; the time blinks. Set the time using the “+” (D) resp. “-” (C) button (keep it
pressed to enter the quick adjustment mode).
•
Brie
fl
y press the “SET/WAVE” button; then “24HR” resp. “12HR” blinks. With the buttons “+” (D) resp. “-” (C), you
can switch between the 24h and 12h modes.
☞
In the 12h mode, the text “PM” appears in the display to the left of the time during the second half of the
day.
•
Brie
fl
y press the “SET/WAVE” button; the internal temperature blinks. With the buttons “+” (D) resp. “-” (C), you can
switch between the “°C” (Degrees Celsius) and “°F” (Degrees Fahrenheit) modes.
•
Press the “SET/WAVE” button (A) one more time to leave the setting mode. If you press no key for a long time, the
setting is automatically terminated, and all previous settings will be saved.
☞
After the beginning of the setting, the DCF reception is automatically deactivated. If DCF reception oc-
curs again, start a manual search for the DCF signal; see the corresponding section in this user manual.
The settings for the language for displaying the weekday, the temperature unit °C/°F and the 12h/24h
mode are retained.
Setting the alarm
• If the radio projection clock is in the normal display (and not in the setting mode), brie
fl
y press the “+” (D) resp. “-”
(C) button. In the display, the alarm time blinks and below it appears “
”.
•
Set the alarm time using the “+” (D) resp. “-” (C) button (keep it pressed to enter the quick adjustment mode).
• Do not press any buttons for a few seconds, so that the alarm time is saved and the display returns to normal
(showing the time).
Snooze function (“SNOOZE”)
When the alarm is activated at the preset alarm time, you can activate the snooze function by brie
fl
y pressing the
“SNOOZE/DIMMER” button (E).
The alarm is interrupted for 5 minutes (the symbol “
” blinks) and then reactivated. The alarm can be interrupted
up to 3 times.
Activating/deactivating the alarm function, turning off the alarm
•
Activating the alarm:
Slide the “ALARM” switch (K) to the “ON” position (the symbol “
”
appears in the display); the alarm begins at the set time
• Deactivating the alarm:
Slide the “ALARM” switch (K) to the “OFF” position
• Turning off the alarm:
Slide the “ALARM” switch (K) to the “OFF” position
Displaying the time, alarm time, date and internal temperature
If the radio projection clock is in the normal display (and not in the setting mode), repeatedly press the “MODE”
button (B). Then you can switch between the display of the time, the alarm time, the date, the day of the week and
the internal temperature.
The LC display returns to displaying the time after a few seconds.
☞
If you have held the “MODE” button (B) for about 2 seconds, the radio projection clock emits a beep.
Then the display in the LC display automatically switches between the time, the alarm time, the date,
the day of the week and the internal temperature.
Deactivate this function by holding the “MODE” button (B) in for about 2 seconds again, until the radio
projection clock emits a beep.
Selecting the backlighting
With the “BACKLIGHT” switch (L) you can switch between different settings:
“OFF”
Backlighting off
“LO”
Backlighting activated, low brightness
„
” Backlighting activated, normal brightness; otherwise the higher part of the radio projection clock is
illuminated in color (the color depends on the weather forecast; see section “Display of the weather
forecast”); the colored illuminating is deactivated when the white LED illumination is off
Turning the white LED light on/off, setting the brightness
Brie
fl
y press the “SNOOZE/DIMMER” button (E), so the white LED light in the upper part of the radio projection
clock is activated.
Brie
fl
y press the button several more times to switch between the different brightness levels.
To turn off the white LED light, hold the “SNOOZE/DIMMER” button (E) in for about 2 seconds.
Turning the projection on/off
With the “PROJECTION” switch (H), the integrated LED projector (F) on the upper side can be turned on (“ON”) or
off (“OFF”).
The distance between the projector and the area on which the projection is directed should be at least 1 m, as
otherwise the type is too blurry to read. Make sure that the protector of the projector (F) has been removed from the
top side of the radio projection clock.
Displaying the weather forecast
The weather forecast is based on the observation of the atmospheric pressure over the past hours and the estimation
for the next 12 hours. An accuracy of up to 70% is thus achieved.
After commissioning, the radio projection clock requires about 24 hours to take
fi
rst measurements and estimate a
weather forecast from them.
In areas with frequent rapid changes in air pressure (e.g., mountains), less accurate predictions are obtained than
in areas with slow changes.
When you set the “BACKLIGHT” switch (L) to the position “
”, each weather forecast symbol is indicated
by its own color.
Red
Orange/Amber
Green
Blue
Purple
Sunny
Partly cloudy
Cloudy
Rainfall
Storm/Severe
weather
☞
The display does not give the current weather, but the weather forecast for the next 12 hours.
Reset
If weird characters appear on the display or the buttons no longer react to use, press the “RESET” button (N), e.g.,
with a toothpick. Thus, all settings will be deleted.
Alternatively, the radio projection clock can be removed from the AC adapter; also remove the batteries.
Maintenance and Cleaning
Apart from the the occasional battery change, the product is maintenance-free for you. Repair or maintenance work
must be carried out by a specialist.
Clean the product with a soft, clean, dry cloth.
Never use aggressive cleaning agents or chemical solutions because these might damage the surface of the casing
or impair the operation.
Do not push the projector opening or the display too hard, as this leads to scratches. This could also damage the
display.
Dust can be very easily removed with a soft, clean brush and a vacuum cleaner.
Disposal
a) Product
Electronic devices are recyclable waste materials and must not be disposed of in the household waste!
Dispose of the unserviceable product according to the relevant statutory regulations.
Remove any inserted battery and dispose of it separately from the product.
b) Batteries and Rechargeable Batteries
The end user is legally obliged (Battery Regulation) to return used batteries and rechargeable batteries. Do not
dispose of used batteries in the household waste!
Contaminated batteries/rechargeable batteries are labelled with these symbols to indicate that disposal
in the domestic waste is forbidden. The symbols for the relevant heavy metals are: Cd=cadmium,
Hg=mercury, Pb=lead (marking can be seen on the battery/rechargeable battery, e.g., underneath the
refuse bin symbol shown on the left).
You can dispose of your used batteries/rechargeable batteries free of charge at your community’s collection point or
any place where batteries/rechargeable batteries are sold!
You thereby ful
fi
l your statutory obligations and contribute to the protection of the environment.
Declaration of Conformity (DOC)
We, Conrad Electronic, Klaus-Conrad-Straße 1, D-92240 Hirschau, hereby declare that this product conforms to the
fundamental requirements and the other relevant regulations of the directive 1999/5/EC.
☞
The Declaration of Conformity (DOC) for this product can be found at www.conrad.com.
Technical Data
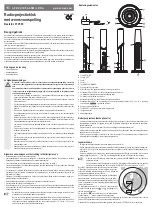
Wireless projection clock:
Operating voltage ............................12 V/AC
Backup battery .................................4 batteries of type AAA/Micro
Temperature measurement range ...0 °C to +40 °C
Dimensions ......................................128 x 400 mm (Ø x H)
Weight .............................................approx. 584 g (without batteries)
Power transformer:
Operating voltage ............................230 V/AC, 50 Hz
Output ..............................................12 V/AC, 350 mA