background image


Wall Mounting


1. 

Remove the front cover (2 screws on the side and 2 screws on the bottom). 

2. 

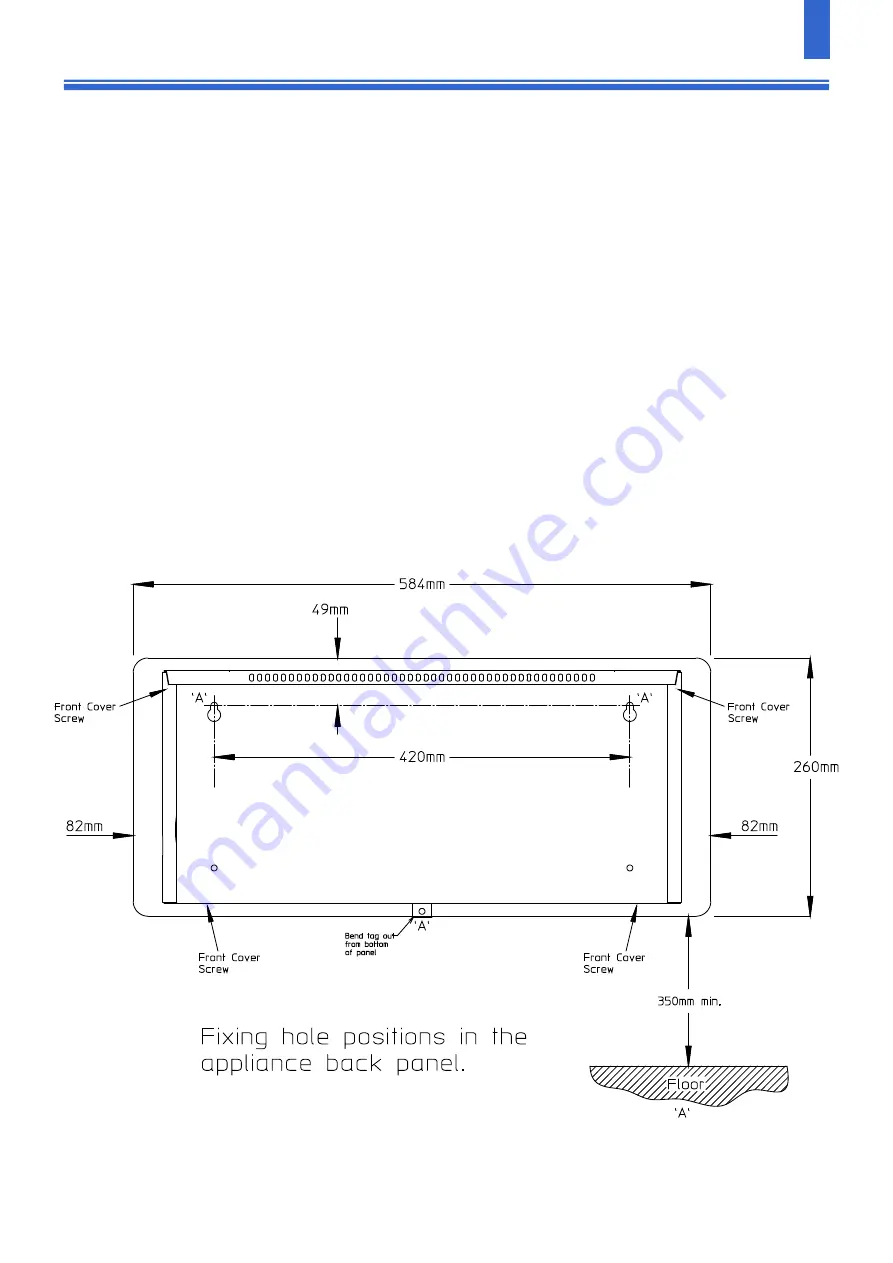
Mark top 2 screw fixing positions ‘A’ in accordance with the dimension shown on the diagram. The 

unit must be screwed to the wall with 3 screws through the holes provided in the case. Drill 2 holes in 
the wall to suit No 10 wood screws (round head) and insert wall plugs. At the top 2 screw positions 

‘A’ screws can now be screwed in until the heads are approximately 5mm from the wall. The unit 

can now be hung on these two screws and the position of the third bottom fixing marked on the 

wall. Remove the unit from the wall and drill a third fixing hole in the position marked and insert a 

wall plug.  The unit can now be hung on the wall and the third screw screwed in.  Before tightening 

all three screws ensure the unit is horizontal.  

3. 

Refit front cover.  Ensure grille bars internal/external are spaced equally. 


OPTIMUM MOUNTING HEIGHT IS 400mm FROM THE FLOOR.  

NOTE:  

- MINIMUM CLEARANCE FROM THE FLOOR IS 200mm.  

- IF THE HEATER IS MOUNTED AT HIGH LEVEL, THE MINIMUM DISTANCE FROM THE CEILING IS 1000mm. 

- THE HEATER MUST NOT BE LOCATED IMMEDIATELY  BELOW A FIXED SOCKET OUTLET.  

58000388 Iss 02 

Summary of Contents for WMH3SL

Page 1: ... electricity supply or subject to misuse neglect damage or modified or repaired by any person not authorised by us This guarantee is offered to you as an extra benefit and does not affect your legal rights The correct electricity supply voltage is shown on the rating label attached to the appliance Reasonable care has been taken to ensure that this guide is accurate at the time of printing In the ...

Page 2: ...s a risk of overheating Cleaning Always disconnect the heater from the mains before cleaning The heater should not require any maintenance but it is strongly advised that it is kept clean An occasional wipe over with a soft cloth is all that should be necessary Do NOT use metal or furniture polish on any part of the heater Do NOT touch the heater with wet hands or in any way bring water into conta...

Page 3: ...n now be hung on these two screws and the position of the third bottom fixing marked on the wall Remove the unit from the wall and drill a third fixing hole in the position marked and insert a wall plug The unit can now be hung on the wall and the third screw screwed in Before tightening all three screws ensure the unit is horizontal 3 Refit front cover Ensure grille bars internal external are spa...

Page 4: ...1 Registered Company No FM12671 58000388 Iss 02 Operation When the appliance is connected to the mains supply the LED indicator will light up green showing that the power is available to the unit When the heat output has been enabled by a controller the LED indicator light will turn red This heater can only be used in conjunction with any SL wireless controller Each SL controller can control any n...

Reviews: