background image

Introduction

Getting Ready

Taking Pictures

Playback

Set Up

EN-14

NEXT

NEXT

Contents

Glossary

Index

Nomenclature

Menus and Settings

Troubleshooting

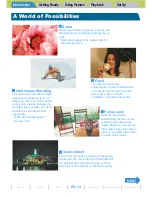
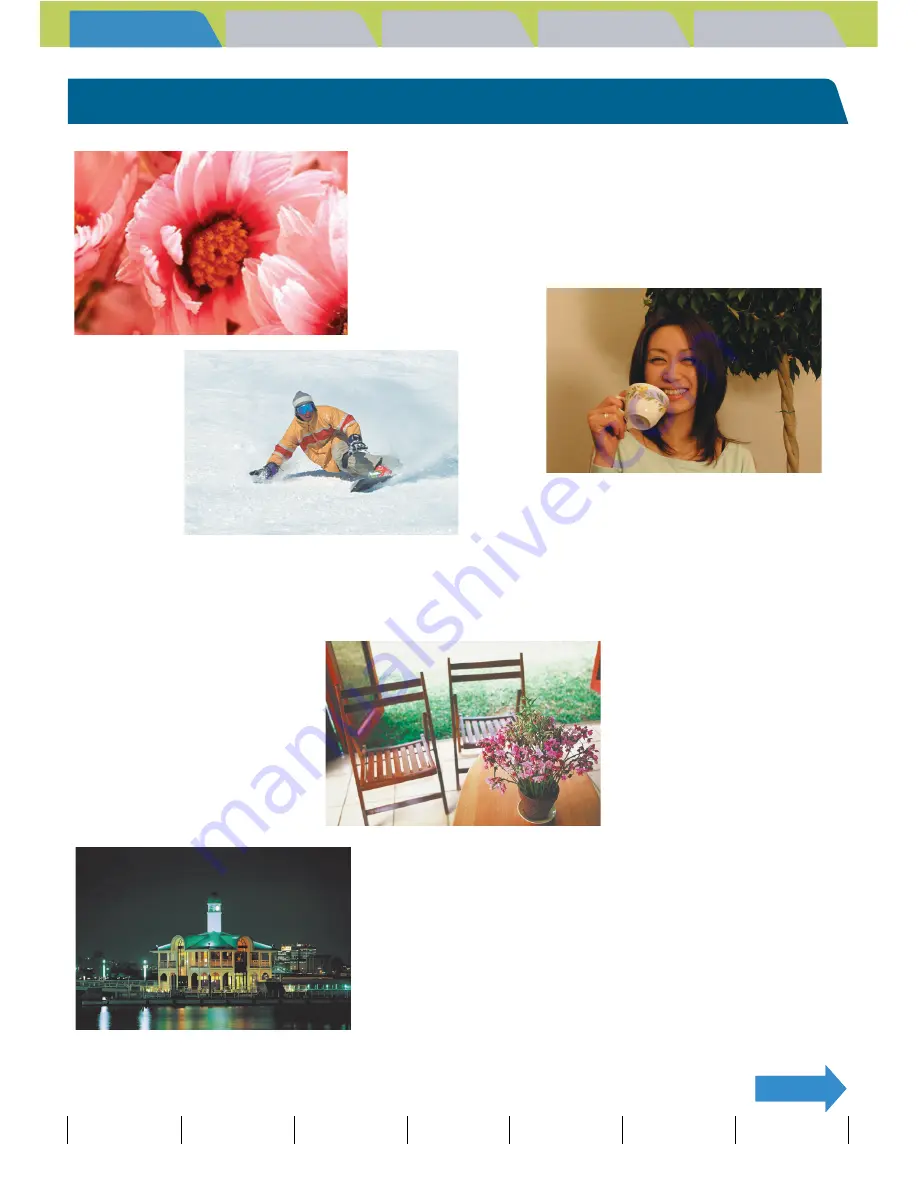
A World of Possibilities

„

 Zoom

When you are taking a picture, you can use 
the digital zoom to enlarge the image by up 
to 6x.
* Restrictions apply to the digital zoom for 

some image sizes.

„

 Continuous Shooting

This feature lets you shoot a rapid 
sequence of photos at up to 3.0 
frames per second.* This is useful 
when you are taking pictures of a 
moving subject or when you don't 
want to miss a sudden photo 
opportunity.
* When using a high-speed 

memory card.

„

 Flash

The camera's flash fires 
automatically in dark conditions. But 
you can also set the flash so that it 
always fires, even in bright 
conditions, or so that it never fires.

„

 Focus Lock

Normally, the camera 
automatically focuses on the 
subject in the center of the 
image. However, you can use 
focus lock to have the camera 
focus on a subject that is off to 
one side of the image.

„

 Scene Select

Scene Select provides a range of photography 
modes you can choose from, with settings that 
are optimized for particular scenes, such as 
sporting events, portraits or nighttime scenery.

Summary of Contents for I4R

Page 1: ...attery Pack EN 26 Charging the Battery EN 27 Inserting the Memory Card EN 28 Write Protect Switch SD Memory Cards only EN 29 Removing the Memory Card EN 30 Turning the Camera On EN 31 Turning the Came...

Page 2: ...sing Macro Mode EN 56 k Using the Self Timer EN 57 Using Zoom Wide angle and Telephoto EN 59 Using the Flash EN 60 Flash Modes EN 60 Setting the Flash Mode EN 61 Flash settings for each mode EN 62 Eff...

Page 3: ...RASE ALL EN 103 U Protecting Images from Accidental Erasing PROTECT EN 104 Protecting an image EN 104 Unprotecting an image EN 105 Tips for Erasing Images Using PROTECT and ERASE ALL EN 106 p Adding S...

Page 4: ...a Slideshow Auto Play EN 153 U Protecting Images from Accidental Erasing PROTECT EN 156 J Erasing individual images ERASE EN 158 Set Up EN 159 AF MODE Setting the AF method EN 160 FORMAT Initializing...

Page 5: ...us and Settings Troubleshooting FILE NO Starting Image File Numbers from 0001 EN 181 MODE RESET Resetting Function Settings EN 183 List of Menu Items and Default Values EN 184 Troubleshooting EN 186 P...

Page 6: ...nt does cause harmful interference to radio or television reception which can be determined by turning the equipment off and on the user is encouraged to try to correct the interference by one or more...

Page 7: ...may result in death or personal injury if not followed properly FCAUTION This symbol indicates procedures which may result in injury to the user or physical damage to the product if not followed prope...

Page 8: ...ropped it may be damaged internally or parts may have been dislodged even when there is no visible external damage The camera must be taken to a Contax Service Center for checking Do not attempt to to...

Page 9: ...fashioned by the user This camera incorporates a safety circuit to protect its microcomputer against strong external static electricity Though rare it may fail to function because this safety circuit...

Page 10: ...to disassemble or modify batteries since they may generate heat emit smoke or flame or the internal battery liquid may enter your eyes causing blindness or other personal injury If battery liquid sho...

Page 11: ...ven if the camera is turned off a small current will flow and the battery will overly discharge This can result in the battery becoming unusable When you remove the battery pack from the camera the da...

Page 12: ...n away the dirt before reusing In the event that AC adapter plug emits smoke or unusual smell or sound or if it is damaged by impact or falling cease use immediately Continuing to use a damaged plug c...

Page 13: ...soft and Windows are registered trademarks of Microsoft Corporation in the United States and or other countries Macintosh Mac OS QuickTimeTM and the QuickTime logo are registered trademarks of Apple C...

Page 14: ...of a moving subject or when you don t want to miss a sudden photo opportunity When using a high speed memory card Flash The camera s flash fires automatically in dark conditions But you can also set t...

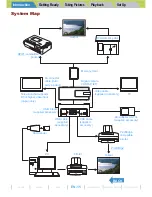
Page 15: ...tal camera CONTAX i4R AC adapter AC 73L supplied accessory Memory Card PictBridge compatible printer PictBridge Video cable supplied accessory TV DPOF compatible printer Print processing store Output...

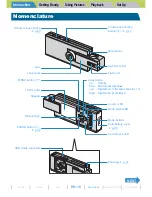
Page 16: ...rap lug p 37 Microphone Lens Flash unit Self timer LED Continuous shooting button N p 43 MENU button K 4 way button Up Flash F Down Macro Landscape O Left Digital Zoom b Reduces down to x1 0 Right Dig...

Page 17: ...corded images on the LCD monitor Images can also be resized and trimmed p 82 Shooting Still images The 4 0 megapixel high performance CCD enables you to shoot high quality still images p 39 Shooting M...

Page 18: ...ated USB cradle and USB cable gives you access to a wide range of uses for your images including using image retouching software to edit your images on a computer and sending them as attachments via e...

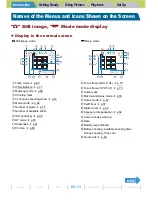
Page 19: ...r of pixels p 75 i Number of available shots o ISO sensitivity p 66 0 AF mode p 74 1 Sharpness p 81 2 Chroma p 80 M Movie mode 3 Focus frame MULTI AF p 70 4 Focus frame SPOT AF p 70 5 Audio mark 6 Mac...

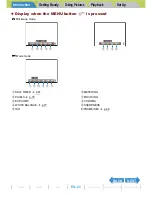
Page 20: ...clature Menus and Settings Troubleshooting z Display when the MENU button K is pressed C Still image mode M Movie mode q SELF TIMER p 57 w PIXELS p 75 e EXP COMP r WHITE BALANCE p 77 t ISO y METERING...

Page 21: ...y when the MENU button K is pressed q DISPLAY MODE p 87 w POSTRECORDING p 107 e PROTECT p 104 p 156 r ERASE p 100 p 158 t ERASE MULTIPLE p 101 y RESIZE p 111 u ROTATE p 118 p 153 i AUTO PLAY p 95 p 15...

Page 22: ...umbers and file names p 139 w File size e Number of pixels image size p 75 r Protection status t Whether or not voice is used y Shutter speed u Aperture Information Display Press the 4 way button up t...

Page 23: ...ng the self timer Lights When a movie is being shot When the shutter operates and shooting has ended does not light for continuous shots When the camera is set to Playback mode When the camera is set...

Page 24: ...C Still image mode M Movie mode Flashes rapidly Take particular care to avoid camera shake because a slow shutter speed is being used Flashes slowly The flash is currently charging Wait until the ligh...

Page 25: ...rt the battery pack BP 760S supplied with the camera Turn the battery stopper at the end of the battery pack in the direction of the arrow while inserting the battery pack as shown in the illustration...

Page 26: ...he card battery cover until it is stopped by the hinge rFully open the card battery cover 3 Rotate the battery stopper to unlock the battery pack When you turn the catch in the direction of the arrow...

Page 27: ...is inserted in the camera before charging BNote Refer to Using the USB Cradle p 36 for details on attaching the USB cradle A Important When you first purchase the camera you need to charge the batter...

Page 28: ...abeled side facing the lens side of the camera When inserting the card push it into the slot until it makes a clicking sound and stops 4 Close the card battery cover Push the card battery cover into t...

Page 29: ...this switch downward prevents any more files from being recorded onto the card and protects the images and files already stored on it If a write protected card is inserted into the camera in C or M m...

Page 30: ...it is stopped by the hinge rFully open the card battery cover 3 Push the memory card in gently with your fingertip When the memory card is pushed in slightly it pops back out and you can then remove...

Page 31: ...ease the cover The lens moves out of the camera and the startup screen is displayed on the LCD monitor Turning the Camera Off 1 Slide the lens cover towards the outer edge until it stops approximately...

Page 32: ...onitor is cleared and the lens is retracted into the camera Use the following procedure to operate the camera after the auto off function has been activated z When you want to close the lens cover Sli...

Page 33: ...the LCD monitor The amount of power consumed by a digital camera varies considerably depending on the environment in which it is being used Even if the battery level indicator shows that there is sti...

Page 34: ...y button up or down to select DATE then press right The details screen for setting the date and time appears 3 Press the 4 way button left or right to select the item to set Pressing the 4 way button...

Page 35: ...s the OK button E This completes the settings and the SET UP menu reappears BNote On this camera the date and time of shooting are stored on the memory card along with the image file Setting the date...

Page 36: ...he cradle in the direction shown in the illustration z Removing the camera from the USB cradle Take the camera and remove it from the USB cradle as shown in the illustration A Important Make sure the...

Page 37: ...layback Set Up EN 37 BACK Contents Glossary Index Nomenclature Menus and Settings Troubleshooting Attaching the Strap Attach the supplied strap as shown in the illustration Using the Camera Case Use t...

Page 38: ...e Size Adjusting Image Colors and Other Settings Taking Still Images Using Continuous Shooting Mode Shooting Movies Quickly Checking Your Shots Quick View Using Scene Modes Using Self Timer Using Zoom...

Page 39: ...y looking at the LCD monitor BNote Press the 4 way button right to zoom in on the image and left to zoom back out p 59 Avoiding camera shake Camera shake refers to the effect of images appearing blurr...

Page 40: ...f way again until the shooting mark Z stays lit and the focus is set When the focus frame p 70 is set to MULTI AF the selected focus frame turns green There is no selected focus frame displayed when t...

Page 41: ...ges on a memory card the MEMORY CARD FULL message appears on the LCD monitor When this happens try the following Erase any unwanted images Save your images onto a PC and then erase the images stored o...

Page 42: ...ra on a stable surface and use the self timer p 57 or depending on the subject use the flash Avoiding camera shake p 39 Using the Flash p 60 After taking a shot the warning LED flashes relatively slow...

Page 43: ...g a high speed memory card an SD Memory Card with a writing speed of 10MB S or more 1 Turn the camera on and press the mode button until C lights up on the mode select LED 2 Press the continuous shoot...

Page 44: ...before continuing The number of continuous shots that can be taken varies depending on the type and capacity of the memory card in the camera and on the subject Continuous shooting stops when the memo...

Page 45: ...ting BNote When used in combination with the self timer a series of 3 continuous shots is taken after either 10 seconds or 2 seconds k Using the Self Timer p 57 You cannot switch to AF continuous shoo...

Page 46: ...down half way to set the focus The camera gives a short double beep the green shooting mark Z lights on the LCD monitor and the focus frame turns green to indicate that the focus has been set BNote Du...

Page 47: ...ble shooting time display in movie mode The shooting time shown on the LCD monitor when you start shooting in movie mode does not indicate the time available for one continuous shot The length of a co...

Page 48: ...h movement in movies with a frame rate of 30 fps is smooth the available shooting time for 30 fps movies is shorter than for movies shot at 15 fps 1 Turn the camera on and press the mode button until...

Page 49: ...ayback Set Up EN 49 BACK Contents Glossary Index Nomenclature Menus and Settings Troubleshooting 5 Press the MENU button K The selected frame rate appears on the LCD monitor A Important This setting i...

Page 50: ...om magnification of the image by pressing the 4 way button left or right p 84 Press the continuous shooting button N when an image from a group of continuous shots is displayed to playback the group o...

Page 51: ...to confirm that you want to erase the image 2 Press the 4 way button up to select EXECUTE then press the OK button E The image is erased Press the shutter release button down half way to return to th...

Page 52: ...l C lights up on the mode select LED 2 Press the SCENE button I The scene mode menu is displayed 3 Press the 4 way button up down left or right to choose the appropriate scene mode for the subject Ref...

Page 53: ...set mode This is the best scene mode for shots of the sunset The flash is turned off and white balance and ISO settings are automatically configured f Night Portrait mode This scene mode is ideal for...

Page 54: ...e gives the same colors as photographs taken using monochrome film N Sepia mode This mode gives the same colors as photographs taken using sepia film Cancelling Scene Modes Applicable mode C 1 Press t...

Page 55: ...between Macro and Landscape mode each time you press the 4 way button down c Macro Mode Macro mode allows you to take close up pictures at distances as close as approx 5 cm 2 from the subject As flas...

Page 56: ...gardless of the shooting mode the flash is set not to fire and focus is fixed at infinity Using Macro Mode Compose the shot and press the shutter release button half way The camera gives a short doubl...

Page 57: ...r preventing camera shake when you are shooting still photographs using Macro or Night View mode 1 Turn the camera on and press the mode button until C or M lights up on the mode select LED 2 Press th...

Page 58: ...e movie shooting starts when the specified self timer delay has elapsed A Important This mode is cancelled after you take the picture To continue using the self timer select self timer mode again To i...

Page 59: ...or a movie by up to 2x 1 Press the 4 way button right before shooting A zoom bar is displayed on the bottom of the screen The indicator in the zoom bar moves right as you zoom in and left as you zoom...

Page 60: ...This mode is best for shots of sunsets or shots where you want to retain an indoor ambiance b Fill in Flash mode In this mode the flash fires regardless of the ambient light conditions When you take...

Page 61: ...he Flash Mode 1 Turn the camera on and press the mode button until C lights up on the mode select LED 2 Press the 4 way button up to select the icon for the mode you want to set The flash mode icon ch...

Page 62: ...e Default a Auto Flash mode Twilight g Flash Off mode Night View Black and White a Auto Flash mode Default h Red eye Reduction Auto mode g Flash Off mode b Fill in Flash mode Sepia BNote When you canc...

Page 63: ...Contents Glossary Index Nomenclature Menus and Settings Troubleshooting Effective flash range This varies depending on the ISO sensitivity setting p 66 Refer to the following graph when shooting Appr...

Page 64: ...erent You can also use this feature when you deliberately want to shoot under or over exposed images This camera allows you to adjust the brightness up to plus or minus 2 0 EV in 1 3 EV increments 1 T...

Page 65: ...button K The specified value appears on the LCD monitor A Important The exposure compensation setting does not change after a shot is taken This setting reverts to the default value when you turn the...

Page 66: ...higher values the sensitivity to light is better allowing you to take shots in dark locations and use the high speed shutter This also slightly increases the effective range of the flash 1 Turn the c...

Page 67: ...menclature Menus and Settings Troubleshooting 5 Press the MENU button K The icon for the specified value appears on the LCD monitor A Important This setting is retained when you turn the camera off BN...

Page 68: ...bject that strikes the central part of the screen This mode makes it easy for the camera to set the exposure even in shots where there is a strong light source close to the subject SPOT AREA The camer...

Page 69: ...en is partitioned into 256 zones and the light in each zone is measured to determine the optimum exposure for the subject Default G CENTER The exposure is determined by measuring the light and giving...

Page 70: ...me and is useful for shots such as photos of 2 people standing side by side Default When you press the shutter release button half way the one location out of the nine focus frames that is focused is...

Page 71: ...he 4 way button up or down to select the desired mode and press the OK button E The focusing frame is now set 5 Press the MENU button K The selected focusing frame appears on the LCD monitor A Importa...

Page 72: ...double beep the green shooting mark Z lights on the LCD monitor and the focus frame turns green to indicate that the focus has been set and locked Focus Lock AE Lock 3 With the shutter release button...

Page 73: ...camera as the desired subject and then take the picture Low contrast subjects Objects that consist of the same pattern repeated Dark subjects Subjects made up only of horizontal lines Extremely brigh...

Page 74: ...With the shutter release button pressed half way down check that the shooting mark is shown and then simply press the shutter release button down fully to take the shot 1 Turn the camera on and press...

Page 75: ...ntended use of the shot p 76 1 Turn the camera on and press the mode button until C or M lights up on the mode select LED 2 Press the MENU button K to display the menu icons 3 Press the 4 way button l...

Page 76: ...ber of pixels in an image after shooting p 111 Still Images When you are attaching images to an email to send to a mobile phone the number of pixels that can be used varies depending on the mobile pho...

Page 77: ...the camera on and press the mode button until C or M lights up on the mode select LED 2 Press the MENU button K to display the menu icons 3 Press the 4 way button left or right to select WHITE BALANCE...

Page 78: ...ate white Reconfigure each time the light source changes 1 Turn the camera on and press the mode button until C or M lights up on the mode select LED 2 Press the MENU button K to display the menu icon...

Page 79: ...The preset value for the white balance is set To cancel this setting select CANCEL and press the OK button E 7 Press the MENU button K The white balance is set to u A Important This setting is retaine...

Page 80: ...ess the MENU button K to display the menu icons 3 Press the 4 way button left or right to select CHROMA H and press the OK button E 4 Press the 4 way button up or down to select the desired setting an...

Page 81: ...s up on the mode select LED 2 Press the MENU button K to display the menu icons 3 Press the 4 way button left or right to select SHARPNESS n and press the OK button E 4 Press the 4 way button up or do...

Page 82: ...r images T Click on the section you want to read Viewing Still Images Viewing Multiple Images Viewing Continuous Shooting Images Viewing Movies Viewing Images with Auto Play Erasing Unwanted Images Pr...

Page 83: ...eft Displays images in reverse order Hold the 4 way button left for more than one second to scroll through the images at high speed Right Displays images in forward order Hold the 4 way button right f...

Page 84: ...ght to select the image to playback 3 Press the OK button E to display the zoom magnification adjustment screen 4 Press the 4 way button right The image is enlarged as follows each time you press the...

Page 85: ...ent screen The scroll bars act as a guide to which part of the original image is currently displayed During zoomed playback press the 4 way button left or right to move forwards or backwards through t...

Page 86: ...yback Set Up EN 86 BACK Contents Glossary Index Nomenclature Menus and Settings Troubleshooting BNote Refer to p 22 for details of the screen displayed Press the MENU button K when information is disp...

Page 87: ...from each group of continuous shots are shown separately GROUP playback 6 small thumbnail images are shown on the screen at the same time Only the first image from each series of continuous shots imag...

Page 88: ...nclature Menus and Settings Troubleshooting 3 Press the 4 way button left or right to select DISPLAY MODE O and press the OK button E 4 Press the 4 way button up or down to select MULTI or GROUP then...

Page 89: ...the 4 way button left or right to move rapidly through the pages of images Press the 4 way button up or down to move up or down a layer M Movie icon Displayed for movies To next image forwards R Resi...

Page 90: ...yback SINGLE playback 1 In MULTI playback GROUP playback mode press the 4 way button up down left or right to select the image to be viewed in the normal playback mode 2 Press the OK button E BNote Fo...

Page 91: ...oting images to playback BNote You can also playback continuous shooting images using the MULTI playback and GROUP playback p 87 In SINGLE playback mode you can easily search for groups of continuous...

Page 92: ...gs Troubleshooting 3 Press the continuous shooting button N BNote Press the continuous shooting button N again or press the MENU button K to stop the playback of continuous shooting images A Important...

Page 93: ...ss the OK button E Movie playback begins The table below shows the operations that can be performed during playback BNote You can also adjust the playback volume while the movie is running You can vie...

Page 94: ...ning forwards through the movie frame by frame each time you press the 4 way button Hold the 4 way button right for 1 second to scan forward through the movie at twice the playback speed Hold the 4 wa...

Page 95: ...pecify the effect used for the transition between images AUTO PLAY settings You can specify the following settings for an AUTO PLAY slideshow INTERVAL The delay between images START FRAME The first im...

Page 96: ...yback from the image with the lowest number in the file name 8 Press the 4 way button up or down to select RECORD MOVIE then press right BNote The recorded duration of movies and postrecordings takes...

Page 97: ...t image gradually darkens fades out and the next image gradually fades in OVERLAP The next image slides over the current image and replaces it SHUTTER Black curtains close from the top and bottom of t...

Page 98: ...the mode button until P lights up on the mode select LED 2 Press the MENU button K to display the menu icons 3 Press the 4 way button left or right to select AUTO PLAY o and press the OK button E 4 P...

Page 99: ...movie at twice the playback speed Hold the 4 way button left for another 2 seconds to scan back through the movie at 4 times the playback speed Hold the 4 way button left to slow playback down to half...

Page 100: ...s 3 Press the 4 way button left or right to select ERASE J and press the OK button E BNote You can also erase images from the MULTI playback GROUP playback screen p 87 and Quickview screen p 50 A Impo...

Page 101: ...he mode select LED 2 Press the MENU button K to display the menu icons BNote To erase another image repeat steps 4 and 5 When you select an image from a group of continuous shots a screen is displayed...

Page 102: ...then press the OK button E J appears next to the selected image Then repeat this procedure to select the other images you want to erase To deselect a selected image select an image marked with the Tr...

Page 103: ...rs 4 Press the 4 way button up or down to select ERASE ALL then press the OK button E A message appears asking you to confirm that you want to erase the images 5 Press the 4 way button up to select EX...

Page 104: ...elect LED 2 Press the MENU button K to display the menu icons 3 Press the 4 way button left or right to select PROTECT U and press the OK button E 4 Press the 4 way button left or right to select the...

Page 105: ...layed with protected images 5 Press the 4 way button up to select EXECUTE then press the OK button E The image protection is removed 6 Press the MENU button K A Important ERASE ALL p 103 does not eras...

Page 106: ...CT AND ERASE to erase individual images can be very time consuming In a situation like this where you have a large number of recorded images and you only want to keep a few of them you can accomplish...

Page 107: ...ode select LED 2 Press the MENU button K to display the menu icons 3 Press the 4 way button left or right to select POSTRECORDING p and press the OK button E 4 Press the 4 way button left or right to...

Page 108: ...Recording stops and the screen in step 3 reappears 7 Press the MENU button K A Important It may not be possible to record a voice message if there is insufficient space available on the memory card P...

Page 109: ...ct the image you want to playback The y icon is displayed for images with a postrecorded message 3 Press the OK button E Voice message playback begins The table below shows the operations that can be...

Page 110: ...ect LED 2 Press the MENU button K to display the menu icons 3 Press the 4 way button left or right to select POSTRECORDING p and press the OK button E 4 Press the 4 way button left or right to select...

Page 111: ...s can be viewed in normal playback but cannot be viewed enlarged using zoomed playback Note also that resized images cannot be resized again or rotated and postrecording cannot be used with resized im...

Page 112: ...splay the menu icons 3 Press the 4 way button left or right to select RESIZE V and press the OK button E The resize menu appears 4 Press the 4 way button up to select EXECUTE RESIZING then press the O...

Page 113: ...OK button E The name of the resized image is displayed 320x240 E MAIL S Resizes the image to a smaller size that is convenient for attaching to an e mail and sending from a computer 160x120 THUMB NAIL...

Page 114: ...n until P lights up on the mode select LED 2 Press the MENU button K to display the menu icons 3 Press the 4 way button left or right to select RESIZE V and press the OK button E The resize menu appea...

Page 115: ...a memory card 1 Turn the camera on and press the mode button until P lights up on the mode select LED 2 Press the MENU button K to display the menu icons 3 Press the 4 way button left or right to sele...

Page 116: ...s the OK button E to confirm 7 Press the MENU button K BNote When you are attaching images to an email to send to a mobile phone the number of pixels that can be used varies depending on the mobile ph...

Page 117: ...s the 4 way button left or right to select RESIZE V and press the OK button E The resize menu appears 4 Press the 4 way button up or down to select ERASE ALL RESIZED IMAGE then press the OK button E A...

Page 118: ...U button K to display the menu icons 3 Press the 4 way button left or right to select ROTATE W and press the OK button E 4 Press the 4 way button left or right to select the image to be rotated 5 Pres...

Page 119: ...Menus and Settings Troubleshooting 6 Press the MENU button K A Important You cannot rotate groups of continuous shots protected images or resized images You may not be able to rotate images shot with...

Page 120: ...printer supports DPOF printing or that your local print processing shop provides a DPOF printing service For more information on the DPOF settings refer to the instruction manual provided with your DP...

Page 121: ...4 way button up or down to select DATE then press right 10Press the 4 way button up or down to select NOT PRINT or PRINT then press the OK button E NOT PRINT The date is not imprinted on the image PR...

Page 122: ...mode button until P lights up on the mode select LED 2 Press the MENU button K to display the menu icons 3 Press the 4 way button left or right to select DPOF T and press the OK button E The print set...

Page 123: ...ettings 1 Turn the camera on and press the mode button until P lights up on the mode select LED 2 Press the MENU button K to display the menu icons 3 Press the 4 way button left or right to select DPO...

Page 124: ...up or down to select ALL RESET then press right 5 Press the 4 way button up to select EXECUTE then press the OK button E All the print settings are reset and the screen from step 4 reappears 6 Press t...

Page 125: ...hat support DPOF Refer to the Instruction Manual for your printer when using this print method Connecting the camera to the printer 1 Turn the printer on 2 Place the camera in the USB cradle 3 Turn th...

Page 126: ...with the camera to connect the USB cradle holding the camera to the printer A Important Do not connect the camera to the printer until the CONNECT TO PRINTER screen shown in step 5 appears on the scr...

Page 127: ...press the OK button E The number of prints is set 4 Press the 4 way button up or down to select PAPER SIZE then press right BNote The number of prints can be set to a maximum of 9 PRINT MENU SINGLE P...

Page 128: ...Uses the printer settings YES The images are printed without borders NO The images are printed with borders BNote The paper sizes displayed are determined by the printer settings or by the paper sizes...

Page 129: ...n up to select SINGLE PRINT and then press the OK button E 2 Press the 4 way button left or right to select the image to be printed 3 Press the 4 way button up to select OK then press the OK button E...

Page 130: ...e images you want to print To deselect a selected image select an image marked with the print icon T and press the OK button E A Important If an error occurs during printing an error message is displa...

Page 131: ...Press the MENU button K to display the print menu screen A Important If an error occurs during printing an error message is displayed and printing stops See p 189 for information on the message displa...

Page 132: ...and the correct response BNote You can specify the print settings by clicking the SCENE button I before proceeding with this step See steps 2 to 12 on p 127 for information on the setting procedure Th...

Page 133: ...ng Ready Taking Pictures Playback Set Up EN 133 BACK Contents Glossary Index Nomenclature Menus and Settings Troubleshooting Ending PictBridge Wait until the print menu screen is displayed then discon...

Page 134: ...ard required for camera connection Must be equipped with a CD ROM drive for Windows 98 and Windows 98SE required for installing the USB drivers Must have Windows 98 Windows 98SE Windows Me Windows 200...

Page 135: ...Computer 3 When the language selection screen appears click the language to be used 4 Click Install USB drivers Installation begins Proceed with the installation as directed by the on screen instructi...

Page 136: ...longer need the USB drivers 1 Turn the PC on and start up Windows 2 Double click My Computer 3 Double click Control Panel 4 Double click Add Remove Programs and select Digital Camera USB Device3 5 Cl...

Page 137: ...ows Me Windows 2000 or Windows XP you do not need to install the USB drivers Connect the USB cable without installing the drivers To view images on your PC you must have image viewing software already...

Page 138: ...his happens click the Cancel button to close the window When the camera is connected to a PC and you are viewing or copying images the card access LED flashes Do not do any of the following Remove the...

Page 139: ...etc do not forget to copy the image to your PC beforehand If you directly edit the image on the memory card the image will no longer be viewable in the camera Do not format the memory card using your...

Page 140: ...when disconnecting the USB cable from a Windows PC z For Windows Me users 1 Double click the Unplug or Eject Hardware icon in the task bar in the lower right corner of the desktop 2 Select USB Disk a...

Page 141: ...in the task bar in the lower right corner of the desktop 2 Select USB Mass Storage Device and then click Stop 3 Select CONTAX i4R USB Device and then click OK 4 When the message saying The USB Mass St...

Page 142: ...rocedure on p 135 to re install the drivers Note that this operation is only required for Windows 98 and Windows 98SE 1 Insert the memory card into the camera p 28 2 Place the camera in the USB cradle...

Page 143: ...mera on p 31 5 Right click My Computer and select Properties 6 When the System Properties window opens click the Device Manager tab 7 Select CONTAX i4R marked with a question mark in Other devices and...

Page 144: ...erating system software on your Macintosh and then read the relevant sections for your software Computer hardware and software requirements Must be equipped with a USB port as standard required for ca...

Page 145: ...t the USB cable without installing the drivers To view images on your Macintosh you must have image viewing software already installed To play movies QuickTime 4 1 or later is required Always use the...

Page 146: ...ages folder in the DCIM folder and then select and double click the image file you want to view A Important When the camera is connected to a Macintosh and you are viewing or copying images the card a...

Page 147: ...tating etc do not forget to copy the image to your Macintosh beforehand If you directly edit the image on the memory card the image will no longer be viewable in the camera Do not format the memory ca...

Page 148: ...oting Disconnecting the USB cable from a Macintosh Drag the untitled Mac OS 9 or NO_NAME Mac OS X folder on the desktop to the Trash Check that the It is now safe to disconnect the device message is d...

Page 149: ...the camera in the USB cradle and connect the AC adapter 3 Use the supplied video cable to connect the USB cradle holding the camera to the television then turn the television on 4 Turn the camera on...

Page 150: ...hile the video cable is connected Images may sometimes not be displayed correctly on a television BNote The video output format of the camera can be selected from NTSC and PAL formats Because differen...

Page 151: ...ven if the camera is connected to a D4 video input port You cannot view images on a television using a D1 or D2 video input connector 1 Insert the memory card into the camera p 28 2 Place the camera i...

Page 152: ...ss the 4 way button up while playing back an image The information for the displayed image appears A Important Push the D3 connector cable on until the clips on the right and left sides of the D3 vide...

Page 153: ...down to select the direction of rotation then press the OK button E The rotated image is displayed 90 Rotates the image 90 to the left counterclockwise 90 Rotates the image 90 to the right clockwise...

Page 154: ...ng playback to display the menu icons 2 Press the 4 way button up or down to select AUTO PLAY o and press the OK button E 3 Press the 4 way button up or down to select SETTINGS and press the OK button...

Page 155: ...button E OFF No effect is set FADE The current image gradually darkens fades out and the next image gradually fades in OVERLAP The next image slides over the current image and replaces it SHUTTER Bla...

Page 156: ...OK button E 3 Press the 4 way button up to select EXECUTE then press the OK button E The slideshow begins U Protecting Images from Accidental Erasing PROTECT Applicable images Still images movies Thi...

Page 157: ...enu icons 2 Press the 4 way button up or down to select PROTECT U and press the OK button E 3 Press the 4 way button left or right to select the image to be unprotected The U icon is displayed with pr...

Page 158: ...down to select ERASE J and press the OK button E 3 Press the 4 way button left or right to select the image you want to erase 4 Press the 4 way button up to select EXECUTE then press the OK button E T...

Page 159: ...Brightness Setting the Date Setting POWER SAVE Adjusting the BEEP Adjusting the SHUTTER VOLUME Setting the Startup Screen Checking images right after shooting Selecting the Language Setting VIDEO OUTP...

Page 160: ...ctures Playback Set Up EN 160 Contents Glossary Index Nomenclature Menus and Settings Troubleshooting AF MODE Setting the AF method This setting selects the method the camera uses to automatically set...

Page 161: ...e select LED The SET UP menu screen is displayed 2 Press the 4 way button up or down to select FORMAT then press right 3 Press the 4 way button up to select EXECUTE then press the OK button E Card for...

Page 162: ...t BRIGHT CNTRL then press right 3 Press the 4 way button up or down to select the brightness then press the OK button E The selected brightness is applied 2 Sets the maximum brightness 1 Sets the brig...

Page 163: ...LED 2 Press the 4 way button up or down to select INSERT DATE then press right 3 Press the 4 way button up or down to select NO DATE or WITH DATE then press the OK button E The selected setting is ap...

Page 164: ...s retained when you turn the camera off When INSERT DATE is set to NO DATE the date is only shown for 3 seconds when the camera is turned on The date is written on the bottom right of the image It is...

Page 165: ...rned on When you activate the power save function the camera automatically enters sleep mode after the configured time and then turns off two minutes later In sleep mode the LCD monitor goes blank Thi...

Page 166: ...f after 30 seconds In P and G mode the camera shuts down after 1 minute 1MIN In C and M mode the LCD monitor turns off after 1 minute In P and G mode the camera shuts down after 1 minute Default 3MIN...

Page 167: ...ton half way or by pressing any of the other function buttons However the camera turns off after the two minutes have passed When POWER SAVE is set to NO PWR OFF If the camera is left turned on for si...

Page 168: ...until G lights up on the mode select LED 2 Press the 4 way button up or down to select BEEP then press right 3 Press the 4 way button up or down to select the desired volume then press the OK button E...

Page 169: ...y button up or down to select SHUTTER VOL then press right 3 Press the 4 way button up or down to select the desired volume then press the OK button E The selected volume is applied 3 Maximum volume 2...

Page 170: ...the memory card to display sequentially for approximately 1 second to form an animation up to 10 images OFF screen No startup screen is displayed To set the CONTAX logo screen SINGLE MULTI 1 Turn the...

Page 171: ...ond before returning to the SET UP menu screen To set a user defined screen SINGLE 1 Turn the camera on and press the mode button until G lights up on the mode select LED The SET UP menu screen is dis...

Page 172: ...ET then press the OK button E The selected image is stored in the internal camera memory The user defined screen setting is set and the startup screen is displayed for 1 second and then the SET UP men...

Page 173: ...he OK button E 4 Press the 4 way button left or right to select the center location then press down The image selection screen appears showing the still images stored on the memory card A Important Ch...

Page 174: ...d image is stored in the internal camera memory The user defined screen setting is set and the startup screen is displayed for 1 second and then the SET UP menu screen reappears BNote You can select a...

Page 175: ...up on the mode select LED 2 Press the 4 way button up or down to select START SCREEN then press right 3 Press the 4 way button down to select OFF then press the OK button E The startup screen is set t...

Page 176: ...Press the 4 way button up or down to select the desired number of seconds and press the OK button E This sets the number of seconds to show images 2SEC The photographed image is displayed for 2 secon...

Page 177: ...press the mode button until G lights up on the mode select LED 2 Press the 4 way button up or down to select ZLANGUAGE then press right 3 Press the 4 way button up or down to select the language then...

Page 178: ...de button until G lights up on the mode select LED 2 Press the 4 way button up or down to select VIDEO OUT then press right 3 Press the 4 way button up or down to select the video output format then p...

Page 179: ...n up or down to select STARTUP MODE then press right 3 Press the 4 way button up or down to select the desired mode then press the OK button E The selected setting is applied STILL The camera switches...

Page 180: ...e select LED 2 Press the 4 way button up or down to select DISPLAY INFO then press right 3 Press the 4 way button up or down to select the display style then press the OK button E The selected setting...

Page 181: ...older 101CXBOX and new images are stored in this folder File names are numbered starting from 0001 Resetting the file number in this way is useful when you want to store shots of a particular scene in...

Page 182: ...the OK button E The image file numbers are reset and the SET UP menu screen reappears BNote Folders 100CXBOX to 999CXBOX can be created FILE NO cannot be used if the 999CXBOX folder has already been c...

Page 183: ...ack to their default settings 1 Turn the camera on and press the mode button until G lights up on the mode select LED The SET UP menu screen is displayed 2 Press the 4 way button up or down to select...

Page 184: ...e Menu After OFF Default Page C Still image mode M Movie mode C Flash mode Default Auto Flash 60 C Continuous Shooting mode Previous Single shot 43 C Scene mode Previous Normal 52 C M Macro Landscape...

Page 185: ...turned off Not applicable Mode Menu After OFF Default Page G SET UP mode AF MODE Previous SAF 74 FORMAT 161 BRIGHT CNTRL Previous STANDARD 162 DATE Previous 34 INSERT DATE Previous NO DATE 163 POWER S...

Page 186: ...the shutter release button half way or press any other camera button to restore the camera to Shooting mode The details vary depending on the Power Save function settings 165 There is something genera...

Page 187: ...ing stops The caution LED flashes slowly The charging protection circuit was activated and halted charging because the ambient temperature is too high or too low Charge the battery when the ambient te...

Page 188: ...omputer no Removable disk untitled or NO_NAME icon appears The USB cable is not connected properly Make sure that the USB cable is securely connected 137 145 The USB cable is connected to the keyboard...

Page 189: ...ages 41 NO CARD There is no memory card inserted Insert a memory card 28 WRITE PROTECT The SD memory card is write protected Remove the write protection for the card or use another memory card 29 CARD...

Page 190: ...to print Check that the printer is ready to print Refer to the instructions provided with the printer for details An error was detected in the connection to the printer Reconnect to the printer and th...

Page 191: ...and many hundreds of thousand of CCDs are used to make up the imaging element in a digital camera The number of CCDs is referred to as the number of pixels The larger the number of pixels the greater...

Page 192: ...el the EV becomes 1 When the exposure is doubled again EV 2 and so on Exposure This refers to the amount of light projected through the lens that strikes the camera s film or image sensor CCD in this...

Page 193: ...s variable with higher compression ratios giving smaller image file sizes but poorer image quality Memory Card A recording medium on which data can be written erased and rewritten SD memory cards and...

Page 194: ...fluorescent tubes or incandescent light bulbs differs slightly in color Without any adjustment the colors in shots taken under such light sources differ from the actual colors you see For this reason...

Page 195: ...0 Continuous Shooting 43 Continuous shooting button 16 Image group 91 Viewing Continuous Shooting Images 91 D D3 video output terminal 17 DATE 34 DCF 191 Depth of field 191 DISPLAY INFO 180 Display mo...

Page 196: ...idge 125 193 Playback 82 Portrait mode 53 POSTRECORDING 107 POWER IN port 17 POWER SAVE 165 PROTECT 104 Unprotecting an image 105 Q Quick View 50 R REC REVIEW 176 Red eye effect 193 RESIZE 111 RESIZE...

Page 197: ...menclature Menus and Settings Troubleshooting U USB USB cable 126 137 145 USB driver 135 USB port 17 USB Cradle 17 36 USB cradle connector 16 V Video cable 149 VIDEO OUT 178 VIDEO OUT port 17 W WB Whi...

Reviews: