2. Setup
14
DIO-48D-LPE
Step 2 Setting the Hardware
This section describes how to set the board and plug it on your PC.
The board has some switches to be preset.
Check the on-board switches before plugging the board into an extension slot.
The board can be set up even with the factory defaults untouched. You can change board settings later.
Replacing the Bracket
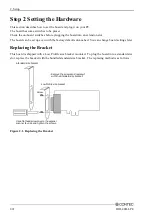
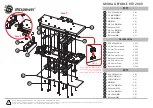
This board is shipped with a Low Profile size bracket mounted. To plug the board into a standard size
slot, replace the bracket with the bundled standard size bracket. The replacing method is as follows :
Use a flathead screwdriver or hexagonal
spanner to undo and tighten the screws.
- Remove the screws and replace it
with the Standard size bracket.
Screw
Standard size bracket
Low Profile size bracket
Figure 2.1. Replacing the Bracket
Summary of Contents for DIO-48D-LPE
Page 7: ...vi DIO 48D LPE ...
Page 15: ...1 Before Using the Product 8 DIO 48D LPE ...
Page 33: ...2 Setup 26 DIO 48D LPE ...
Page 45: ...4 Function 38 DIO 48D LPE ...


