background image

2. Setup 


10

 EAD(PCI)BE, 

EAD(LPCI)BE 

Step 1 Preparation 

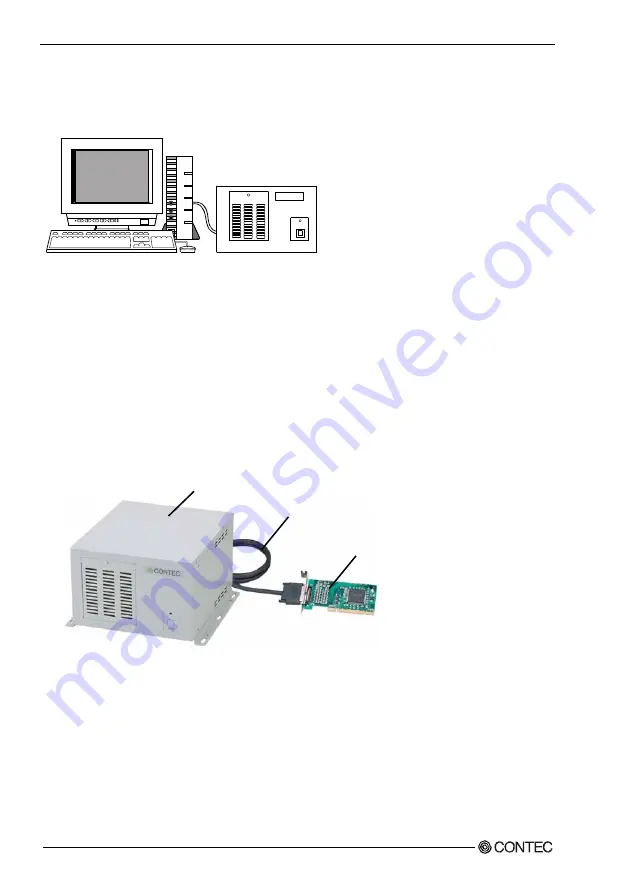
Configuration image 

CONTEC


The photo is of the EAD(PCI)BE+ECH(PCI)BE-H4A. 

Figure 2.1.  Configuration image 

Items to be prepared 

- PC 

- Expansion 

adapter 


Expansion adapter board [BUS-PC(PCI)A or BUS-PC(LPCI)A] …(a), 


Connection Cable [CB-BF96 or CB/CB68/96] …(b) 

- Expansion 

chassis 


Chassis…(c), Power cable 

PCI board to be installed 


The photo is of the EAD(LPCI)BE+ECH(PCI)BE-H4A but the check points are the same as with the  

ECH(PCI)BE-H2B/F2B/H4B/F4B/H7A/F7A/H13A/F13A. 

(c)

(a) 

(d)

Summary of Contents for EAD(LPCI)BE

Page 1: ...PC HELPER PCI Bus Expansion Adapter for PCI Bus PC Slot EAD PCI BE PCI Bus Expansion Adapter for Low Profile PCI PC Slot EAD LPCI BE User s Manual CONTEC CO LTD ...

Page 2: ...figuration List EAD PCI BE Expansion adapter board BUS PC PCI A 1 Connection cable CB BF96 1 This User s Manual this booklet 1 Connection cable CB BF96 Expansion adapter board BUS PC PCI A User s Manual User s Manual Product Configuration List EAD LPCI BE Expansion adapter board BUS PC LPCI A 1 Connection cable CB CB68 96 1 This User s Manual this booklet 1 Bracket for PCI 1 Bracket for PCI Connec...

Page 3: ... change without notice All relevant issues have been considered in the preparation of this document Should you notice an omission or any questionable item in this document please feel free to notify CONTEC CO LTD Regardless of the foregoing statement CONTEC assumes no responsibility for any errors that may appear in this document or for results obtained by the user as a result of using this produc...

Page 4: ...ons 6 Environment 7 Inspection 7 Storage 7 2 SETUP 9 What is Setup 9 Step 1 Preparation 10 Items to be prepared 10 Names of major parts 11 Step 2 Installing the Expansion Board 11 Step 3 Connecting the Cable 12 Connecting the connection cable to the BUS PC PCI A 12 Connecting the connection cable to the BUS PC LPCI A 12 Connecting the connection cable to the Expansion Chassis 13 Plugging the Power...

Page 5: ...iv EAD PCI BE EAD LPCI BE Symptoms and Actions 17 3 ABOUT HARDWARE 19 Hardware specification 19 BUS PC PCI A 19 BUS PC LPCI A 20 Restrictions and Notes 21 Replacing the Bracket 21 ...

Page 6: ...ollable in response to the turning on off of the PC s power supply Supporting both of Low Profile and standard PCI slots exchangeable with the bundled bracket EAD LPCI BE Expansion chassis Option PCI Bus Expansion Chassis PCI Bus Expansion Chassis Short x 2Slots ECH PCI BE H2B PCI Bus Expansion Chassis Long x 2Slots ECH PCI BE F2B PCI Bus Expansion Chassis Short x 4Slots ECH PCI BE H4B PCI Bus Exp...

Page 7: ...ion chassis ECH PCI BE Expansion adapter H2B F2B H4B F4B H4A H7A F7A H13A F13A EAD CB BE Ο Ο Ο Ο Ο EAD PCI BE Ο Ο Ο Ο Ο Ο Ο Ο Ο EAD LPCI BE Ο Ο Ο Ο Ο Ο Ο Ο Ο EAD BE LPE Ο Ο Ο Ο Ο Ο Ο Ο Ο Expansion chassis ECH PCI BE H2B ECH PCI BE F2B ECH PCI BE H4B ECH PCI BE F4B ECH PCI BE H4A ECH PCI BE H7A ECH PCI BE F7A ECH PCI BE H13A ECH PCI BE F13A Expansion adapter EAD CB BE EAD PCI BE EAD LPCI BE EAD BE ...

Page 8: ...estrictions on transfer rate When the expansion chassis accommodates a board that performs high speed transfer such as bus mastering the overall transfer rate may be lower than that of PCI bus slots in the main unit of a desktop PC This is caused by bus extension by the PCI to PCI Bridge The transfer rate may vary with the system configuration and the type of the PC Restrictions of PCI board None ...

Page 9: ...e is returned freight prepaid with a copy of the original invoice and a Return Merchandise Authorization to the distributor or the CONTEC group office from which it was purchased This warranty is not applicable for scratches or normal wear but only for the electronic circuitry and original products The warranty is not applicable if the device has been tampered with or damaged through abuse mistrea...

Page 10: ...the destruction of equipment and resources Understand the meanings of these labels to operate the equipment safely DANGER DANGER indicates an imminently hazardous situation which if not avoided will result in death or serious injury WARNING WARNING indicates a potentially hazardous situation which if not avoided could result in death or serious injury CAUTION CAUTION indicates a potentially hazard...

Page 11: ... not connect any signal other than specified to the on board connector Doing so may result in a malfunction overheating fault or damage If a specific expansion slot is recommended for a board plug the board into that slot Doing so may result in a malfunction overheating fault or damage When plugging or unplugging the power cable be sure to hold it by the plug itself Do not use or store the board w...

Page 12: ...The gold plated leads of the bus connector have no stain or corrosion Check that the board has no dust or foreign matter adhering Check that the bus connector of the board and its cable have been plugged correctly The photo is of the BUS PC PCI A but the check points are the same as with the BUS PC LPCI A Storage When storing these products keep it in its original packing form 1 Put the board in t...

Page 13: ...1 Before Using the Product 8 EAD PCI BE EAD LPCI BE ...

Page 14: ...p means a series of steps to take before these products can be used Taking the following steps in this chapter sets up the EAD PCI BE EAD LPCI BE Step 1 Preparation Step 2 Installing the Expansion Board Step 3 Connecting the Cable Step 4 Installing the expansion adapter board Step 5 Setup and Check If setup fails to be performed correctly refer to Setup Troubleshooting ...

Page 15: ...mage Items to be prepared PC Expansion adapter Expansion adapter board BUS PC PCI A or BUS PC LPCI A a Connection Cable CB BF96 or CB CB68 96 b Expansion chassis Chassis c Power cable PCI board to be installed The photo is of the EAD LPCI BE ECH PCI BE H4A but the check points are the same as with the ECH PCI BE H2B F2B H4B F4B H7A F7A H13A F13A c a d ...

Page 16: ...ctor CN1 Figure 2 2 Names of major parts BUS PC PCI A BUS PC LPCI A BUS PC LPCI A JP1 Power supply voltage setting jumper for PCI bus slot Interface connector CN1 1 2 3 JP1 Figure 2 3 Names of major parts BUS PC LPCI A Step 2 Installing the Expansion Board Refer to the user s manual for the expansion chassis to install the expansion board on the expansion chassis ...

Page 17: ...g or unplug them with the PC powered Figure 2 4 Connecting the connection cable to the BUS PC PCI A Connecting the connection cable to the BUS PC LPCI A Connect the connection cable CB CB68 96 to the expansion adapter board BUS PC LPCI A as shown in Figure 2 5 below CAUTION Do not plug or unplug them with the PC powered Figure 2 5 Connecting the connection cable to the BUS PC LPCI A Board Thumb sc...

Page 18: ...nto the expansion chassis Step 4 Installing the expansion adapter board 1 Before plugging the board shut down the system unplug the power cable of your PC from a wall outlet 2 Remove the cover from the PC so that the board can be mounted 3 Plug the board into an expansion slot 4 Attach the board bracket to the PC with a screw 5 Put the cover back into place The photo is of the BUS PC PCI A but the...

Page 19: ...he terminals with industrial alcohol Do not install or remove the board to or from the expansion slot with the PC or expansion chassis powered Otherwise the board may malfunction overheat or cause a failure Be sure to turn off the PC Make sure that your PC or expansion chassis can supply ample power to all the boards installed Insufficiently energized boards could malfunction overheat or cause a f...

Page 20: ...C s power supply 4 Make sure that the POWER LED on the expansion chassis is on Turning off the system 1 The power supply of a PC is turned OFF 2 The expansion chassis is turned off in synchronization with the PC s power supply 1 Pressing the POWER switch on the front panel of the expansion chassis turns on the expansion chassis or puts it to sleep Use the switch for example to turn on only the exp...

Page 21: ...their respective manuals Checking the hardware in Windows You can use Device Manager to check whether the expansion adapter and expansion chassis has been identified in Windows Device Manager shows PCI standard PCI to PCI bridge under System devices The expansion adapter and expansion chassis in use can be identified with the number of PCI standard PCI to PCI bridge entries Two entries ECH PCI BE ...

Page 22: ...oards The total current consumption must not exceed the power capacity of the expansion chassis No PCI board on the expansion chassis is detected e Make sure that the expansion adapter board BUS PC PCI A or BUS PC LPCI A has been installed correctly f Make sure that the JP1 jumper on the expansion adapter board BUS PC PCI A or BUS PC LPCI A in the PC has been set correctly g Make sure that the con...

Page 23: ...2 Setup 18 EAD PCI BE EAD LPCI BE ...

Page 24: ...er consumption Max 3 3VDC 200mA 1 JP1 pins 1 and 2 connected 5VDC 200mA 1 JP1 pins 2 and 3 connected Usable condition 0 50 C 10 90 RH No condensation Weight 50g 1 Power is supplied from the PC s main unit Table 3 2 Specification of CB BF96 Item Specification Bundled connection cable CB BF96 Cable length 1m Outside dimensions 121 69 L 105 68 H mm d to the outer surface of the slot cover the distanc...

Page 25: ...VDC 200mA 1 JP1 pins 1 and 2 connected 5VDC 200mA 1 JP1 pins 2 and 3 connected Usable condition 0 50 C 10 90 RH No condensation Weight 50g 1 Power is supplied from the PC s main unit Table 3 4 Specification of CB CB68 96 Item Specification Bundled connection cable CB CB68 96 Cable length 1m Outside dimensions mm 121 69 L 63 41 H d to the outer surface of the slot cover the distance from the end of...

Page 26: ...nted To plug it into a standard PCI bus slot replace the bracket with the bundled PCI bracket as illustrated below Screws Remove the screws and replace the Low Profile PCI bracket with the standard PCI bracket Bracket for the PCI Bracket for the Low Profile PCI Use a standard screwdriver to attach and detach the screws Figure 3 1 Replacing the Bracket ...

Page 27: ...saka 555 0025 Japan Japanese http www contec co jp English http www contec com Chinese http www contec com cn No part of this document may be copied or reproduced in any form by any means without prior written consent of CONTEC CO LTD 06302011 10212003 Management No A 46 811 06302011_rev4 PartsNo LYDC802 ...

Reviews: