background image

4. Setting the Display


20

User’s Manual

Panel Cut

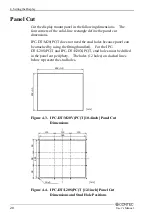
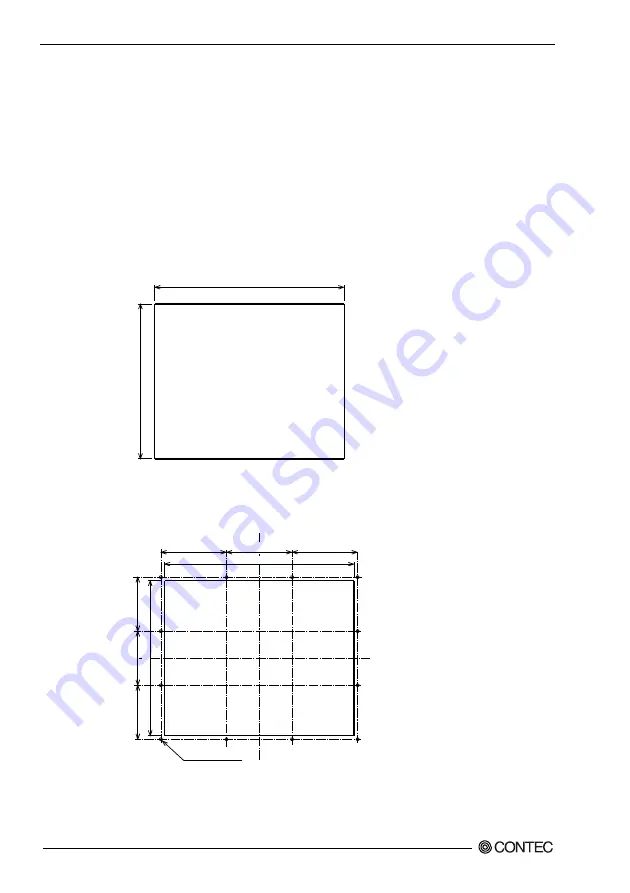
Cut the display mount panel in the following dimensions.    The
four corners of the solid-line rectangle define the panel cut
dimensions.

IPC-DT/M20(PC)T does not need the stud holes because panel can
be attached by using the fitting(bundled).    For the IPC-
DT/L20S(PC)T and IPC-DT/H20X(PC)T, stud holes must be drilled
in the panel cut periphery.    The holes (12 holes) on dashed lines
below represent the stud holes.

292

±

0.5

25

2

±

0.

5

[mm]

Figure 4.3. IPC-DT/M20V(PC)T [10.4inch] Panel Cut

Dimensions

119

119

119

344

98

98

98

281

12-

φ

5

[mm]

Figure 4.4. IPC-DT/L20S(PC)T [12.1inch] Panel Cut

Dimensions and Stud Hole Positions

Summary of Contents for IPC-DT

Page 1: ...IPC Series Analogue RGB input flat panel display 10 4inch IPC DT M20V PC T 12 1inch IPC DT L20S PC T 15inch IPC DT H20X PC T User s Manual CONTEC CO LTD ...

Page 2: ...rks MS Microsoft MS DOS and Windows are trademarks of Microsoft Corporation Other brand and product names are trademarks of their respective holder FCC PART 15 Class A Notice This equipment has been tested and found to comply with the limits for a Class A digital device pursuant to part 15 of the FCC Rules These limits are designed to provide reasonable protection against harmful interference when...

Page 3: ...ral Specifications 9 Optical Display Specifications 10 3 Outside Dimensions and Part Names 11 Outside Dimensions 11 Part Names 14 Analog RGB Connector 15 RS Touch Panel Connector 15 USB Touch Panel Connector 16 Dip Switch 17 Backlight ON OFF Connector 18 4 Setting the Display 19 Installation Requirements 19 Panel Cut 20 Attaching the Fitting Used to Attach to the Main Unit 22 5 Connection to the H...

Page 4: ...y Connector 27 AC Adapter Jack 28 AC code removal prevention fitting 29 7 Screen Adjustment and a Setup 31 Menu Screen 31 Direct Key 36 Memory of a Setting Value 36 8 LED Indicators 37 9 Touch Panel 39 USB Multi Touch Panel 41 10 Display Mode 43 11 Options 45 ...

Page 5: ...iv User s Manual ...

Page 6: ...panels are supported when using the USB touch panel interface Auto scaling feature that resizes the input screen to the LCD dot configuration On screen display setup menu facilitating screen adjustment Analog touch panel enabling mouse emulation using driver software Input connector allowing external control of turning on off the backlight Back mounted dedicated power supply unit IPC POA200 12 01 ...

Page 7: ... if the device has been tampered with or damaged through abuse mistreatment neglect or unreasonable use or if the original invoice is not included in which case repairs will be considered beyond the warranty policy How to Obtain Service For replacement or repair return the device freight prepaid with a copy of the original invoice Please obtain a Return Merchandise Authorization Number RMA from th...

Page 8: ...urce Do not use the product in extremely humid or dusty locations Do not perform key operations with the touch panel to implement a process that might endanger life or result in serious damages Design a system that can cope with incorrect key input operations Do not use a sharp edged object such as a mechanical pencil to operate the touch panel in order to prevent scratching or malfunctions Protec...

Page 9: ... 25 000 hours 2 Touch panel The operating lifetime of the touch panel is at least 1 million touches as tested by mechanical touching under 300g of force at a rate of two presses per second CONTEC accepts your request for replacing each consumable in the PANECON PC as a request for repair at an additional cost Contact your local retailer or CONTEC sales office LCD Display Pixel Drop LCD display may...

Page 10: ... cannot be used together with the built in touch panel on the computer In this case the touch panel on the screen cannot be used although display operation is still available However on the following CONTEC panel computers multiple touch panels can be used together when connected via the USB interface IPC PT 600 Series IPC PT x6x0x PCW x ...

Page 11: ...1 Introduction 6 User s Manual ...

Page 12: ...sing the front switch software control from the host computer or ON OFF control via the rear panel connector input Display interface Analog RGB input HD SUB 15 pin Female connector Cable length which recommends 5mm or less 2 Picture signal RGB separation Analog Positive polarity 0 7Vp p 75Ω Synchronized signal V H separation TTL Positive negative polarity Horizontal scan frequency 31 38kHz 31 48kH...

Page 13: ... supply Power supply unit IPC ACAP12 01 available as an option enabling input at 100 240 VAC Input power supply voltage DC 12V 5 Power consumption 1 3A Max 1 6A Max 1 8A Max Power consumption power save mode 0 2A Max 1 Optional desk stand IPC SND 03 allowing desktop installation 2 Using a cable longer than 5 m may reduce the image quality The cable should be as short as possible as degradation in ...

Page 14: ... IEC1000 4 2Level3 EN61000 4 2Level3 HOST IPC BX M600 PCW Power supply IPC POA200 12 01 Sweep durability 10 50 Hz Single side amplitude or 0 15 mm 50 500 Hz 2 0 G in the X Y Z directions for 23 minutes each Conforming to JIS C0040 and IEC68 2 6 Vibration resistance Fixed vibration durability 16 7 Hz 2 G in the X Y Z directions for 30 minutes each Conforming to JIS C0040 and IEC68 2 6 Shock resista...

Page 15: ...70deg 60deg Visual angle horizontal CR 10 φ 90 Display in monochrome 70deg 70deg 60deg Surface brightness at center Display in white 350cd m2 Typ 350cd m2 Typ 250cd m2 Left φ 90o Z Y X Top φ 180o Right φ 90o Bottom φ 0o θ 0o Measurement direction θ Module φ Figure 2 1 Viewing Range Definition Note The above optical specification data shows optical characteristics of the liquid crystal in the displ...

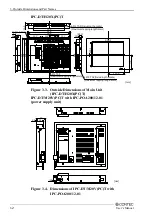
Page 16: ... Maximum tapping length 4mm 4 M4 TAP Maximum tapping length 4mm 115 105 5 Figure 3 1 Outside Dimensions of Main Unit IPC DT M20V PC T IPC DT L20S PC T 266 4 M4 TAP Including the mate Maximum tapping length 4mm 4 M4 TAP Including the mate Maximum tapping length 4mm 4 M4 TAP Maximum tapping length 4mm 370 342 119 119 119 69 7 100 307 279 98 98 98 100 22 3 15 5 254 5 189 5 251 137 5 122 5 mm 12 M4 ST...

Page 17: ...tapping length 4mm 4 M4 TAP Maximum tapping length 4mm 15 5 12 M4 STUD 48 13 2 4 336 106 304 106 107 100 100 428 396 137 137 137 96 7 22 3 15 5 254 7 233 1 309 1 157 5 138 Figure 3 3 Outside Dimensions of Main Unit IPC DT H20X PC T IPC DT M20V PC T with IPC POA200 12 01 power supply unit 2 4 54 44 1 5 mm Figure 3 4 Dimensions of IPC DT M20V PC T with IPC POA200 12 01 ...

Page 18: ...20S PC T with IPC POA200 12 01 power supply unit 2 4 58 48 0 8 mm Figure 3 5 Dimensions of IPC DT L20S PC T with IPC POA200 12 01 IPC DT H20X PC T with IPC POA200 12 01 power supply unit 2 4 58 48 mm Figure 3 6 Dimensions of IPC DT H20X PC T with IPC POA200 12 01 ...

Page 19: ...ght side Left side Screen Touch panel Power LED Screen adjustment switch Power supply connector AC adapter jack Dip switch Analog RGB connector RS touch panel connector Backlight ON OFF connector USB touch panel connector Figure 3 7 Part Names Figure 3 8 Screen Adjustment Switch ...

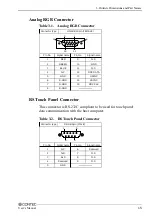
Page 20: ...GND G GND B GND Signal name N C GND N C DDC DATA HSYNC VSYNC DDC CLK HD SUB 15pin FEMALE 5 1 11 15 10 6 RS Touch Panel Connector This connector is RS 232C compliant to be used for touch panel data communication with the host computer Table 3 2 RS Touch Panel Connector Connector type Pin No 1 2 3 4 5 Pin No 6 7 8 9 Signal name N C TxD RxD Reserved GND Signal name Reserved N C N C N C D SUB 9pin MAL...

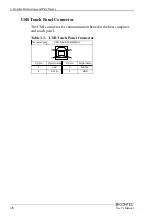
Page 21: ...ual USB Touch Panel Connector The USB connector for communication between the host computer and touch panel Table 3 3 USB Touch Panel Connector Connector type Pin No 1 2 Pin No 3 4 Signal name 5V DATA Signal name DATA GND USB Type B Receptacle 2 1 4 3 ...

Page 22: ...hat the power is turned OFF before changing the DIP switch settings ON 1 2 3 4 Figure 3 9 Dip Switch Table 3 4 Setting a Dip Switch No Setting Setting description Factory setting 1 USBID0 Setting the USB touch panel ID OFF 2 USBID1 Setting the USB touch panel ID OFF 3 USBID2 Setting the USB touch panel ID OFF 4 Reserved Reserve Leave this at OFF OFF The USB ID0 1 and 2 settings specify the ID when...

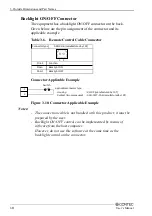
Page 23: ...acklight OFF S2B XH A manufactured by JST 1 2 Connector Applicable Example Applicable connector type Housing XHP 2 manufactured by JST Contact two pieces used SXH 001T P0 6 manufactured by JST 1 2 Switch Figure 3 10 Connector Applicable Example Notes The connection cable is not bundled with this product it must be prepared by the user Backlight ON OFF control can be implemented by means of softwar...

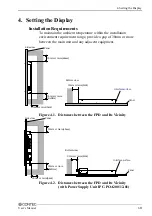
Page 24: ... and any adjacent equipment 30mm or more Side Interface surface Bottom view Panel 30mm or more above 30mm or more Bottom Side view 30mm or more back Panel Figure 4 1 Distances between the FPD and Its Vicinity 30mm or more Side Interface surface Bottom view Panel 30mm or more above 30mm or more Bottom Side view 30mm or more back Panel Figure 4 2 Distances between the FPD and Its Vicinity with Power...

Page 25: ...les because panel can be attached by using the fitting bundled For the IPC DT L20S PC T and IPC DT H20X PC T stud holes must be drilled in the panel cut periphery The holes 12 holes on dashed lines below represent the stud holes 292 0 5 252 0 5 mm Figure 4 3 IPC DT M20V PC T 10 4inch Panel Cut Dimensions 119 119 119 344 98 98 98 281 12 φ5 mm Figure 4 4 IPC DT L20S PC T 12 1inch Panel Cut Dimension...

Page 26: ...4 Setting the Display User s Manual 21 137 137 137 398 106 106 107 306 12 φ5 mm Figure 4 5 IPC DT H20X PC T 15inch Panel Cut Dimensions and Stud Hole Positions ...

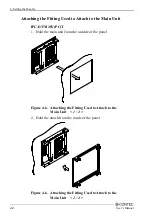
Page 27: ...ach to the Main Unit IPC DT M20V PC T 1 Hold the main unit from the outside of the panel Figure 4 6 Attaching the Fitting Used to Attach to the Main Unit 1 4 2 Hold the attach from the inside of the panel Figure 4 6 Attaching the Fitting Used to Attach to the Main Unit 2 4 ...

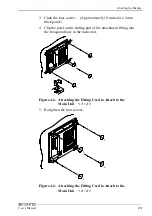
Page 28: ...k panel 4 Clip the pawl on the sliding part of the attachment fitting into the hexagonal hole in the main unit 4 3 4 3 3 3 4 4 Figure 4 6 Attaching the Fitting Used to Attach to the Main Unit 3 4 5 Re tighten the four screws 5 5 5 5 Figure 4 6 Attaching the Fitting Used to Attach to the Main Unit 4 4 ...

Page 29: ...ng inserted in between apply M4 nuts to the studs 12 positions out through the panel then tighten the nuts to fasten the panel and the display together Stud Even washer Spring washer Nut Display Packing Panel Figure 4 7 Attachment to IPC DT L20S PC T or IPC DT H20X PC T Note The maximum mountable panel thickness is 10 mm for each model ...

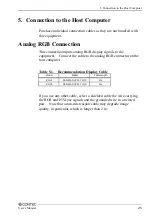
Page 30: ...s to the equipment Connect the cable to the analog RGB connector on the host computer Table 5 1 Recommendation Display Cable Model Maker Cable length KC V2 SANWA SUPPLY INC 2m KC V5 SANWA SUPPLY INC 5m If you use any other cable select a shielded cable the wire carrying the RGB and H Vsync signals and the grounded wire in a twisted pair Note that a non twisted pair cable may degrade image quality ...

Page 31: ...optional driver software IPC SLIB 01 for windows or download one from the CONTEC s web site http www contec co jp download The USB touch panel driver software requires V1 20 or later of IPC SLIB 01 The USB connection can only be used on Windows XP 2000 or 98SE Connect via the RS 232C interface if using a different OS Use either USB or RS 232C for connecting the touch panel The touch panel cannot b...

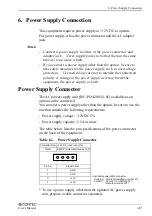
Page 32: ...he equipment the power supply or both Power Supply Connector The AC power supply unit IPC POA200 12 01 available as an option can be connected You connect a power supply other than the option be sure to use the one that satisfies the following requirements Power supply voltage 12VDC 5 Power supply capacity 2 5A or more The table below lists the pin specifications of the power connector on the back...

Page 33: ...nnection 28 User s Manual AC Adapter Jack The AC adapter jack is used to connect the AC adapter IPC ACAP12 01 available as an option Do not connect any AC adapter other than the option 12V GND Figure 6 1 AC Adapter Jack ...

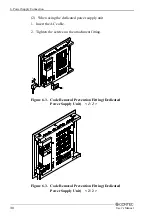
Page 34: ...removal prevention fitting 1 When using the AC Adapter 1 Insert the plug of AC Adapter 2 Tighten the screws on the attachment fitting 1 2 Figure 6 2 Code Removal Prevention Fitting AC Adapter 1 2 Figure 6 2 Code Removal Prevention Fitting AC Adapter 2 2 ...

Page 35: ...g the dedicated power supply unit 1 Insert the AC cable 2 Tighten the screws on the attachment fitting 1 2 Figure 6 3 Code Removal Prevention Fitting Dedicated Power Supply Unit 1 2 Figure 6 3 Code Removal Prevention Fitting Dedicated Power Supply Unit 2 2 ...

Page 36: ...menu screen Use the and switches to select individual items adjust them then press the MENU to save the settings Figure 7 1 Main Menu Screen PHASE Adjust this item when the screen is partly blurred or flickering Press or while checking the screen to optimize the item AUTO ADJUST Select AUTO ADJUST when using the equipment for the first time or when the screen cannot be displayed normally due to a ...

Page 37: ... submenu select a desired item using or then press MENU to accept the setting made Figure 7 2 POSITION Submenu H POSITION Select this item to adjust the horizontal position of the screen Press or while checking the screen to optimize the item V POSITION Select this item to adjust the vertical position of the screen Press or while checking the screen to optimize the item MAIN MENU Select this item ...

Page 38: ...setting made Figure 7 3 SCREEN Submenu CONTRAST Select this item to adjust the contrast of the screen Press or to optimize the item BRIGHTNESS Select this item to adjust the brightness of the backlight Press or to optimize the item The brightness can also be adjusted by pressing the and keys without the MENU screen displayed as the direct brightness control keys MAIN MENU Select this item to retur...

Page 39: ... be sure to set this item to DOS Factory setting WINDOWS ON OFF Select this item to turn ON enable or OFF disable the touch panel operation The equipment is started always with this item set to OFF Usually this item does not have to be set as the touch panel is turned ON enabled automatically upon startup of the touch panel driver Note however that the touch panel does not work when the equipment ...

Page 40: ...ng when you change the setting MAIN MENU Select this item to return to the main menu INITIALIZATION Select this item to reset all items to the factory defaults If the screen has become blank or displayed abnormally use this item to initialize the equipment The initialization is executed by selecting YES and pressing MENU It can also be executed by turning on the equipment while holding down the ME...

Page 41: ...he screen from the power save mode by pressing any of the front switches The power consumption of the equipment in the power save mode is about 1 5 of that during normal operation Turning off the backlight when not required the backlight to extend its life Recycling the power to the equipment in the power save mode recovers it to the normal display state The POWER LED on the front face remains bli...

Page 42: ...hing No signal input 2 1 The LED looks like this when the equipment cannot process the input signal to provide normal display for example when the horizontal vertical sync signal frequency is exceeding the supported frequency See Chapter 10 Display mode for the display modes supported by this equipment 2 The LED looks like this also when the horizontal or vertical sync signal is turned off by the ...

Page 43: ...8 LED Indicators 38 User s Manual ...

Page 44: ...uch Panel and Block Diagram Data input at the touch panel is processed by the touch panel controller and passed to the host PC via the serial port on the CPU in the controller Before the touch panel can be used touch panel driver software must be installed Note that the driver software is not bundled with this product Purchase the one separately or download it from the CONTEC s web site For furthe...

Page 45: ...0 or 98SE Connect via the RS 232C interface if using a different OS Use either USB or RS 232C for connecting the touch panel The touch panel cannot be connected via both interfaces at the same time When using the USB connection the screen image may disappear momentarily when the USB cable is connected or disconnected and when the computer power is turned ON or OFF ...

Page 46: ...n the host computer to identify each device a different USB ID must be set on the DIP switch located on the side of each display unit USB ID7 USB ID0 8 sets Max USB HUB RGB distributor Host PC USB cable RGB cable Touch panel display Figure 9 2 Example of connection of a USB multi touch panel You can use a CONTEC IPC PT 600 series panel computer as the host PC In this case the ID of the touch panel...

Page 47: ...9 Touch Panel 42 User s Manual ...

Page 48: ... VESA 640 x 480 31 50 37 86 72 VESA 800 x 600 36 00 35 16 56 VESA 800 x 600 40 00 37 88 60 VESA 800 x 600 50 00 48 08 72 Table 10 3 IPC DT H20X PC T Video mode Number of pixels dot Dot clock MHz Horizontal frequency kHz Vertical frequency Hz VGA 640 x 350 25 18 31 47 70 1 2 VGA 640 x 400 25 18 31 47 70 VGA 720 x 400 28 32 31 47 70 2 VGA 640 x 480 25 18 31 47 60 VESA 640 x 480 31 50 37 86 72 VESA 6...

Page 49: ...input has a resolution lower than the number of display pixels of each model the screen display is enlarged automatically Note in this case that the display quality is therefore degraded in clearness compared to the screen displayed at the resolution that matches the number of display pixels of the LCD The equipment cannot provide normal display at a resolution or frequency other than the supporte...

Page 50: ...RS 232C cable for touch panels 2m IPC CBL3 5 RS 232C cable for touch panels 5m Driver IPC SLIB 01 Driver Utility Soft Set CD ROM version Exclusive option IPC SND 03 Desk stand IPC POA200 12 01 12 VDC output AC power supply Input Voltage 85 264V AC Current 0 8A Typ for input voltage 100V AC Current 0 4A Typ for input voltage 200V AC Output Voltage 12V DC Current 2 5A IPC ACAP12 01 12 VDC output AC ...

Page 51: ...11 Options 46 User s Manual Recommendation Cable Maker SANWA SUPPLY INC KC V2 RGB display cable 2m KC V5 RGB display cable 5m KU20 2H USB cable for touch panel 2m KU20 5H USB cable for touch panel 5m ...

Page 52: ...to Nishiyodogawa ku Osaka 555 0025 Japan Japanese http www contec co jp English http www contec com Chinese http www contec com cn No part of this document may be copied or reproduced in any form by any means without prior written consent of CONTEC CO LTD 03292005 02072002 Management No A 46 563 04182005_rev5 Parts No LZN0111 ...

Reviews: