background image

7. BIOS Setup


54

SPC-8450-LVA

Description

Choice

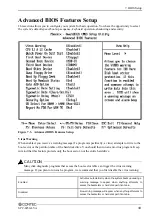
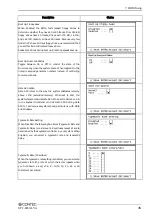
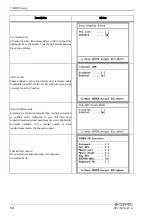
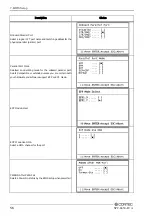
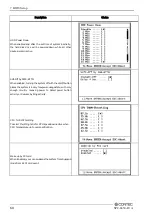
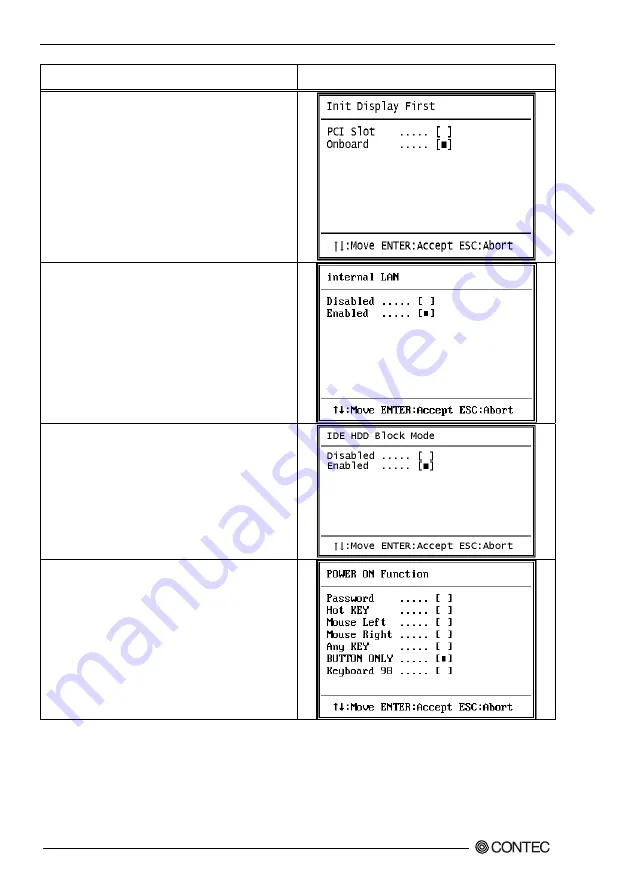
Init Display First
Initialize the AGP video display before initializing any other
display device on the system. Thus the AGP display becomes
the primary display.

Internal LAN
Select Enabled to active the Internal LAN controller, select
Disabled to turn-off the Internal LAN controller when you do
not want to use this function

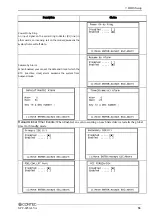
IDE HDD Block mode
Block mode is also called block transfer, multiple commands,
or multiple sector read/write. If your IDE hard drive
supports block mode (most new drives do), select Enabled for
automatic detection of the optimal number of block
read/writes per sector the drive can support.

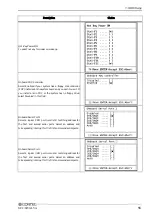
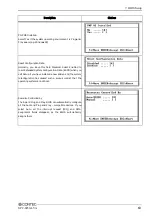
POWER ON Function
When system into suspend mode , to choice wake
Up method as list .

Summary of Contents for SPC-8450-LVA

Page 1: ...SBC Series Single Board Computer Middle Size PCI with LAN VGA Audio SPC 8450 LVA User s Manual CONTEC CO LTD...

Page 2: ...le with bracket 1 Parallel port 25pin D SUB female x 1 ribbon cable with bracket 1 Audio jack cable with bracket 1 6 pin mini DIN cable 2 in 1 for PS2 Mouse Keyboard functions DVI Analog RGB conversio...

Page 3: ...or any questionable item in this document please feel free to notify CONTEC CO LTD Regardless of the foregoing statement CONTEC assumes no responsibility for any errors that may appear in this documen...

Page 4: ...recautions 3 Safety Information 3 Handling Precautions 3 Environment 4 Inspection 4 Storage 4 Disposal 4 2 System Reference 5 Specifications 5 Power Requirements 6 Connector Jumper Location 7 Block Di...

Page 5: ...or FAN1 FAN2 23 4 Jumper Setting 25 RS 232C 422 485 Selector JP1 JP8 25 RS 422 Setting 26 RS 485 Setting 26 RS 422 485 Terminator JP7 28 CF Master Slave Selector JP6 29 ATX AT Power supply select JP9...

Page 6: ...SPC 8450 LVA v Frequency Voltage Control 66 Defaults Menu 67 Supervisor User Password Setting 68 Exit Selecting 69 POST Messages 69 POST Beep 69 Error Messages 70 POST Codes 74...

Page 7: ...vi SPC 8450 LVA...

Page 8: ...R Celeron R D Processor 2 26G 2 8GHz FSB533MHz DDR SDRAM of up to 1GB can be mounted Equipped with a CF card slot Type I II enabling boot up from a CF card Equipped with DVI I I F enabling connection...

Page 9: ...nly when this device is returned freight prepaid with a copy of the original invoice and a Return Merchandise Authorization to the distributor or the CONTEC group office from which it was purchased Th...

Page 10: ...ling Precautions CAUTION Do not modify the product CONTEC will bear no responsibility for any problems etc resulting from modifying this product Do not strike or bend the board Otherwise the board may...

Page 11: ...no dust or foreign matter adhering The gold plated leads of the bus connector have no stain or corrosion Check that the bus connector of the board and its cable have been plugged correctly Storage Whe...

Page 12: ...AN Port 100BASE TX 10BASE T Intel ICH4 integrated controller One RJ 45 connector IDE I F One EIDE port up to two IDE devices support Ultra DMA 33 66 100 One box header 20 x 2 pins connector SATA I F N...

Page 13: ...ements Your system requires a clean steady power source for reliable performance of the high frequency CPU on the SPC 8450 LVA the quality of the power supply is even more important For the best perfo...

Page 14: ...Connector CN21 SO DIMM Memory Socket CN6 10 100BASE TX LAN Connector FAN1 FAN Connector1 CN7 Keyboard Mouse Connector FAN2 FAN Connector2 CN8 External Keyboard Connector PW1 12V power supply Connector...

Page 15: ...V DVH CONNECTOR TMDS Sir164 DDR266 SO DIMM Modules x 1 HUB LINK PCI GOLD FINGER LAN 10 100M Connector LAN DATA PCI CNTRL PCI ADDR DATA RGB BUS DVOS BUS ICH4 USB USB 2 0 PORT 1 3 IDE Primary CF Card Sl...

Page 16: ...of the processor and connect it to FAN2 connector 5 Insert 12V Power supply cable to PW1 connector 6 The jumpers are set up according to the conditions to be used 7 Insert all external cables Hard dis...

Page 17: ...Cache size 533MHz 256KB Pentium 4 Processor Host Bus frequency Cache size 400MHz 533MHz 256K 512K 1MB The socket 478 comes with a lever to secure the processor Make sure the notch on the corner of th...

Page 18: ...M with gold plated contacts 200 MHz PC1600 266 MHz PC2100 DDR SDRAM Non ECC DIMM Unbuffered unregistered single sided or double sided SO DIMMs Table 3 1 DDR SDRAM SO DIMM Size Non ECC 128MB 16Mbit x 6...

Page 19: ...GND DST RTS CTS RI N C RS 422 TX TX RX RX GND RTS RTS CTS CTS N C RS 485 TX TX RX RX GND N C N C N C N C N C CN1 CN2 1 6 5 10 RS 422 485 assigned for Serial2 CN2 connector only Pin assignment after co...

Page 20: ...full duplex serial transmission conforming to RS 422 RS 485 Baud rate 115 2K 50bpx programmable Signal extensible distance 1 2km Max RTS JP1 7 8 TXD D JP1 5 6 JP1 4 6 R RXD 47k 6 2k 6 2k 47k R CTS 47...

Page 21: ...2 3 4 Function GND USBP1 USBP1 VCC1 CN3 1 4 Table 3 5 USB box header Connector Pin No 1 3 5 7 9 Function VCC2 USBP2 USBP2 GND N C Pin No 2 4 6 8 10 Function VCC3 USBP3 USBP3 GND Chassis GND CN9 1 2 9...

Page 22: ...l signal CN1 cannot be used when using this signal Table 3 6 DVI Analog RGB converter Connector type DVI I 29pin 1 8 17 24 16 9 C1 C2 C3 C4 C5 Pin No Signal name Pin No Signal name Pin No Signal name...

Page 23: ...CN7 The CPU card provides a standard PS 2 keyboard mouse connector for attaching a PS 2 keyboard mouse You will connect with an add on cable for a PS 2 keyboard mouse You can select that plug a PS 2 m...

Page 24: ...E OUT L N C MIC IN GND LINE IN L Pin No 1 3 5 7 9 Function LINE OUT R GND N C GND LINE IN R CN10 2 1 10 9 CD IN Connector CN11 This connector is used to connect CD Audio cable from CD ROM or DVD drive...

Page 25: ...vided IDE hard disk ribbon cable After connecting the single end to the board connect the two plugs at the other end to your hard disk s If you install two hard disks you must configure the second dri...

Page 26: ...the provided floppy drive ribbon cable After connecting the single and to the board connect the two plugs on the other end to the floppy drives Table 3 15 Floppy Disk Drive Connector Pin No 1 3 5 7 9...

Page 27: ...le Standard mode Bi Directional PS 2 compatible Bi Directional EPP A driver from the peripheral manufacturer is required for operation Bi Directional High speed ECP Table 3 16 Parallel Port Connector...

Page 28: ...ive or writing it Speaker An external speaker can be installed in this CPU board as an option When the computer cannot use the video interface the speaker offers the error warning sound in POST Moreov...

Page 29: ...m the BIOS turns off power to the computer Table 3 18 ATX power control Connector Pin No 1 2 3 4 5 6 Function PCI_PME GND PSWIN GND PS_ON 5VSB Housing XHP 6 JST Contact SXH 001T P0 6 JST CN18 1 2 3 4...

Page 30: ...user In addition the support about this connector use cannot be performed in our company 12V power supply Connector PW1 The power supply that conformed for ATX12V is used this connector connect 4Pin...

Page 31: ...3 Hardware Installations 24 SPC 8450 LVA...

Page 32: ...5 3 1 10 8 6 4 2 9 7 5 3 1 10 8 6 4 2 Transmit date control in half duplex mode In half duplex mode the transmission buffer must be controlled to prevent transmit data from causing a collision The SP...

Page 33: ...RX CTS JP7 7 8 JP7 5 6 JP7 3 4 JP7 1 2 D R D R RXD RTS CTS SERIAL2 1 2 3 4 5 6 7 8 9 JP8 5 6 JP8 4 6 120 120 120 120 Figure 4 1 RS 422 Setting RS 485 Setting RTS JP8 7 8 TXD JP7 7 8 JP7 5 6 D R RXD S...

Page 34: ...W Transmitter holding Register THR 0 R Receiver buffer Register RBR 02F8h 1 W Divisor latch Register LSB DLL 1 W Divisor latch Register MSB DLM 02F9h 0 W Interrupt enable Register IER 02FAh X R Interr...

Page 35: ...JP7 Terminator CTS for RS 422 RTS for RS 422 RXD for RS 422 485 TXD for RS 422 485 Function Terminating resisiter provided Terminating resisiter provided Terminating resisiter provided Terminating re...

Page 36: ...ing to the power supply type to be used Table 4 5 ATX AT Power supply select JP9 JP9 Function ATX Default AT 3 2 1 3 2 1 Clear CMOS Content JP10 The time date and CMOS values can be specified in the S...

Page 37: ...4 Jumper Setting 30 SPC 8450 LVA...

Page 38: ...Expansion Area 896 960KB Extended System BIOS Area 960 1MB System BIOS Area Table 5 2 Memory Segment Memory Segments Comments 00000h 9FFFh 0 640K DOS Region A0000h BFFFFh Video Buffer B0000h B7FFFh M...

Page 39: ...5 Board Resources 32 SPC 8450 LVA...
Page 40: ...or any abnormal condition occurs The watchdog timer comes with 255 level time out interval 1 255 seconds per interval which can be adjusted by software setting There is a tolerance of 2 second for th...

Page 41: ...H OUT DX AL OUT DX AL Set WDT function at pin89 MOV DX 2EH MOV AL 2BH OUT DX AL MOV DX 2FH MOV AL 0DH OUT DX AL Select logical device WDT number 8 MOV DX 2EH MOV AL 07H OUT DX AL MOV DX 2FH MOV AL 08H...

Page 42: ...MOV DX 2EH MOV AL 87H OUT DX AL OUT DX AL Select logical device WDT number 8 MOV DX 2EH MOV AL 07H OUT DX AL MOV DX 2FH MOV AL 08H OUT DX AL Set time of WDT and start to count down MOV DX 2EH MOV AL...

Page 43: ...ct logical device WDT number 8 MOV DX 2EH MOV AL 07H OUT DX AL MOV DX 2FH MOV AL 08H OUT DX AL Stop count down of WDT MOV DX 2EH MOV AL F6H OUT DX AL MOV DX 2FH The data of 00H is stop WDT MOV AL 00H...

Page 44: ...screen during the POST Power On Self Test Press DEL to enter SETUP If the message disappears before you respond and you still wish to enter Setup restart the system to try again by turning it OFF the...

Page 45: ...ons for the highlighted item To exit the Help Window press Esc or the F1 key again In Case of Problems If after making and saving system changes with Setup you discover that your computer no longer is...

Page 46: ...udes the following main setup categories Recall that some systems may not include all entries Standard CMOS Features Use this menu for basic system configuration Advanced BIOS Features Use this menu t...

Page 47: ...s for optimal performance system operations While Award has designed the custom BIOS to maximize performance the factory has the right to change these defaults to meet their needs Supervisor User Pass...

Page 48: ...Press Enter to enter the sub menu of detailed options IDE Secondary Master Options are in its sub menu described in Table 64 Press Enter to enter the sub menu of detailed options Drive A Drive B None...

Page 49: ...he type of fixed disk User Type will let you select the number of cylinders heads etc Note PRECOMP 65535 means NONE Capacity Auto Display your disk drive size Disk drive capacity Approximated Note tha...

Page 50: ...of the hard disk drive You should then run an anti virus program Keep in mind that this feature protects only the boot sector not the entire hard drive CAUTION Many disk diagnostic programs that acces...

Page 51: ...commend that you normally disable quick POST Better to find a problem during POST than lose data during your work First Second Third Other Boot Device The BIOS attempts to load the operating system fr...

Page 52: ...stead of controlling cursor operations Gate A20 option Gate A20 refers to the way the system addresses memory above 1 MB extended memory When set to Fast the system chipset controls Gate A20 When set...

Page 53: ...ot entered at the prompt Setup The system will boot but access to Setup will be denied if the correct password is not entered at the prompt Note To disable security select PASSWORD SETTING at Main Men...

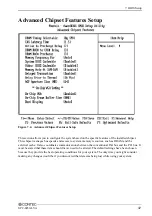
Page 54: ...s to system memory resources such as DRAM and the external cache It also coordinates communications between the conventional ISA bus and the PCI bus It must be stated that these items should never nee...

Page 55: ...K of 2 2 or 3 3 The system board designer should set the values in this field depends on the DRAM installed specifications of the installed DRAM or the installed CPU Active to Precharge delay Select t...

Page 56: ...esult Video BIOS Cacheable Selecting Enabled allows caching of the video BIOS ROM at C0000h to C7FFFh resulting in better video performance However if any program writes to this memory area a system e...

Page 57: ...e dedicated for graphics memory address space Host cycles that hit the aperture range are forwarded Host cycles that hit the aperture range are forwarded to the AGP without any translation On Chip VGA...

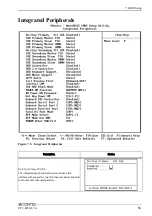
Page 58: ...d Peripherals Figure 7 5 Integrated Peripherals Description Choice On Chip Primary PCI IDE The integrated peripheral controller contains an IDE interface with support for two IDE channels Select Enabl...

Page 59: ...transfer rate for each IDE device On Chip Secondary PCI IDE The integrated peripheral controller contains an IDE interface with support for two IDE channels Select Enabled to activate each channel se...

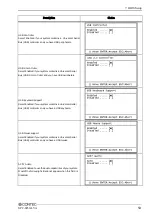
Page 60: ...al Bus USB 2 0 controller and you have USB peripherals USB Keyboard Support Select Enabled if your system contains a Universal Serial Bus USB controller and you have a USB keyboard USB Mouse support S...

Page 61: ...ller select Disabled to turn off the Internal LAN controller when you do not want to use this function IDE HDD Block mode Block mode is also called block transfer multiple commands or multiple sector...

Page 62: ...in FDC or the system has no floppy drive select Disabled in this field Onboard Serial Port 1 Select a logical COM port name and matching address for the first and second serial ports Select an address...

Page 63: ...l printer port Parallel Port Mode Selected an operating mode for the onboard parallel port Select Compatible or extended unless you are certain both your hardware and software support EPP or ECP mode...

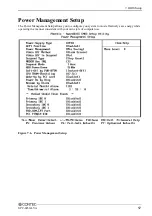
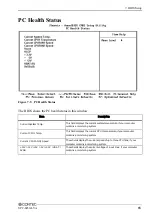
Page 64: ...7 Power Management Setup The Power Management Setup allows you to configure you system to most effectively save energy while operating in a manner consistent with your own style of computer use Figure...

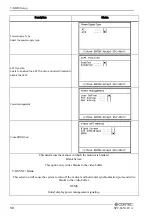
Page 65: ...sable the APCI Power management Video Off Method This determines the manner in which the monitor is blanked Blank Screen This option only writes blanks to the video buffer V H SYNC Blank This selectio...

Page 66: ...s the manner in which the monitor is blanked Suspend Type Select the Suspend Type MODEM Use IRQ Name the interrupt request IRQ line assigned to the modem if any on your system Activity of the selected...

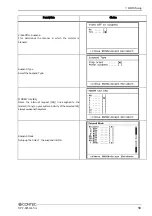
Page 67: ...enabled turning the system off with the on off button places the system is a very low power usage state with only enough circuitry receiving power to detect power button activity or Resume by Ring act...

Page 68: ...an incoming call on the modem awakens the system from a soft off state Resume by Alarm When Enabled your can set the date and time at which the RTC real time clock alarm awakens the system from Suspe...

Page 69: ...nect is a system which allows I O devices to operate at speeds nearing the speed the CPU itself uses when communicating with its own special components This section covers some very technical items an...

Page 70: ...d System Configuration Data ESCD when you exit Setup if you have installed a new add on and the system reconfiguration has caused such a serious conflict that the operating system can not boot Resourc...

Page 71: ...g on the type of device using the interrupt Legacy ISA Devices compliant with the original PC AT bus specification requiring a specific interrupt Such as IRQ4 for serial port 1 PCI ISA PnP Devices com...

Page 72: ...ur computer contains a monitoring system Current CPU1 Temp This field displays the current CPU1 temperature if your computer contains a monitoring system Current CPUFAN1 2 Speed These fields display t...

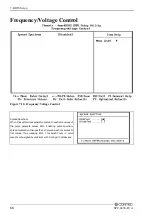
Page 73: ...Spectrum When the system clock generator pulses the extreme values of the pulse generate excess EMI Enabling pulse spectrum spread modulation changes the extreme values from spikes to flat curves thus...

Page 74: ...og box with a message similar to Load Fail Safe Defaults Y N N Pressing Y loads the BIOS default values for the most stable minimal performance system operations Load Optimized Defaults When you press...

Page 75: ...e selection and not enter a password To disable a password just press Enter when you are prompted to enter the password A message will confirm the password will be disabled Once the password is disabl...

Page 76: ...in CMOS any change The previous selections remain in effect This exits the Setup utility and restarts your computer POST Messages During the Power On Self Test POST if the BIOS detects an error requi...

Page 77: ...tch is set incorrectly Display switch on the motherboard can be set to either monochrome or color This indicates the switch is set to a different setting than indicated in Setup Determine which settin...

Page 78: ...orrectly and no keys are being pressed during the boot If you are purposely configuring the system without a keyboard set the error halt condition in Setup to HALT ON ALL BUT KEYBOARD This will cause...

Page 79: ...system will boot in ISA mode which allows you to run the EISA Configuration Utility Should have EISA board but not found PLEASE RUN EISA CONFIGURATION UTILITY The board installed is not responding to...

Page 80: ...key Unlock the key BIOS detect the keyboard is locked P17 of keyboard controller is pulled low Keyboard error or no keyboard present Cannot initialize the keyboard Make sure the keyboard is attached...

Page 81: ...cache socket 7 or below C3h Expand compressed BIOS code to DRAM C5h Call chipset hook to copy BIOS back to E000 F000 shadow RAM 0h1 Expand the Xgroup codes locating in physical address 1000 0 02h Res...

Page 82: ...F000 for ESCD DMI support 11h Reserved 12h Use walking 1 s algorithm to check out interface in CMOS circuitry Also set real time clock power status and then check for override 13h Reserved 14h Program...

Page 83: ...take into consideration of the ESCD s legacy information 4 Onboard clock generator initialization Disable respective clock resource to empty PCI DIMM slots 5 Early PCI initialization Enumerate PCI bu...

Page 84: ...ncluding Award title CPU type CPU speed 2Eh Reserved 2Fh Reserved 30h Reserved 31h Reserved 32h Reserved 33h Reset keyboard except Winbond 977 series Super I O chips 34h Reserved 35h Reserved 36h Rese...

Page 85: ...word of each 64K page 2 Program writes allocation for AMD K5 CPU 4Ah Reserved 4Bh Reserved 4Ch Reserved 4Dh Reserved 4Eh 1 Program MTRR of M1 CPU 2 Initialize L2 cache for P6 class CPU program CPU wi...

Page 86: ...ed 59h Initialize the combined Trend Anti Virus code 5Ah Reserved 5Bh Optional Feature Show message for entering AWDFLASH EXE from FDD optional 5Ch Reserved 5Dh 1 Initialize Init_Onboard_Super_IO swit...

Page 87: ...6Dh 1 Assign resources to all ISA PnP devices 2 Auto assign ports to onboard COM ports if the corresponding item in Setup is set to AUTO 6Eh Reserved 6Fh 1 Initialize floppy controller 2 Set up flopp...

Page 88: ...screen logo is supported If errors occur report errors wait for keys If no errors occur or F1 key is pressed to continue Clear EPA or customization logo 80h Reserved 81h Reserved 82h 1 Call chipset po...

Page 89: ...PCI devices 7 Initialize APM 8 Clear noise of IRQs 86h Reserved 87h Reserved 88h Reserved 89h Reserved 90h Reserved 91h Reserved 92h Reserved 93h Read HDD boot sector information for Trend Anti Virus...

Page 90: ...scription 95h 1 Program daylight saving 2 Update keyboard LED typematic rate 96h 1 Build MP table 2 Build update ESCD 3 Set CMOS century to 20h or 19h 4 Load CMOS time into DOS timer tick 5 Build MSIR...

Page 91: ...55 0025 Japan Japanese http www contec co jp English http www contec com Chinese http www contec com cn No part of this document may be copied or reproduced in any form by any means without prior writ...

Reviews: