background image

7. BIOS Setup


50

SPC-8520-LA , SPC-8521-LA

Description

Choice

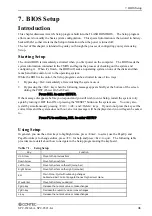
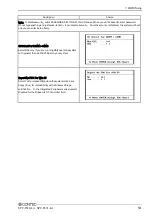
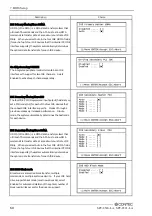
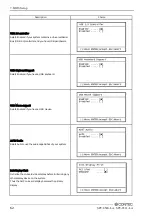
Execute Disable Bit
When disabled, forces the XD feature flag to always return
0.

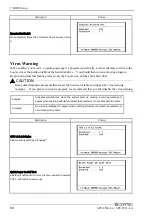
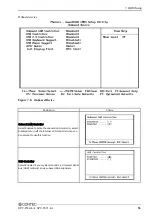
Virus Warning

When enabled, you receive a warning message if a program (specifically, a virus) attempts to write to the
boot sector or the partition table of the hard disk drive.    You should then run an anti-virus program.
Keep in mind that this feature protects only the boot sector, not the entire hard drive.

CAUTION


Many disk diagnostic programs that access the boot sector table can trigger the virus warning
message.    If you plan to run such a program, we recommend that you first disable the virus warning.

Enabled

Activates automatically when the system boots up causing a warning message to
appear when anything attempts to access the boot sector or hard disk partition table.

Disabled

No warning message will appear when anything attempts to access the boot sector or
hard disk partition table.

Description

Choice

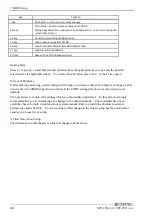
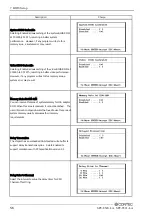
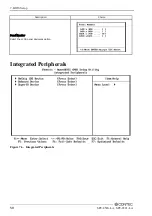
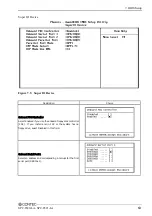
CPU L1 & L2 Cache
Please use this setting by “Enabled”.

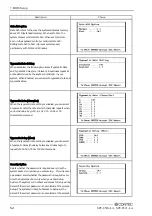
Quick Power On Self Test
Selecting Enabled can shorten the time required to execute
POST (self-test upon power-up).

Summary of Contents for SPC-8520-LA

Page 1: ...SBC Series Single Board Computer PCI Half for Pentium M with LAN Audio SPC 8520 LA Celeron M 800MHz with LAN Audio SPC 8521 LA User s Manual CONTEC CO LTD...

Page 2: ...ith bracket 1 Parallel port 25 pin D SUB female x 1 ribbon cable with bracket 1 Audio jack ribbon cable with bracket 1 6 pin mini DIN cable 2 in 1 for PS2 Mouse Keyboard functions 1 Jumper short pin 5...

Page 3: ...sion or any questionable item in this document please feel free to notify CONTEC CO LTD Regardless of the foregoing statement CONTEC assumes no responsibility for any errors that may appear in this do...

Page 4: ...res 1 Option List 2 Customer Support 3 Web Site 3 Limited One Year Warranty 3 How to Obtain Service 3 Liability 3 Safety Precautions 4 Safety Information 4 Handling Precautions 4 Environment 5 Inspect...

Page 5: ...CNL1 22 Parallel Port Connector CNP1 23 Keyboard Mouse Connector CNQ1 24 External Keyboard Connector CNQ2 24 USB Connector CNU1 CNU2 25 External Battery Connector CNW1 25 Front Panel Connector CN1 26...

Page 6: ...pters 46 Advanced BIOS Features Setup 47 Virus Warning 50 Advanced Chipset Features Setup 54 Integrated Peripherals 58 Power Management Setup 65 PnP PCI Configuration Setup 70 PC Health Status 72 Freq...

Page 7: ...vi SPC 8520 LA SPC 8521 LA...

Page 8: ...rom a CF card When connecting external devices or building the system please read this manual carefully Features SPC 8520 LA Supported CPU Intel R Pentium R M processor 1 6G 2 0GHz FSB400MHz Intel R C...

Page 9: ...eleron M 1 5GHz CPU CPUPMC 13 Celeron M 1 3GHz CPU Heat Sink Fan For SPC 8520 LA HSF PM Heat Sink Fan for Pentium M Celeron M Memory PC2100 SDRAM No parity PC MDD256 200 200 Pin SO DIMM DDR Memory PC2...

Page 10: ...ly when this device is returned freight prepaid with a copy of the original invoice and a Return Merchandise Authorization to the distributor or the CONTEC group office from which it was purchased Thi...

Page 11: ...ing Precautions CAUTION Do not modify the product CONTEC will bear no responsibility for any problems etc resulting from modifying this product Do not strike or bend the product Otherwise the product...

Page 12: ...1 1 1 1 1 1 1 1 Check that the board has no dust or foreign matter adhering Check that the bus connector of the board and its cable have been plugged correctly The gold plated leads of the bus connec...

Page 13: ...1 Introduction 6 SPC 8520 LA SPC 8521 LA...

Page 14: ...header 10 pin connector RS 232C x 1 RS 232C 422A 485 x 1 Baud rate 50 115 200bps programmable Parallel I F One box header 26 pin connector One high speed parallel port support SPP EPP ECP mode On boa...

Page 15: ...y Power supply specifications Max Pentium M 1 6GHz 5VDC 5 9 0A 12VDC 5 0 1A For fan Average 5VSB Stand by 5 0 5A 5VDC 5 5 0A 5VSB Stand by 5 0 5A Operating temperature Operating Humidity 0 60 C 3 10 9...

Page 16: ...he high frequency CPU the quality of the power supply is even more important For the best performance makes sure your power supply provides a range of 4 75 volts minimum to 5 25 volts maximum DC power...

Page 17: ...LAN Connector CN3 ATX power control Connector CNP1 Parallel Port Connector CN6 External Power Connector only SPC 8521 LA CNQ1 Keyboard Mouse Connector CNA1 Audio connector CNQ2 External Keyboard Conne...

Page 18: ...DIMM HUB LINK Analog RGB PCI BUS ICH4 Primary IDE AC97 CODEC PCI FINGER Connector LPC SUPER I O W83627 Parallel FWH BIOS LVDS Connector Analog RGB Connector PSB AC Link CFSlot S IDE Audio Jack FDD SER...

Page 19: ...2 System Reference 12 SPC 8520 LA SPC 8521 LA...

Page 20: ...t it to the CNJI connector Only SPC 8520 LA 4 Insert the DRAM module with correct orientation 5 The jumpers are set up according to the conditions to be used 6 Insert all external cables Hard disk flo...

Page 21: ...et 478 contains a turn lock to secure the processor Make sure the notch on the corner of the CPU corresponds with the notch on the inside of the socket The CPU should always have a Heat Sink and a coo...

Page 22: ...aximum memory of 1GB Using the non ECC DDR SDRAM SO DIMM The CPU board supports the following memory features 200 pin SO DIMM with gold plated contacts 200 MHz PC1600 266 MHz PC2100 DDR SDRAM Non ECC...

Page 23: ...patible with ATA ATA 4 Table 3 3 Compact Flash Slot Pin No 1 3 5 7 9 11 13 15 17 19 21 23 25 27 29 31 33 35 37 39 41 43 45 47 49 Function GND D4 D6 CS1 GND GND VCC GND GND A1 D0 D2 GND D11 D13 D15 GND...

Page 24: ...ed floppy drive ribbon cable After connecting the single end to the product connect the two plugs on the other end to the floppy drives Table 3 4 Floppy Disk Drive Connector Pin No 1 3 5 7 9 11 13 15...

Page 25: ...DST RTS CTS RI N C RS 422A TX TX RX RX GND RTS RTS CTS CTS N C RS 485 TX TX RX RX GND N C N C N C N C N C CNG1 CNG2 1 6 5 10 RS 422A 485 supported for Serial2 CNG2 connector only Pin assignment after...

Page 26: ...ax RTS JP2 7 8 TXD D JP2 5 6 JP2 4 6 R RXD 47k 6 2k 6 2k 47k R CTS 47k 6 2k 6 2k 47k RTS D JP1 3 4 120 JP1 1 2 120 JP1 7 8 120 10 5 6 1 JP1 5 6 120 5V Terminating Resister Figure 3 1 RS 422A RS 485 Se...

Page 27: ...provided IDE hard disk ribbon cable After connecting the single end to the product connect the two plugs at the other end to your hard disk s If you install two hard disks you must configure the secon...

Page 28: ...ensor input Table 3 10 FAN1 Connector Pin No 1 2 3 Function GND POWER FAN CNJ1 Housing 5102 03 molex Contact 5103 molex 1 2 3 FAN2 Connector CNJ2 CNJ2 is a 3 pins box header for the cooling fan power...

Page 29: ...CLK1 GND DDC_CLK Reserved Reserved BKL_EN GND GND CNK1 Housing DF13 30DS 1 25C HIROSE Contact DF13 2630SCF HIROSE 2 1 30 29 LCD_VDD 3 3V LCD power out 1A Max 5V BKL Power out controlled by BKL_EN sign...

Page 30: ...patible Standard mode Bi Directional PS 2 compatible Bi Directional EPP A driver from the peripheral manufacturer is required for operation Bi Directional High speed ECP Table 3 14 Parallel Port Conne...

Page 31: ...pin definition is shown below Table 3 15 Keyboard Mouse Connector Pin No 1 2 3 4 5 6 Function KB or MS Data MS or KB DATA GND 5VSB KB or MS Clock MS or KB Clock 3 6 4 2 1 5 CNQ1 Table 3 16 K B M S Se...

Page 32: ...s requirements even if no device or a low speed USB device is attached to the cable Use shielded cable that meets the requirements for full speed devices External Battery Connector CNW1 It is a 2 Pin...

Page 33: ...ve or writing it Speaker An external speaker can be installed in this product as an option When the computer cannot use the video interface the speaker offers the error warning sound in POST Moreover...

Page 34: ...must be enabled in the Setup program and in the operation system When the system BIOS receives the correct APM command from the operating system the BIOS turns off power to the computer Table 3 22 AT...

Page 35: ...LA CN6 This connector support only SPC 8521 LA The supply of the power is possible from this connector in the case that it does not use the Back Plane Table 3 23 External Power Connector Pin No 1 2 3...

Page 36: ...Terminator JP1 Terminator CTS for RS 422A RTS for RS 422A RXD for RS 422A 485 TXD for RS 422A 485 Function Terminating resisiter provided Terminating resisiter provided Terminating resisiter provided...

Page 37: ...5 3 1 23 21 20 18 1614121 0 8 6 4 2 25 22 JP3 19 17 151311 9 7 5 3 1 23 21 20 18 1614121 0 8 6 4 2 25 22 JP2 JP2 JP2 9 7 5 3 1 10 8 6 4 2 9 7 5 3 1 10 8 6 4 2 9 7 5 3 1 10 8 6 4 2 Transmit date contro...

Page 38: ...the receiver at the same time preventing the port from receiving output data to an external device RS 422A Setting RTS JP2 7 8 TXD TX RTS TX RTS RX CTS RX CTS JP1 7 8 JP1 5 6 JP1 3 4 JP1 1 2 D R D R R...

Page 39: ...ister W Transmitter holding Register THR 0 R Receiver buffer Register RBR 02F8h 1 W Divisor latch Register LSB DLL 1 W Divisor latch Register MSB DLM 02F9h 0 W Interrupt enable Register IER 02FAh X R...

Page 40: ...ble 4 4 Clear CMOS Content JBAT1 Function Normal Operation Default Clear CMOS Content 3 2 1 3 2 1 Clear ROM Content JP5 It is possible to start by invalidating the BIOS setting because pin 2 and pin 3...

Page 41: ...4 Jumper Setting 34 SPC 8520 LA SPC 8521 LA...

Page 42: ...8 896KB Expansion Area 896 960KB Extended System BIOS Area 960 1MB System BIOS Area Table 5 2 Memory Segment Memory Segments Comments 00000h 9FFFFh 0 640K DOS Region A0000h BFFFFh Video Buffer B0000h...

Page 43: ...5 Board Resources 36 SPC 8520 LA SPC 8521 LA...

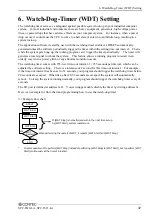
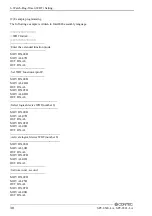
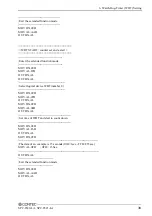
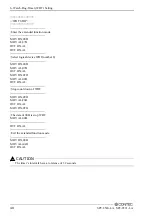
Page 44: ...er glitch or any abnormal condition occurs The watchdog timer comes with 255 level time out interval 1 255 seconds per interval which can be adjusted by software setting There is a tolerance of 2 seco...

Page 45: ...AL 87H OUT DX AL OUT DX AL Set WDT function at pin89 MOV DX 2EH MOV AL 2BH OUT DX AL MOV DX 2FH MOV AL 0DH OUT DX AL Select logical device WDT number 8 MOV DX 2EH MOV AL 07H OUT DX AL MOV DX 2FH MOV A...

Page 46: ...mode MOV DX 2EH MOV AL 87H OUT DX AL OUT DX AL Select logical device WDT number 8 MOV DX 2EH MOV AL 07H OUT DX AL MOV DX 2FH MOV AL 08H OUT DX AL Set time of WDT and start to count down MOV DX 2EH MO...

Page 47: ...L Select logical device WDT number 8 MOV DX 2EH MOV AL 07H OUT DX AL MOV DX 2FH MOV AL 08H OUT DX AL Stop count down of WDT MOV DX 2EH MOV AL F6H OUT DX AL MOV DX 2FH The data of 00H is stop WDT MOV A...

Page 48: ...POST Power On Self Test Press DEL to enter SETUP If the message disappears before you respond and you still wish to enter Setup restart the system to try again by turning it OFF then ON or pressing t...

Page 49: ...ghted item To exit the Help Window press Esc or the F1 key again In Case of Problems If after making and saving system changes with Setup you discover that your computer no longer is able to boot the...

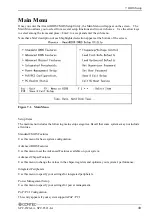
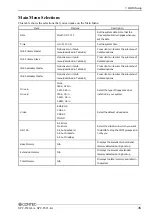
Page 50: ...ms The main menu includes the following main setup categories Recall that some systems may not include all entries Standard CMOS Features Use this menu for basic system configuration Advanced BIOS Fea...

Page 51: ...ttings for optimal performance system operations While Award has designed the custom BIOS to maximize performance the factory has the right to change these defaults to meet their needs Supervisor User...

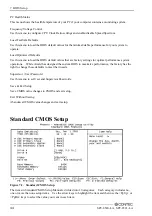
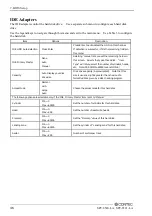
Page 52: ...le 64 Press Enter to enter the sub menu of detailed options IDE Secondary Master Options are in its sub menu described in Table 64 Press Enter to enter the sub menu of detailed options Drive A Drive B...

Page 53: ...d disk User Type will let you select the number of cylinders heads etc Note PRECOMP 65535 means NONE Capacity Auto Display your disk drive size Disk drive capacity Approximated Note that this size is...

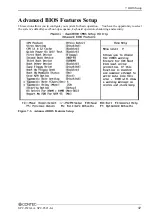
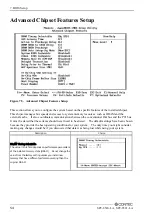
Page 54: ...BIOS Features Setup This section allows you to configure your system for basic operation You have the opportunity to select the system s default speed boot up sequence keyboard operation shadowing and...

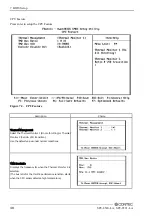
Page 55: ...al Management Select the Thermal Monitor 1 On die throtting or Thermal Monitor 2 Ratio VID transition Use the default values under normal conditions TM2 Bus Ratio Displays the frequency for when the T...

Page 56: ...7 BIOS Setup SPC 8520 LA SPC 8521 LA 49 Description Choice TM2 Bus VID Indicates the voltage for the throttle performance condition which starts when a high temperature is detected...

Page 57: ...isk diagnostic programs that access the boot sector table can trigger the virus warning message If you plan to run such a program we recommend that you first disable the virus warning Enabled Activate...

Page 58: ...loppy Seek When Enabled the BIOS tests seeks floppy drives to determine whether they have 40 or 80 tracks Only 360 KB floppy drives have 40 tracks drives with 720 KB 1 2 MB and 1 44 MB capacity all ha...

Page 59: ...Sec When the typematic rate setting is enabled you can select a typematic rate the rate at which character repeats when you hold down a key of 6 8 10 12 15 20 24 or 30 characters per second Typematic...

Page 60: ...he security is disabled the system will boot and you can enter Setup freely OS Select For DRAM 64MB Select OS2 only if you are running OS 2 operating system with greater than 64 MB of RAM on your syst...

Page 61: ...and the PCI bus It must be stated that these items should never need to be altered The default settings have been chosen because they provide the best operating conditions for your system The only tim...

Page 62: ...iming delay between the CAS and RAS strobe signals used when DRAM is written to read from or refreshed Fast gives faster performance and Slow gives more stable performance This field applies only when...

Page 63: ...ever if any program writes to this memory area a system error may result Memory Hole At 15M 16M You can reserve this area of system memory for ISA adapter ROM When this area is reserved it cannot be c...

Page 64: ...at hit the aperture range are forwarded Host cycles that hit the aperture range are forwarded to the AGP without any translation On Chip VGA setting On Chip VGA When Enabled to choice the on board VGA...

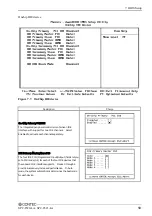
Page 65: ...7 BIOS Setup 58 SPC 8520 LA SPC 8521 LA Description Choice Panel Number Select the LVDS panel device resolution Integrated Peripherals Figure 7 6 Integrated Peripherals...

Page 66: ...support for two IDE channels Select Enabled to activate each channel separately IDE Primary Master Slave PIO The four IDE PIO Programmed Input Output fields let you set a PIO mode 0 4 for each of the...

Page 67: ...set a PIO mode 0 4 for each of the four IDE devices that the onboard IDE interface supports Modes 0 through 4 provide successively increased performance In Auto mode the system automatically determin...

Page 68: ...ce Onboard LAN Controller Select Enabled to active the onboard LAN controller select Disabled to turn off the Internal LAN controller when you do not want to use this function USB Controller Select En...

Page 69: ...peripherals USB Keyboard Support Select Enabled if you have a USB keyboard USB Mouse support Select Enabled if you have a USB mouse AC 97 Audio Select Auto to use the audio capabilities of your syste...

Page 70: ...ion Choice Onboard FDC Controller Select Enabled if you use the onboard floppy disk controller FDC If you install and in FDC or the system has no floppy drive select Disabled in this field Onboard Ser...

Page 71: ...ond serial port SERIAL2 Onboard Parallel Port Select the on board parallel port address and interrupt Parallel Port Mode Selected an operating mode for the onboard parallel port Select Normal unless y...

Page 72: ...Power Management Setup allows you to configure you system to most effectively save energy while operating in a manner consistent with your own style of computer use Figure 7 10 Power Management Setup...

Page 73: ...the manner in which the monitor is blanked Blank Screen This option only writes blanks to the video buffer V H SYNC Blank This selection will cause the system to turn off the vertical and horizontal...

Page 74: ...f power supply turn OFF Instant off If a button is pushed it turns off immediately Delay 4 Sec If a button is pushing continues for 4 seconds it turns off PWRON After PWR Fail Sets the boot up state f...

Page 75: ...gnal on the serial Ring Indicator RI line in other words an incoming call on the modem awakens the system from a soft off state Resume by Alarm When Enabled your can set the date and time at which the...

Page 76: ...7 BIOS Setup SPC 8520 LA SPC 8521 LA 69 Description Choice...

Page 77: ...ts This section covers some very technical items and it is strongly recommended that only experienced users should make any changes to the default settings Figure 7 11 PnP PCI Configuration Setup Desc...

Page 78: ...n the next IRQ DMA Resources setup This will prevent the IRQ DMA number from being assigned automatically by BIOS IRQ n Resources Figure 7 12 IRQ n Resources When resources are controlled manually ass...

Page 79: ...current system temperature if your computer contains a monitoring system Current CPU1 Temp This field displays the current CPU temperature if your computer contains a monitoring system Current CPUFAN...

Page 80: ...OS Setup SPC 8520 LA SPC 8521 LA 73 Frequency Voltage Control Figure 7 14 Frequency Voltage Control Description Choices CPU Clock Ratio Use this field at Default Spread Spectrum Use this field at Defa...

Page 81: ...in creating a password ENTER PASSWORD Type the password up to eight characters in length and press Enter The password typed now will clear any previously entered password from CMOS memory You will be...

Page 82: ...oring in CMOS any change The previous selections remain in effect This exits the Setup utility and restarts your computer POST Messages During the Power On Self Test POST if the BIOS detects an error...

Page 83: ...nstalled in the system is different from the CMOS definition Run Setup to reconfigure the drive type correctly Display switch is set incorrectly Display switch on the product can be set to either mono...

Page 84: ...this error appears the system will boot in ISA mode which allows you to run the EISA Configuration Utility Keyboard error or no keyboard present Cannot initialize the keyboard Make sure the keyboard i...

Page 85: ...arity error in Random Access Memory Should be empty but EISA board found PLEASE RUN EISA CONFIGURATION UTILITY A valid board ID was found in a slot that was configured as having no board ID NOTE When...

Page 86: ...or Hard disk s fail 10 Unable to recalibrate fixed disk Hard disk s fail 08 Sector Verify failed Keyboard is locked out Unlock the key Unlock the key BIOS detect the keyboard is locked P17 of keyboard...

Page 87: ...eyboard mouse followed by a port interface swap optional Reset keyboard for Winbond 977 series Super I O chips 0Bh Reserved 0Ch Reserved 0Dh Reserved 0Eh Test F000h segment shadow to see whether it is...

Page 88: ...VGA BIOS and put it into C000 0 24h Reserved 25h Reserved 26h Reserved 27h Initialize INT 09 buffer 28h Reserved 29h Program CPU internal MTRR P6 PII for 0 640K memory address Initialize the APIC for...

Page 89: ...latform 56h Reserved 57h Display PnP logo Early ISA PnP initialization Assign CSN to every ISA PnP device 58h Reserved 59h Initialize the combined Trend Anti Virus code 5Ah Reserved 5Bh Optional Featu...

Page 90: ...een logo is supported If errors occur report errors wait for keys If no errors occur or F1 key is pressed to continue Clear EPA or customization logo 80h Reserved 81h Reserved 82h Call chipset power m...

Page 91: ...agement final initialization Clear screen display summary table Program K6 write allocation Program P6 class write combining 95h Program daylight saving Update keyboard LED typematic rate 96h Build MP...

Page 92: ...aka 555 0025 Japan Japanese http www contec co jp English http www contec com Chinese http www contec com cn No part of this document may be copied or reproduced in any form by any means without prior...

Reviews: