


Fig.1
X
2
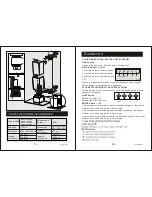
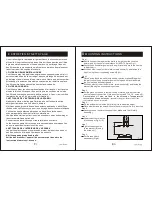
B INSTRUCTIONS DE MONTAGE
Étape 1
Posez la barre de support contre le mur en respectant un écart avec le plan
de travail calculé comme suit : X+(650~700) mm (Fig.1).
Vérifiez l'alignement horizontal à l'aide d'un niveau à bulle et marquez les 4
trous à percer (1).
Percez les trous. Insérez les chevilles de 8 mm (2) et fixez la barre (3) à l'aide
des vis correspondantes (Fig. 2).
Étape 2
Après avoir déterminé la position optimale, posez le support (B) contre le mur,
vérifiez l'alignement horizontal à l'aide d'un niveau à bulle et marquez les 2
trous à percer aux extrémités. Percez les trous (4). Insérez les 2 chevilles de
8 mm (5) et fixez le support (B) à l'aide des vis correspondantes.
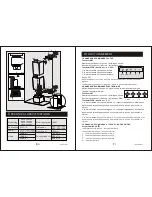
Étape 3
Étape 4
Étape 5
Étape 6
Étape 7
Étape 8
Positionnez le verre sur la hotte, fixez-le en utilisant 4 vis. Insérez le conduit
dans le raccord prévu pour celui-ci et fixez-le à l'aide de deux vis ST2.9*10 (7).
Le kit de recyclage d'air a été préfixé dans la rallonge. Pour séparer le kit de
recyclage d'air et la rallonge, fixez le tuyau, puis réinstallez le kit de recyclage
et la rallonge.
Fixez la rallonge à l'élément (8) en la faisant glisser à la hauteur souhaitée.
P
lacez l'élément et la rallonge sur le conduit d'évacuation jusqu'à insertion
complète.
Accrochez la hotte de la plaque de cuisson sur la barre de support Assurez-
vous qu'elle soit solidement fixée (9).
Faites sortir le conduit à l'extérieur de la cuisine, comme sur la Fig. 3 (10)
Vissez la rallonge sur la patte
de fixation (B) à l'aide des vis
(11).
our le filtre à charbon si
nécessaire. (Fig. 4).
5
3. CLEANING THE OUTSIDE OF THE APPLIANCE
The outside of the cooker hood should be cleaned using a damp cloth
and neutral liquid detergent or denatured alcohol.
Do not use products that contain abrasive substances, rough cloths or
cloths specifically designed for cleaning steel. Using abrasive substances
or rough cloths will inevitably damage the finish of steel.
The steel surface will be irrevocably damaged if the instructions above
are not complied with.
Keep these instructions together with the instructions for use of your
hood.
The manufacturer accepts no liability for any damage caused by
non-compliance with the instructions above.
4. CLEANING THE INSIDE OF THE APPLIANCE
The electrical parts or parts of the motor assembly inside the range
hood must not be cleaned using liquids or solvents.
Do not use abrasive products.
All the above operations must be performed after having
disconnected the appliance from the mains power supply.
E
MAINTENANCE AND CLEANING
Constant maintenance ensures the correct operation and efficiency of
the appliance over time. Special attention should be paid to the metal
grease-trapping filters and the charcoal filters. Frequent cleaning of
the filters and their supports will ensure that fats and grease do not
accumulate on the cooker hood, with the consequent risk of fire.
1. METAL GREASE-TRAPPING FILTERS
These trap the fat and grease particles suspended in the air, and
therefore should be washed every month in hot water and detergent,
without bending them. Wait until they are completely dry before
repositioning them. The metal filters could be cleaned in a dishwasher.
2. CHARCOAL FILTERS
These trap the odours present in the stream of air that passes through
them. The air is purified by passing a number of times through the filters
and being recirculated into the kitchen. The charcoal filters cannot be
cleaned, and should be replaced on average every 3-4 months(according
to use).
En
Fr


