background image


11


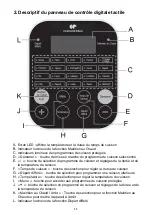
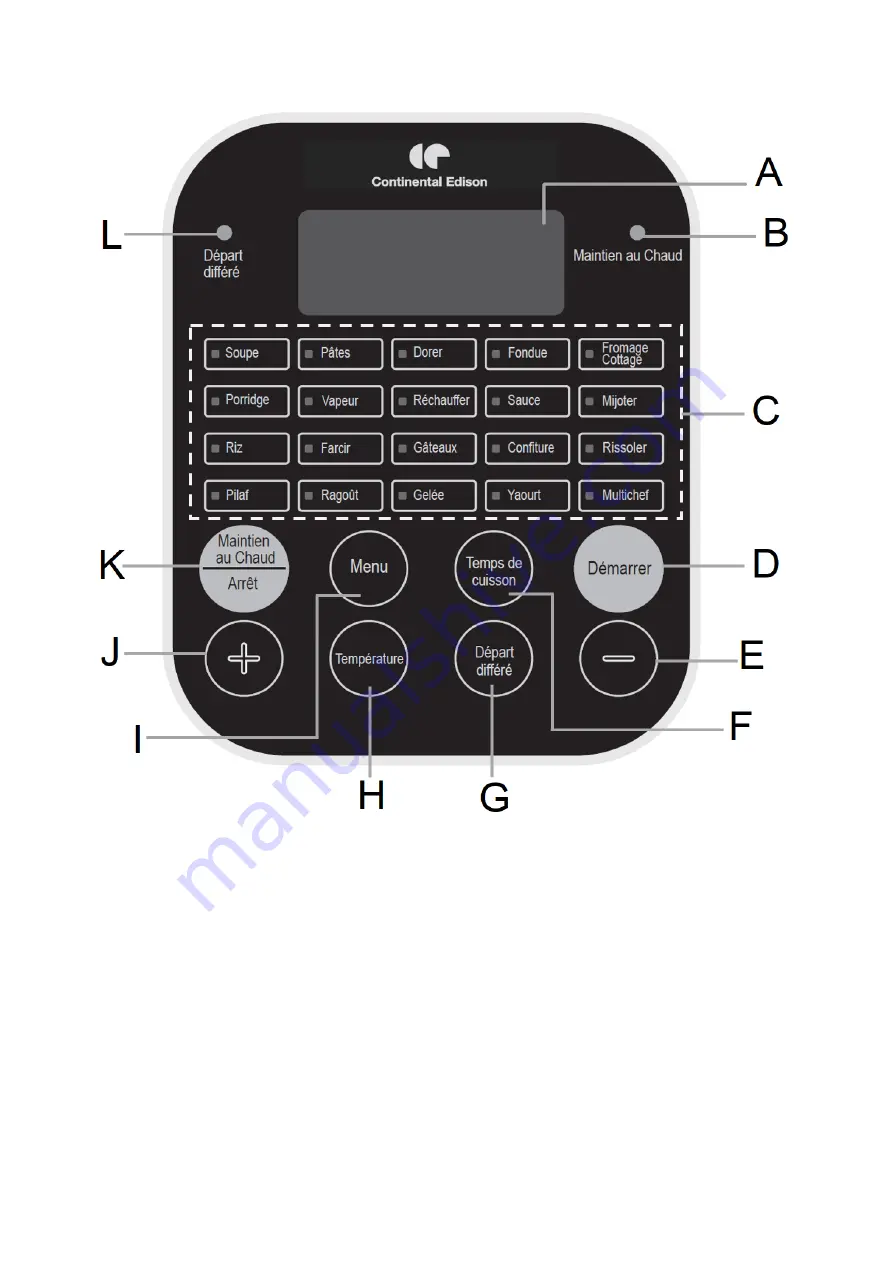
2. Descriptif du panneau de contrôle digitale tactile 


A. 

Ecran LED : affiche la température et la durée du temps de cuisson 

B. 

Indicateur lumineux de la fonction Maintien au Chaud 

C. 

Indicateurs lumineux des programmes de cuisson préréglés 

D. 

« Démarrer » : touche de mise en marche du programme de cuisson sélectionné 

E. 

«

 -


» : touche de sélection du programme de cuisson et réglages de la durée et de 

la température de cuisson 

F. 

« Temps de cuisson » : touche de sélection pour régler la durée de cuisson 

G. 

« Départ différé » : touche de sélection pour programmer une cuisson ultérieure 

H. 

« Température » : touche de sélection pour régler la température de cuisson 

I. 

«


Menu


» : touche pour accéder aux programmes de cuisson préréglés 

J. 

«

 + 

» : touche de sélection du programme de cuisson et réglages de la durée et de 

la température de cuisson 

K. 

«


Maintien au Chaud / Arrêt


» : Touche de sélection pour la fonction Maintien au 

Ch

aud ou pour mettre l’appareil à l’arrêt 

L. 

Indicateur lumineux de la fonction Départ différé 


Summary of Contents for CEMC900IN

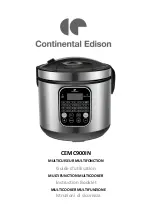
Page 1: ...CEMC900IN MULTICUISEUR MULTIFONCTION Guide d utilisation MULTIFUNCTION MULTICOOKER Instruction Booklet MULTICOOKER MULTIFUNZIONE Istruzioni di sicurezza ...

Page 2: ...à lire attentivement ce guide d utilisation jusqu au bout ses instructions détaillées ses avertissements et ses consignes de sécurité pour profiter au maximum de votre produit Conservez ce guide d utilisation pour toute consultation ultérieure ...

Page 3: ...SATION PAR LES CLIENTS DES HÔTELS MOTELS ET AUTRES ENVIRONNEMENTS À CARACTÈRE RÉSIDENTIEL o LES ENVIRONNEMENTS DE TYPE CHAMBRES D HÔTES CET APPAREIL PEUT ÊTRE UTILISÉ PAR DES ENFANTS AGES D AU MOINS 8 ANS À CONDITION QU ILS BÉNÉFICIENT D UNE SURVEILLANCE OU QU ILS AIENT REÇU DES INSTRUCTIONS QUANT À L UTILISATION DE L APPAREIL EN TOUTE SÉCURITÉ ET QU ILS COMPRENNENT BIEN LES DANGERS ENCOURUS CET A...

Page 4: ...OU PAR UN SYSTÈME DE COMMANDE A DISTANCE SÉPARÉ AVERTISSEMENT RISQUES DE BLESSURES EN CAS DE MAUVAISE UTILISATION DE L APPAREIL MISE EN GARDE ÉVITER TOUT DÉBORDEMENT SUR LE CONNECTEUR ATTENTION SURFACE CHAUDE LA SURFACE DE L ÉLÉMENT CHAUFFANT PRÉSENTE UNE CHALEUR RÉSIDUELLE APRES UTILISATION LES SURFACES SONT SUSCEPTIBLES DE DEVENIR CHAUDES AU COURS DE L UTILISATION LA TEMPÉRATURE DES SURFACES ACC...

Page 5: ...LS LES SURFACES SONT DE NATURE À CHAUFFER PENDANT L UTILISATION SOYEZ PARTICULIEREMENT PRUDENT E LORSQUE VOUS TOUCHEZ LE MULTICUISEUR FAITES ATTENTION À LA VAPEUR BRULANTE S ÉCHAPPANT DES ÉVENTS À VAPEUR PENDANT LA CUISSON ET À LA VAPEUR S ÉCHAPPANT DU MULTICUISEUR LORSQUE VOUS OUVREZ LE COUVERCLE ÉLOIGNEZ VOS MAINS ET VOTRE VISAGE DU MULTICUISEUR POUR ÉVITER TOUT CONTACT AVEC LA VAPEUR PENDANT ET...

Page 6: ...AS LA CUVE SI ELLE EST DEFORMÉE INSTRUCTIONS DE SECURITE CONCERNANT LE NETTOYAGE AVANT TOUTE OPÉRATION DE NETTOYAGE DÉBRANCHEZ ET LAISSEZ REFROIDIR L APPAREIL COMPLÈTEMENT NE JAMAIS PLONGER L APPAREIL SON FIL ÉLECTRIQUE ET SA PRISE DE COURANT DANS L EAU OU AUTRE LIQUIDE RETIREZ LES ACCESSOIRES AMOVIBLES LAVEZ LES AVEC UNE ÉPONGE IMBIBÉE DE LIQUIDE VAISSELLE A PH NEUTRE PUIS RINCEZ LES A L EAU AVAN...

Page 7: ...LTEZ UNE PERSONNE COMPÉTENTE N UTILISEZ JAMAIS D ACCESSOIRES OU DE PIÈCES D UN AUTRE FABRICANT L UTILISATION DE CE TYPE D ACCESSOIRES OU DE PIÈCES ENTRAÎNE L ANNULATION DE LA GARANTIE L APPAREIL NE DOIT PAS ÊTRE UTILISÉ S IL A CHUTÉ S IL PRÉSENTE DES DOMMAGES APPARENTS S IL FUIT OU PRÉSENTE DES ANOMALIES DE FONCTIONNEMENT DÉBRANCHEZ TOUJOURS LE PRODUIT EN CAS DE LONGUE PÉRIODE SANS UTILISATION ENL...

Page 8: ... AVEC DE L EAU ÉTOUFFEZ LES FLAMMES AVEC UN LINGE HUMIDE OU UTILISEZ UN EXTINCTEUR EN ORIENTANT LE JET VERS L APPAREIL DANS LE SENS DU VENT NE RANGEZ PAS DE PRODUITS INFLAMMABLES À PROXIMITÉ OU SOUS LE MEUBLE OÙ EST RANGÉ L APPAREIL NE FAITES PAS FONCTIONNER L APPAREIL A PROXIMITÉ DE MATÉRIAUX INFLAMMABLES TELS QUE STORES RIDEAUX TENTURES ETC En ce qui concerne l installation la manipulation le ne...

Page 9: ...RE UTILISATION 12 2 UTILISER VOTRE APPAREIL 14 IV NETTOYAGE ET ENTRETIEN 29 V ANOMALIES DE FONCTIONNEMENT 30 VI MISE AU REBUT 32 VII GARANTIE 33 Ce guide d utilisation est disponible dans les langues suivantes FR version originale EN translated from the original Toute autre traduction serait une traduction de la version originale Ce guide d utilisation ses modifications éventuelles ou toute nouvel...

Page 10: ...ifice de sortie vapeur et valve située sous le couvercle 4 Poignée 5 Récupérateur de condensation 6 Corps de l appareil 7 Panneau de contrôle digitale tactile 8 Base anti dérapante 9 Cuve graduée 10 Gobelet doseur gradué 11 Panier vapeur 12 6 pots de yaourts avec couvercles 13 Spatule 14 Cordon d alimentation ...

Page 11: ... de la température de cuisson F Temps de cuisson touche de sélection pour régler la durée de cuisson G Départ différé touche de sélection pour programmer une cuisson ultérieure H Température touche de sélection pour régler la température de cuisson I Menu touche pour accéder aux programmes de cuisson préréglés J touche de sélection du programme de cuisson et réglages de la durée et de la températu...

Page 12: ...nteneurs de collecte appropriés Les autres éléments d emballage adhésif attaches doivent être jetés avec les déchets ménagers Pour en savoir plus www quefairedemesdechets fr Lavez tous les accessoires avec une éponge imbibée de liquide vaisselle puis rincez les à l eau chaude avant de les sécher avec un torchon propre Nettoyez le corps de l appareil avec un chiffon sec et doux Ne jamais immerger l...

Page 13: ...s d utilisation Ne dépassez pas le niveau maximal de remplissage indiqué sur la paroi interne de la cuve par les marquages 1 8L 10 CUP Nejamaisfairefonctionnerl appareilsanslacuvemiseenplaceouavecune cuve vide Ne jamais mettre de l eau ou des ingrédients dans l appareil sans lacuveàl intérieur Vousrisquezd endommageretde réduirela duréedevie de l appareil Pour le transport sécurisé de l appareil u...

Page 14: ...t 5min 24h Incrément 1h Non Fermé Gâteaux 130 140 C Non 45min 40min à 2h Incrément 5min Non Oui Fermé Gelée 100 110 C Non 4h 2h à 8h Incrément 5min Non Non Fermé Farcir 100 110 C Non 20min 10min à 2h Incrément 5min 24h Incrément 1h Oui Fermé Ragoût 100 110 C Non 40min 30min à 2h30 Incrément 5min 24h Incrément 1h Oui Fermé Sauce 118 120 C Non 5min 5min à 30min Incrément 5min Non Oui Fermé Confiture...

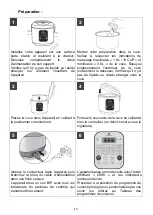
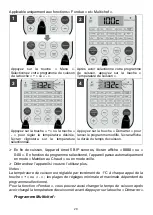
Page 15: ...pas de liquide ou résidu étranger sous la cuve Placez la cuve dans l appareil en veillant à la positionner correctement Fermez le couvercle de la cuve en veillant à bien le verrouiller un déclic sonore vous le signalera Insérez le connecteur dans l appareil puis branchez la prise du câble d alimentation dans une fiche secteur L appareil émet un son BIP avec tous les indicateurs du panneau de contr...

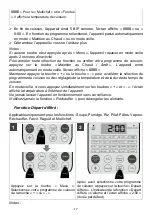
Page 16: ...omage Cottage Fondue Dorer Pâtes Soupe La touche vous permet de sélectionner successivement les programmes suivants Soupe Pâtes Dorer Fondue Fromage Cottage Porridge Vapeur Réchauffer Sauce Mijoter Riz Farcir Gâteaux Confiture Rissoler Pilaf Ragoût Gelée Yaourt Multichef Soupe Le programme sélectionné aura son indicateur qui clignote L écran affiche la durée de cuisson par défaut pour chaque progr...

Page 17: ...nez appuyer la touche ou la touche pour accélérer la sélection du programme de cuisson ou des réglages de la température et de la durée du temps de cuisson En mode veille si vous appuyez simultanément sur les touches et l écran affiche la température à l intérieur de l appareil Ne jamais laisser l appareil en fonctionnement sans surveillance N utilisez jamais la fonction Réchauffer pour décongeler...

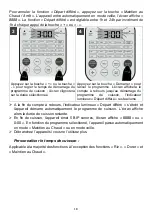
Page 18: ... le compte à rebours jusqu au démarrage du programme de cuisson l indicateur lumineux Départ différé reste allumé A la fin du compte à rebours l indicateur lumineux Départ différé s éteint et l appareil démarre automatiquement le programme de cuisson L écran affiche alors la durée de cuisson restante En fin de cuisson l appareil émet 5 BIP sonores l écran affiche 8888 ou 0 00 En fonction du progra...

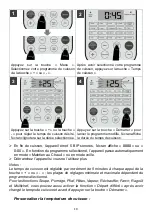
Page 19: ...onores l écran affiche 8888 ou 0 00 En fonction du programme sélectionné l appareil passe automatiquement en mode Maintien au Chaud ou en mode veille Débranchez l appareil si vous ne l utilisez plus Notes Le temps de cuisson est réglable par incrément de 5 minutes à chaque appui de la touche ou les plages de réglages minimale et maximale dépendent du programme sélectionné Pour les fonctions Soupe ...

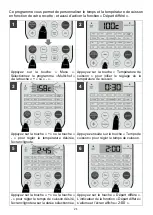
Page 20: ...fiche la durée du temps de cuisson En fin de cuisson l appareil émet 5 BIP sonores l écran affiche 8888 ou 0 00 En fonction du programme sélectionné l appareil passe automatiquement en mode Maintien au Chaud ou en mode veille Débranchez l appareil si vous ne l utilisez plus Notes La température de cuisson est réglable par incrément de 1 C à chaque appui de la touche ou les plages de réglages minim...

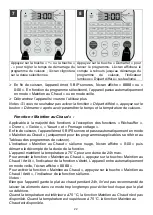
Page 21: ...de cuisson pour initier le réglage de la température de cuisson Appuyez sur la touche ou la touche pour régler la température désirée l écran clignote Appuyez ensuite sur la touche Temps de cuisson pour régler le temps de cuisson Appuyez sur la touche ou la touche pour régler le temps de cuisson désiré l écran clignotera sur la durée sélectionnée Appuyez sur la touche Départ différé L indicateur d...

Page 22: ...En fin de cuisson l appareil émet 5 BIPS sonore et passe automatiquement en mode Maintien au Chaud uniquement pour les programmes applicables se référer au Tableau des programmes de cuisson L indicateur Maintien au Chaud s allume rouge l écran affiche 0 00 puis démarre le décompte de la durée de la fonction L appareil maintient la température à 75 C pour une durée de 24h max Pour annuler la foncti...

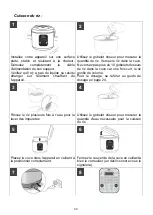
Page 23: ...riz dans la cuve Ne versez pas plus de 10 gobelets doseurs de riz dans la cuve car une fois cuit le riz gonfle de volume Pour le dosage se référer au guide de dosage en page 24 Rincez le riz plusieurs fois à l eau pour le laver des impuretés Utilisez le gobelet doseur pour mesurer la quantité d eau nécessaire pour la cuisson du riz Placez la cuve dans l appareil en veillant à la positionner correc...

Page 24: ... appareil émet 5 BIP sonores et passe automatiquement en mode Maintien au Chaud Ouvrez le couvercle et remuez le riz avec la spatule puis refermez le couvercle Débranchez l appareil si vous ne l utilisez plus Attention Risque de brûlures Veillez à tenir votre visage et mains éloignés du couvercle pour éviter toute brûlure par la vapeur qui s échappe Veillez à ce que la quantité d eau et de riz ne ...

Page 25: ...eil sur une surface plate stable et résistant à la chaleur Vérifiez qu il n y a pas de liquide ou résidu étranger sur l élément chauffant de l appareil Utilisez le gobelet doseur et versez l eau dans la cuve Veillez à remplir au minimum 500ml d eau Placez la cuve dans l appareil en veillant à la positionner correctement Placez vos ingrédients dans le panier vapeur fourni Placez le panier vapeur da...

Page 26: ... et passe automatiquement en mode Maintien au Chaud Débranchez l appareil si vous ne l utilisez plus Attention Risque de brûlures Veillez à tenir votre visage et mains éloignés du couvercle pour éviter toute brûlure par la vapeur qui s échappe Veillez à utiliser des gants de cuisine pour sortir le panier vapeur de la cuve Notes En fonction des ingrédients utilisés vous pouvez modifier le temps de ...

Page 27: ...ne retirez pas le couvercle ainsi que les pots au cours du cycle de fonctionnement Ne mélangez jamais les fruits crus à la préparation L acidité des fruits empêchent le processus de fermentation Conseils Types de lait Types de ferments Lait UHT de longue conservation qui ne nécessite pas d ébullition Lait cru ou pasteurisé doit être portés à ébullition puis refroidis et passés pour éliminer les pe...

Page 28: ...pareil Fermez le couvercle de la cuve en veillant à bien le verrouiller un déclic sonore vous le signalera Insérez le connecteur dans l appareil puis branchez la prise du câble d alimentation dans une fiche secteur L appareil émet un son BIP avec tous les indicateurs du panneau de contrôle qui s allument brièvement L appareil passe en mode veille avec l écran affichant 8888 et les indicateurs lumi...

Page 29: ...e secteur ATTENTION Assurez vous de toujours débrancher l appareil avant toute opération de nettoyage et de toujours laissez l appareil refroidir au minimum une heure avant de démarrer l opération de nettoyage Ne placez pas le corps de l appareil dans le lave vaisselle et n immergez pas l appareil dans l eau Nettoyer le corps de l appareil Utilisez un chiffon doux pour nettoyer les surfaces de l a...

Page 30: ...x Replacez le récupérateur dans son emplacement en veillant à bien le verrouiller un déclic sonore vous le signalera V ANOMALIES DE FONCTIONNEMENT Anomalies Causes Solutions Le couvercle ne se ferme pas Le mécanisme de verrouillage n est pas activé Appuyez sur le couvercle jusqu à entendre un déclic sonore Le mécanisme de verrouillage est cassé Contactez le Service Après Vente Le couvercle ne s ou...

Page 31: ...e est endommagé Contactez le Service Après Vente L appareil ne chauffe pas L élément chauffant est endommagé Contactez le Service Après Vente Riz peu cuits Volume d eau insuffisant Rajoutez de l eau et refaites un autre cycle de cuisson Riz trop cuits Trop d eau Reportez vous au guide de dosage du riz La fonction Maintien au Chaud automatique ne s active pas l appareil est endommagé Contactez le S...

Page 32: ...il contacter le Service Après Vente VI MISE AU REBUT Cet appareil porte le symbole du tri sélectif relatif aux déchets d équipements électriques et électroniques DEEE Cela signifie que ce produit doit être pris en charge par un système de collecte sélectif conformément à la directive européenne 2012 19 UE afin de pouvoir soit être démantelé soit être recyclé et ainsi réduire l impact sur l environ...

Page 33: ...rosion provoquée par la rouille 3 tout incident abus utilisation impropre modification démontage ou réparation non autorisés 4 toute opération impropre d entretien utilisation non conforme aux instructions concernant le produit ou le branchement à une tension incorrecte 5 toute utilisation d accessoires non fournis ou non approuvés par le fabricant La garantie sera annulée en cas d élimination de ...

Page 34: ...34 CEMC900IN MULTICUISEUR MULTIFONCTION Guide d utilisation MULTIFUNCTION MULTICOOKER Instruction Booklet MULTICOOKER MULTIFUNZIONE Istruzioni di sicurezza EN original version ...

Page 35: ...lease read through this user manual thoroughly its detailed instructions warnings and safety precautions to ensure you get the most out of your product Keep this manual for future reference SAFETY WARNINGS ...

Page 36: ...NSTRUCTION CONCERNING USE OF THE APPLIANCE IN A SAFE WAY AND UNDERSTAND THE HAZARDS INVOLVED THIS APPLIANCE CAN BE USED BY CHILDREN AGED FROM 8 YEARS AND ABOVE AND PERSONS WITH REDUCED PHYSICAL SENSORY OR MENTAL CAPABILITIES OR LACK OF EXPERIENCE AND KNOWLEDGE IF THEY HAVE BEEN GIVEN SUPERVISION OR INSTRUCTION CONCERNING USE OF THE APPLIANCE IN A SAFE WAY AND UNDERSTAND THE HAZARDS INVOLVED CLEANI...

Page 37: ...O TOUCH THE APPLIANCE DURING OR AFTER USE THIS APPLIANCE SHALL NOT BE IMMERSED THE COOKING APPLIANCE SHALL BE PLACED ON A STABLE SURFACE WITH ITS HANDLES WELL POSITIONNED TO AVOID ANY HOT LIQUID SPLASHING REGARDING THE INFORMATION FOR INSTALLATION AND OPERATING SETTING THANKS TO REFER TO THE BELOW PARAGRAPH OF THE MANUAL SAFETY INSTRUCTIONS FOR USE THIS APPLIANCE MUST BE EARTHED IF YOU NEED TO USE...

Page 38: ... REMOVE SHELLS BEFORE COOKING DO NOT INSERT A METAL OBJECT OR A FOREIGN BODY THROUGH STEAM VENTS DO NOT PLACE MAGNETIC OBJECT ON THE COVER DO NOT USE THE MULTICOOKER NEAR A MAGNETIC OBJECT NEVER PLACE THE BOWL DIRECTLY ON A HOTPLATE FOR COOKING RICE DO NOT USE THE BOWL IF IT IS DEFORMED SAFETY INSTRUCTIONS FOR CLEANING AND MAINTENANCE ALWAYS UNPLUG THE APPLIANCE AND LET IT COOL DOWN COMPLETELY BEF...

Page 39: ...R SUPPLIER OR A QUALIFIED TECHNICIAN THE USE OF ACCESSORY AND ATTACHMENTS NOT RECOMMENDED BY THE MANUFACTURER MAY CAUSE INJURIES THE APPLIANCE MUST NOT BE USED IF IT HAS BEEN DROPPED IF IT HAS ANY VISIBLE DAMAGE IF IT LEAKS OR IF IT FUNCTIONS ABNORMALLY IN ANY WAY ALWAYS UNPLUG THE APPLIANCE IF NOT USING IT FOR A PERIOD OF TIME REMOVE ALL PACKAGING AND DO NOT LEAVE THE PACKAGING MATERIAL SUCH AS P...

Page 40: ...PLIANCE DURING THE USE CATCH FIRE DO NOT ATTEMPT TO EXTINGUISH IT WITH WATER USE A DAMP CLOTH OR A BLANKET TO CHOKE THE FLAMES OR USE AN EXTINGUISHER BY SPRAYING THE FOAMS TOWARDS THE APPLIANCE AND ON THE SAME DIRECTION THAN THE WIND For installation handling cleaning and disposal of the device refer to the following chapters of the User s Guide Information on the marking of the Conformity Complia...

Page 41: ... 1 PRODUCT ACCESSORIES DESCRIPTION 42 2 LED TOUCH CONTROL PANEL 43 II TECHNICAL INFORMATION 44 III SET UP AND USE 44 BEFORE FIRST USE 44 1 USING YOUR APPLIANCE 46 IV CLEANING AND MAINTENANCE 60 V TROUBLESHOOTING 61 VI ENVIRONMENT RECYCLING 63 VII WARRANTY 63 ...

Page 42: ...ription 1 Cover lid 2 Unlock button 3 Steam vent and inner valve 4 Handle 5 Condensation collector 6 Main body 7 LED touch control panel 8 Anti slip base 9 Bowl 10 Measuring cup 11 Steam basket 12 6 yogurt pots with lids 13 Spatula 14 Power cord ...

Page 43: ...m and setting the cooking time and temperature F Temps de cuisson button to set the cooking time G Départ différé button to program a later start cooking time H Température button to adjust the cooking temperature I Menu button to access the preset cooking programs J button for selecting the cooking program and settings for the cooking time and temperature K Maintien au Chaud Arrêt button for the ...

Page 44: ...kaging elements adhesive fasteners must be thrown away with household waste To know further www quefairedemesdechets fr Wash all accessories with a sponge damped with dishwashing liquid Rinse throughly and dry them with a clean cloth Clean the outer body with a dry clean cloth Do not immerse the appliance into water Do not put the appliance into a dishwasher Place your appliance on a flat stable a...

Page 45: ...le it is in use Do not exceed the maximum filling level indicated on the internal wall of the tank by the markings 1 8L 10 CUP Neveroperatetheappliancewithoutthebowlinplaceorwithanemptybowl Never put water or ingredients in the appliance without the bowl inside This can damage and shorten the life of the appliance Pour le transport sécurisé de l appareil utiliser la poignée de l appareil Risk of b...

Page 46: ...h increment No Closed Gâteaux Cake 130 140 C No 45min 40min à 2h 5min increment No Yes Closed Gelée Jelly 100 110 C No 4h 2h à 8h 5min increment No No Closed Farcir Stuff 100 110 C No 20min 10min à 2h 5min increment 24h 1h increment Yes Closed Ragoût Stew 100 110 C No 40min 30min à 2h30 5min increment 24h 1h increment Yes Closed Sauce 118 120 C No 5min 5min à 30min 5min increment No Yes Closed Con...

Page 47: ...heck that there is no liquid or residue under the bowl Place the bowl inside the multicooker and ensure to position the bowl correctly Close the cover lid ensure it s well locked an audible click will signal it Insert the connector into the appliance and then plug the power cable into a main plug The device beeps with all the light indicators on the control panel lighting up briefly The appliance ...

Page 48: ...s you to successively navigate the following program Soupe Pâtes Dorer Fondue Fromage Cottage Porridge Vapeur Réchauffer Sauce Mijoter Riz Farcir Gâteaux Confiture Rissoler Pilaf Ragoût Gelée Yaourt Multichef Soupe The selected function will have its light indicator flashing The display shows the default cooking time for each program except for Riz Multichef and Fondue For the Riz program the scre...

Page 49: ...if you press the buttons and keys simultaneously the screen displays the temperature inside the appliance Never leave the appliance in operation unattended Never use the Reheat function Réchauffer to defrost food Delay start function Only applicable for the following functions Soupe Porridge Riz Pilaf Pâtes Vapeur Réchauffer Farcir Ragoût et Multichef Press the Menu button Select your cooking prog...

Page 50: ... cooking program automatically The display will then show the remaining cooking time At the end of cooking the appliance emits 5 beeps sounds the screen displays 8888 or 0 00 Depending on the program selected the appliance automatically switches to Keep warm mode or to standby mode Unplug the appliance if you are not using it anymore Customize the cooking time Applicable to the majority of the coo...

Page 51: ... The cooking time is adjustable in 5 minutes increment each time you press on the button or the minimum and maximum setting ranges depend on the program selected For the functions Soupe Porridge Pilaf Pâtes Vapeur Réchauffer Farcir Ragoût et Multichef you can also activate the delay start function Départ différé after setting the new cooking time and before pressing on the start button Démarrer Cu...

Page 52: ...are not using it anymore Notes The cooking temperature is adjustable in 1 C increment each time you press on the button or the minimum and maximum setting ranges depend on the program selected For the functions Fondue you can also change the cooking time after setting the new cooking temperature and before pressing on the start button Démarrer Multichef program This program allows you to customize...

Page 53: ...etting Press on the dealy start button Départ différé The indicator Départ différé light on and the display shows 2 00 Press on the button or to set the starting time of your cooking program the display will flash on the selected duration Press on the button Démarrer to launch the cooking program The screen will display the countdown time until the start of the cooking program the delay start ligh...

Page 54: ...ture at 75 C for 24h max To cancel the function Maintien au Chaud press on the button Maintien au Chaud Arrêt the light indicator will switch off The appliance will automatically switch to standby mode the screen displays 8888 To activate the Keep warm function press on the button Maintien au Chaud Arrêt the light indicator of the function switches on Notes Although the appliance will keep the dis...

Page 55: ...le click will signal it Insert the connector into the appliance and then plug the power cable into a main plug The device beeps with all the light indicators on the control panel lighting up briefly The appliance enters standby mode with the screen displaying 8888 and the indicator lights off Press on the button Menu Select the rice program Riz by using the button or The display shows 8888 press o...

Page 56: ... cup Type of rice Measuring cup Raw rice in g Amount of water Servings Short grain white 2 300 g 450ml 2 à 4 Medium grain white 2 300 g 520ml 2 à 4 Long grain white 2 300 g 600ml 2 à 4 Long grain brown 2 300 g 700ml 2 à 4 Jasmine rice 2 300 g 320ml 2 à 4 Note the dosing guide is only indicative The amount of water depends on the types of rice the desired rendering of the cooked rice crisper or sof...

Page 57: ...wer cable into a main plug The device beeps with all the light indicators on the control panel lighting up briefly The appliance enters standby mode with the screen displaying 8888 and the indicator lights off Press on the button Menu Select the steam program Vapeur by using the button or The display shows 0 20 press on the start button Démarrer to start the steam cooking program At the end of coo...

Page 58: ...i 6min 400 g 500ml Chicken breast 40min 400 g 500ml Note the steam cooking time guide is for information only The cooking times depend on the desired consistency crisper or softer and the thickness of the ingredient For frozen ingredients it is advisable to add 30 additional cooking time Yogurt function Important for a good success of your homemade yoghurt and avoid any risk of compromising their ...

Page 59: ... pots Ingredients Steps Mixture n 1 1L of whole milk 110ml of fresh yoghurt Pour the fresh yogurt into a 2L bowl whip the yoghurt Gradually pour the milk into the bowl and mix gently until smooth Pour the mixture into the glass jars Note 8 to 10 hours of fermentation required Mixture n 2 1L of whole milk 2gr dry lyophilized ferment Pour the milk into a 2L bowl Gradually pour the ferment and mix ge...

Page 60: ... least 3 hours before serving Yogurt and cottage cheese can be stored in the refrigerator for up to 8 days During the tasting arrange the yoghurt to your liking plain or by adding for example sugar jam honey cereals chocolate fruit in pieces or mixed Important Ensure to sterilize all utensils jars and glasses before starting your preparation to avoid any bacterial contamination To sterilise the ap...

Page 61: ...owards you wash it with a sponge soaked in dishwashing liquid rinse it with hot water then dry it with a soft cloth Replace the collector in its location making sure to lock it securely an audible click will signal it V TROUBLESHOOTING Issues Causes Solutions The cover lid does not close The locking mechanism is not activated Press the cover lid until you hear an audible click The locking mechanis...

Page 62: ...es services Rice not cooked Not enough water Add water and cook again Rice overcooked Too much water Refer to the rice dosing guide The automatic keep warm is not working The appliance is damaged Contact the After Sales services Display shows E1 E2 E3 or E4 The sensor is damaged Contact the After Sales services Yogurts too liquid Use of semi skimmed or skimmed milk without the addition of milk pow...

Page 63: ...t must be separately collected Consumers should contact their local authority or retailer for information concerning the correct disposal of their old appliance VII WARRANTY The warranty does not cover the wear parts of the product nor the problems or damage resulting from 1 superficial deterioration due to normal wear of the product 2 defects or deterioration caused by the product coming into con...

Page 64: ...64 CEMC900IN MULTICUISEUR MULTIFONCTION Guide d utilisation MULTIFUNCTION MULTICOOKER Instruction Booklet MULTICOOKER MULTIFUNZIONE Istruzioni di sicurezza www continentaledison fr ...

Page 65: ...nvitiamo a leggere attentamente questa guida per l utente le sue istruzioni dettagliate le avvertenze e le istruzioni di sicurezza per ottenere il massimo dal tuo prodotto Conserva questa guida per l utente per riferimenti futuri ...

Page 66: ...HIO PUÒ ESSERE UTILIZZATO DA BAMBINI A PARTIRE DA 8 ANNI DI ETÀ A CONDIZIONE CHE SIANO SORVEGLIATI O ABBIANO RICEVUTO ISTRUZIONI APPROPRIATE SULL UTILIZZO DELL APPARECCHIO IN TOTALE SICUREZZA E NE COMPRENDANO PERFETTAMENTE I PERICOLI QUESTO APPARECCHIO PUÒ ESSERE UTILIZZATO DA PERSONE CON CAPACITÀ FISICHE SENSORIALI O MENTALI RIDOTTE O SENZA ESPERIENZA E CONOSCENZE A CONDIZIONE CHE SIANO SORVEGLIA...

Page 67: ...VERTENZA EVITARE TRABOCCAMENTI SUL CONNETTORE ATTENZIONE SUPERFICI CALDE LE SUPERFICI POSSONO DIVENTARE CALDE DURANTE L USO LA TEMPERATURA DELLE SUPERFICI ACCESSIBILI PUÒ ESSERE ELEVATA QUANDO L APPARECCHIO È IN FUNZIONE NON IMMERGERE L APPARECCHIO GLI APPARECCHI DI COTTURA DEVONO ESSERE COLLOCATI SU UN PIANO STABILE CON LE MANIGLIE ALL OCCORRENZA POSIZIONATE IN MODO DA EVITARE DI ROVESCIARE LIQUI...

Page 68: ... PRUDENZA QUANDO SI TOCCA IL MULTICOOKER PRESTARE ATTENZIONE AL VAPORE CALDO CHE FUORIESCE DAGLI APPOSITI SFIATI DURANTE LA COTTURA E AL VAPORE CHE FUORIESCE DAL MULTICOOKER QUANDO SI APRE IL COPERCHIO ALLONTANARE LE MANI E IL VISO DAL MULTICOOKER PER EVITARE IL CONTATTO CON IL VAPORE DURANTE E DOPO LA COTTURA LA VASCA E LA VAPORIERA POSSONO ESSERE CALDE E PESANTI NON SOLLEVARE E NON SPOSTARE IL M...

Page 69: ...ASCIAR RAFFREDDARE COMPLETAMENTE L APPARECCHIO NON IMMERGERE MAI L APPARECCHIO IL CAVO ELETTRICO E LA SPINA IN ACQUA O IN UN ALTRO LIQUIDO RIMUOVERE GLI ACCESSORI AMOVIBILI LAVARLI CON UNA SPUGNA IMBEVUTA DI DETERSIVO PER STOVIGLIE CON PH NEUTRO POI SCIACQUARLI CON ACQUA E ASCIUGARLI ALL ARIA O CON UN PANNO PULIRE LA SUPERFICIE ESTERNA CON UN PANNO MORBIDO ASCIUTTO O INUMIDITO CON UN PRODOTTO A PH...

Page 70: ...NULLAMENTO DELLA GARANZIA NON UTILIZZARE L APPARECCHIO DOPO UNA CADUTA SE PRESENTA DANNI EVIDENTI IN CASO DI PERDITE O ANOMALIE DI FUNZIONAMENTO SCOLLEGARE SEMPRE L APPARECCHIO IN CASO DI LUNGHI PERIODI DI INUTILIZZO RIMUOVERE CORRETTAMENTE TUTTI GLI ELEMENTI DI IMBALLAGGIO E TENERE SACCHETTI IN PLASTICA POLISTIROLO ED ELASTICI FUORI DALLA PORTATA DEI BAMBINI IN QUANTO POTENZIALI FONTI DI PERICOLO...

Page 71: ...ECCHIO NEL SENSO DEL VENTO NON RIPORRE PRODOTTI INFIAMMABILI NEI PRESSI O SOTTO IL MOBILE DOVE È RIPOSTO L APPARECCHIO NON FAR FUNZIONARE L APPARECCHIO NEI PRESSI DI MATERIALI INFIAMMABILI COME TENDE CORTINE TENDAGGI ECC Per quanto riguarda l installazione la manipolazione la pulizia e lo smaltimento dell apparecchio consultare i seguenti capitoli della presente guida Informazioni sul significato ...

Page 72: ...APPARECCHIO 77 IV PULIZIA E MANUTENZIONE 92 V ANOMALIE DI FUNZIONAMENTO 94 VI SMALTIMENTO DELL APPARECCHIO 95 V GARANZIA 96 La presente guida per l uso è disponibile nelle seguenti lingue FR versione originale EN versione tradotta IT versione tradotta Qualsiasi altra traduzione è una traduzione della versione originale Questa guida per l uso le sue eventuali modifiche o qualsiasi ulteriore version...

Page 73: ...scita del vapore e valvola situata sotto il coperchio 4 Impugnatura 5 Recuperatore della condensa 6 Corpo dell apparecchio 7 Pulsantiera digitale tattile 8 Base antiscivolo 9 Vasca graduata 10 Bicchierino dosatore graduato 11 Cestello della vaporiera 12 6 vasetti per yogurt con coperchio 13 Spatola 14 Cavo di alimentazione ...

Page 74: ...a temperatura di cottura F Temps de cuisson tasto di selezione per impostare la durata della cottura G Départ différé tasto di selezione per programmare l avvio differito della cottura H Température tasto di selezione per impostare la temperatura di cottura I Menu tasto per accedere ai programmi di cottura preimpostati J tasto di selezione del programma di cottura e di impostazione della durata e ...

Page 75: ... di raccolta Gli altri elementi di imballaggio adesivi reggette ecc devono essere smaltiti con i rifiuti domestici Per saperne di più www quefairedemesdechets fr Lavare tutti gli accessori con una spugna imbevuta di detergente liquido per stoviglie sciacquarli con acqua calda e asciugarli con uno strofinaccio pulito Pulire il corpo dell apparecchio con un panno asciutto e morbido Non immergere mai...

Page 76: ...le quando è in funzione Non superare il livello massimo di riempimento indicato all interno della vasca con le marcature 1 8L 10 CUP Non far mai funzionare l apparecchio senza la vasca o con una vasca vuota Non mettere mai acqua o ingredienti nell apparecchio senza la vasca al suo interno Ciò rischia di danneggiare e ridurre la durata dell apparecchio Per il trasporto sicuro dell apparecchio utili...

Page 77: ...o 10 min No No No Chiuso Aperto Réchauffer Riscaldare 120 C No 30 min da 15 min a 1 ora Incremento 5 min 24 ore Incremento 1 ora No Chiuso Gâteaux Torte 130 140 C No 45 min da 40 min a 2 ore Incremento 5 min No Sì Chiuso Gelée Gelatina 100 110 C No 4 ore da 2 a 8 ore Incremento 5 min No No Chiuso Farcir Farcire 100 110 C No 20 min da 10 min a 2 ore Incremento 5 min 24 ore Incremento 1 ora Sì Chius...

Page 78: ...l calore Svolgere completamente il cavo di alimentazione dal rispettivo supporto Verificare che non ci siano liquidi o residui estranei sulla resistenza dell apparecchio Versare il preparato nella vasca Rispettare le indicazioni di riempimento massimo 1 8L 10 CUP e minimo 0 6L della vasca Asciugare accuratamente l esterno della vasca soprattutto la parte sottostante Verificare che non ci siano liq...

Page 79: ...impostati sono accese in rosso In modo predefinito è selezionata la funzione Soupe e la relativa spia lampeggia in rosso Per modificare la selezione predefinita e selezionare il programma di cottura desiderato premere il tasto o il tasto Il tasto permette di selezionare successivamente i seguenti programmi Soupe Multichef Yaourt Gelée Ragoût Pilaf Rissoler Confiture Gâteaux Farcir Riz Mijoter Sauc...

Page 80: ...ente in modalità di mantenimento al caldo o in modalità stand by Scollegare l apparecchio una volta ultimata la cottura Nota Se non si preme alcun tasto dopo Menu l apparecchio ripassa in modalità stand by dopo 2 minuti d inattività Per annullare la selezione delle funzioni o interrompere il programma di cottura premere il tasto di mantenimento al caldo spegnimento Maintien au Chaud Arrêt L appare...

Page 81: ... annullare la funzione di avvio differito premere il tasto Maintien au Chaud Arrêt L apparecchio passa automaticamente in modalità stand by e sul display appare 8888 La funzione di avvio differito Départ différé può essere impostata tra 1 e 24 ore con incrementi di 1 ora ogni volta che si preme il tasto o Premere il tasto o il tasto per impostare il tempo di avvio del programma di cottura il displ...

Page 82: ...tà stand by Scollegare l apparecchio una volta ultimata la cottura Personalizzazione del tempo di cottura Applicabile alla maggior parte delle funzioni tranne le funzioni Riz Dorer e Maintien au Chaud Premere il tasto Menu Selezionare il programma di cottura con i tasti o Dopo aver selezionato il programma di cottura premere il tasto Temps de cuisson per determinare la durata della cottura Premere...

Page 83: ...er Farcir Ragoût e Multichef è possibile anche attivare la funzione di avvio differito Départ différé dopo aver modificato il tempo di cottura e prima di premere il tasto di avvio Démarrer Personalizzazione della temperatura di cottura Applicabile esclusivamente alle funzioni Fondue e Multichef Premere il tasto Menu Selezionare il programma di cottura con i tasti o Dopo aver selezionato il program...

Page 84: ... Fondue è possibile modificare anche il tempo di cottura dopo aver modificato la temperatura di cottura e prima di premere il tasto di avvio Démarrer Programma Multichef Questo programma permette di personalizzare il tempo e la temperatura di cottura in funzione della ricetta nonché di attivare la funzione di avvio differito Départ différé Premere il tasto Menu Selezionare il programma Multichef c...

Page 85: ...ultimata l apparecchio emette 5 BIP acustici e sul display appare 8888 o 0 00 In funzione del programma selezionato l apparecchio passa automaticamente in modalità di mantenimento al caldo o in modalità stand by Scollegare l apparecchio una volta ultimata la cottura Nota Se non si desidera attivare la funzione di avvio differito Départ différé premere il tasto di avvio Démarrer dopo aver impostato...

Page 86: ...he il piatto si deteriori Quando la temperatura è inferiore a 75 C la funzione Maintien au Chaud non è disponibile Quando la temperatura è superiore a 75 C la funzione Maintien au Chaud è disponibile Cottura del riso Installare l apparecchio su una superficie piana stabile e resistente al calore Svolgere completamente il cavo di alimentazione dal rispettivo supporto Verificare che non ci siano liq...

Page 87: ...display è visualizzato 8888 e le spie sono spente Premere il tasto Menu Selezionare il programma di cottura del riso Riz con i tasti o Sul display appare 8888 premere il tasto Démarrer per avviare la cottura del riso Durante la cottura del riso sul display appare un rettangolo con un movimento circolare e la spia della funzione di cottura del riso Riz è accesa A cottura ultimata l apparecchio emet...

Page 88: ...ml da 2 a 4 Bruno a grana lunga 2 300 gr 700 ml da 2 a 4 Riso al gelsomino 2 300 gr 320 ml da 2 a 4 Nota la guida di dosaggio è fornita esclusivamente a titolo indicativo La quantità d acqua dipende dal tipo di riso nonché dal risultato desiderato per il riso cotto più al dente o più morbido Si raccomanda di seguire le istruzioni riportate sulla confezione di riso Cottura al vapore Installare l ap...

Page 89: ...tiera si accendono brevemente L apparecchio passa in modalità stand by e sul display è visualizzato 8888 e le spie sono spente Premere il tasto Menu Selezionare il programma di cottura al vapore Vapeur con i tasti o Sul display appare 0 20 premere il tasto Démarrer per avviare la cottura al vapore A cottura ultimata l apparecchio emette 5 BIP acustici e passa automaticamente in modalità di manteni...

Page 90: ...r 500 ml Petto di pollo 40 min 400 gr 500 ml Nota la guida del tempo di cottura al vapore è fornita esclusivamente a titolo indicativo Il tempo di cottura dipende dalla consistenza desiderata più al dente o più morbido e dallo spessore dell ingrediente Per gli ingredienti surgelati si consiglia di aggiungere il 30 di tempo di cottura in più Funzione di produzione di yogurt Importante Per ottenere ...

Page 91: ...ollire i fermenti attivi con il latte poiché muoiono oltre una temperatura di 45 C Preparazione di uno yogurt naturale per 6 vasetti Ingredienti Tappe Miscela n 1 1L di latte intero 110 ml di yogurt fresco Versare lo yogurt fresco in una ciotola da 2L sbatterlo energicamente Versare progressivamente il latte nella vasca del multicooker e mescolare delicatamente fino all ottenimento di un preparato...

Page 92: ...io una volta ultimata la cottura Aprire il coperchio dell apparecchio Con un guanto da cucina estrarre i vasetti e avvitare i coperchi Riporre i vasetti di yogurt in frigorifero per almeno 3 ore prima di degustarli È possibile conservare gli yogurt e il formaggio fresco in frigorifero per 8 giorni al massimo Al momento della degustazione aggiungere a piacimento zucchero marmellata miele cereali ci...

Page 93: ...ersivo liquido per stoviglie sciacquarla con acqua calda e asciugarla con un panno morbido Riposizionare la valvola e bloccarla ruotandola in senso orario Pulizia del recuperatore della condensa Rimuovere il recuperatore tirandolo verso di sé lavarlo con una spugna imbevuta di detersivo liquido per stoviglie sciacquarlo con acqua calda e asciugarlo con un panno morbido Riposizionare il recuperator...

Page 94: ... Assistenza Perdite d acqua Il coperchio è chiuso male Premere sul coperchio fino al clic Il recuperatore della condensa è pieno Rimuovere il recuperatore svuotare l acqua e riposizionarlo correttamente Spia spenta I tasti non funzionano La pulsantiera è danneggiata Contattare il Servizio Assistenza La pulsantiera non si accende L apparecchio non è collegato Collegare l apparecchio La pulsantiera ...

Page 95: ...vasetti di yogurt sia assente qualsiasi forma di liquido acqua liquido per stoviglie e sporcizia Yogurt troppo acidi Il tempo di fermentazione è stato troppo lungo Ridurre il tempo di fermentazione per la produzione successiva Per qualsiasi problema constatato sull apparecchio contattare il Servizio Assistenza VI SMALTIMENTO DELL APPARECCHIO In conformità alla direttiva europea sui rifiuti di appa...

Page 96: ...lterazione disassemblaggio o riparazione non autorizzata 4 Qualsiasi operazione di manutenzione non idonea utilizzare non in conformità con le istruzioni del prodotto o il collegamento a una tensione errata 5 qualsiasi utilizzo di accessori non forniti o non approvati dal produttore La garanzia decade se la targhetta e o il numero di serie del prodotto vengono rimossi Continental Edison 120 126 Qu...

Page 97: ...97 CEMC900IN_IM_012020_V1 ...

Reviews: