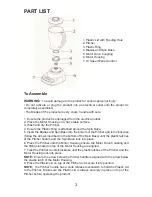
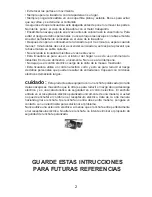
background image

PART LIST

To Assemble

WARNING:


To avoid damage to the product or serious personal injury:  

• Do not activate or plug the product into an electrical outlet until the product is 

completely assembled.

• The Blades of the product are very sharp; handle with care.

1. Ensure the product is unplugged from the electrical outlet.

2. Place the Motor Housing on a flat, stable surface.

3. Wash and dry the Pitcher.

4. Ensure the Plastic Ring is attached around the Spin Base.

5. Insert the Blades and Spin Base into the bottom of the Pitcher and turn clockwise 

(follow the arrows inscribed on the bottom of the Spin Base) until the plastic latches 

of the Pitcher bottom and the Spin Base lock into place.

6. Place the Pitcher onto the Motor Housing ensure the Motor Drive Coupling and 

the fittings located on top of the Motor Housing are aligned.

7. Twist the Pitcher counterclockwise until the plastic latches of the Pitcher and the 

Motor Housing lock into place.

NOTE: 

 Ensure the arrow below the Pitcher handle is aligned with the arrow below 

the plastic latch of the Motor Housing.

8. Place the Plastic Lid on top of the Pitcher and secure it into position.

NOTE:

  The Pitcher handle has a slide release mechanism to hold the Plastic Lid 

to the Pitcher.  Make sure the Plastic Lid is always securely in place on top of the 

Pitcher before operating the product.

3

1. Plastic Lid with Feeding Hole

2. Pitcher

3. Plastic Ring

4. Blades and Spin Base

5. Motor Drive Coupling

6. Motor Housing

7. 10 Speed Panel Control

Summary of Contents for CE22131

Page 1: ...Blender UserManual Model CE22131 ...

Page 2: ...he electrical rating of the product Keep hands and utensils out of container while blending A scraper may be used but only when the blender is not running Do not operate the product if it has a damaged power cord or plug malfunctions or is dropped or damaged This product has no user serviceable parts Do not at tempt to examine or repair this product yourself Only qualified service personnel should...

Page 3: ...the motor from overheating Do not run motor while Pitcher is empty This product is intended for indoor non commercial non industrial household use only Do not use outdoors Do not let cord hang over the edge of a table or counter This product uses a short power cord to reduce the risk of personal injury resulting from becoming entangled in or tripping over a longer cord WARNING This product is equi...

Page 4: ... bottom and the Spin Base lock into place 6 Place the Pitcher onto the Motor Housing ensure the Motor Drive Coupling and the fittings located on top of the Motor Housing are aligned 7 Twist the Pitcher counterclockwise until the plastic latches of the Pitcher and the Motor Housing lock into place NOTE Ensure the arrow below the Pitcher handle is aligned with the arrow below the plastic latch of th...

Page 5: ...se the PULSE Button to turn off the product Cleaning and Maintenance WARNING Always unplug the product from the electrical outlet before assem bling disassembling or cleaning it If the product s motor does not run freely while blending ingredients perform one or more of the following steps as necessary Press the OFF Button and add water to the ingredients Press the PULSE Button for a few minutes a...

Page 6: ... hot water Dry all product parts thoroughly before storing Store the product in a clean dry place with the Plastic Lid removed from the Pitcher Electrical specification Voltage Frequency Power 120V 60HZ 400W 5 ...

Page 7: ...Licuadora ManualdeUso Modelo CE22131 ...

Page 8: ...ar un incendio Si va a utilizar una extensión eléctrica la extensión eléctrica debera de ser igual o de más amperage que las especificaciones eléctricas de la licuadora Mantenga las manos o utensilios fuera del vaso de la licuadora mientras la utilice No utilize esta licuadora si está dañado el cordón eléctrico o ploga no funciona correctamente se a caido o dañado No intente abrir o reparar la lic...

Page 9: ...trial Es de uso doméstico unicamente No lo use a la intemperie No deje que el cordón eléctrico cuelge de la orilla de la mesa o mostrador Esta licuadora utiliza un cordón eléctrico corto y esto es para reducir el riezgo de daños personales que pueden resultar de enrredarse o tropezar con cordones eléctricos demaciado largos cuidado Este producto esta equipado con un enchúfe polarizado Un lado de l...

Page 10: ...l ensamble de la navaja 5 Coloque el ensamble de navaja en la parte inferior del vaso y hagalo girar en el sentido que corren las manecillas del reloj hasta que este completamente ase gurada con el vaso 6 Coloque el vaso sobre la base motora asegurandose que el engrane de la base motora se acople con la del vaso perfectamente 7 Haga girar el baso en sentido que se mueven las manecillas del reloj h...

Page 11: ...minutos cada vez Selec cione y presione el botón de las velocidades permita que la base motora enfríe por unos segundos Luego encienda la licuadora otra vez hasta que alcance los resultados deseados 5 Para apagar la licuadora presione el botón de apagado OFF en el panel de control 6 Desconecte la licuadora cuando termine de licuar cuando no la use o si va a estar desatendida CUIDADO No utilice la ...

Page 12: ...ar el vaso ponga un de cucharada de detergente líquido dentro del vaso de la licuadora y llene de aguate coloque el vaso sobre la base motora y presione el boton de PULSE varias veces por unos pocos segundos Remueva la jarra de la base motora y enjuague con agua limpia PRECAUCIÓN No ponga el vaso y la tapadera en el lava platos o en agua ex tremadamente caliente Seque todas las partes perfectament...

Reviews: