4
4
TOASTING
1. Rotate the Temperature Dial clockwise to “toast”.
Open the Oven Door and place the bread on the Wire Rack up to 4 slices.
NOTE
Oven unit has a unique Multi – use pan which slides into special grooves
beneath the wire rack.. This pan catches the drippings when baking but
must be removed when toasting to allow for even toasting.
2. The Timer Dial is the on/off Switch.
Choose your crust preference by adjusting the Timer Dial clockwise to
select light, medium or dark, To test the toasting of your type of bread, we
suggest to start at medium setting as bread varies according to humidity,
thickness and texture, Each type of bread will toast differently according
to these properties.
IMPORTANT:
When choosing toast color (light, medium, dark,), Always rotate
timer to over “dark” setting and then Rotate back to “dark”, “medium” or
“light”. This will ensure that the timer operates correctly and safely.
automatically turned off.
To stop the cycle at any time, turn the Timer counter – clockwise to “off”
position and the bell will ring.
4 slices will be lighter than 1 slice – adjust Timer accordingly.
Place 1 slice of bread in center of wire rack, 4 slices side by side.
BAKING
1. Slide in the Multi – Pan under the wire rack.
2. place food on the wire rack.
NOTE
– We always suggest to preheat oven 5 minutes at this setting before
place the food.
3. Rotate the Temperature Dial clockwise to desired temperature
4. The Timer Dial is the on/off switch
After rotate the Temperature Dial to your desired temperature, then you must
select the Timer Dial with the following options.
a. For short time baking rotate the Timer Dial clockwise (up to 60 minutes ),
At the sound of the bell the bake function will off automatically.
OR
b. For longer time baking, rotate the Time Dial
counter – clockwise
to
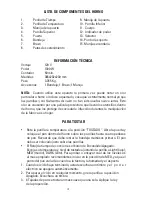
LISTA DE COMPONENTES DEL HORNO
1.
Perilla de Tiempo
9. Manija de la puerta
2.
Perilla de Temperatura
10. Parrilla Inferior
3.
Manija de la puerta
11. Cuerpo
4.
Parrilla Superior
12. Indicador de poder
5.
Puerta
13. Selector
6.
Bandeja
14. Punto de soporte
7.
Brazo
15. Manija secundaria
8.
Patas de sostenimiento
INFORMACIÓN TÉCNICA
Voltaje
120 V
Poder
1300 W
Contador
60 min.
Medidas
385x232x230 mm
Peso
3.355 Kg.
Accesorios
1 Bandeja; 1 Brazo; 1 Manija
NOTA:
Cuando utilice
este
aparato
la
primera
vez
puede
notar
un
olor
particular a
humo
o
incluso a
quemado,
cosa
que
es
totalmente
normal
ya
que
olor es
causando
por
una
película
protectora
que
llevan
los
utensilios
dentro
del horno,
que
los
protege
de
suciedad
e
infección durantes
la
manipulación
de la fabrica a su hogar.
PARA TOS
TAR
•
Rote la
perilla
re
temperatura
a
la posición
“TOS
TADO”.
Abra
la
puerta
y
coloque el
pan
dentro
del
horno
sobre
las
parrillas
hasta
cuatro
pedazos
de pan.
Recuerde
que
debe
retirar
la
bandeja
multiusos
primero.
El
pan
debe ser colocado justo sobre las parrillas.
•
El Reloj de tiempo de cocción es el botón de Encendido/Apagado.
Escoja su
temperatura
y
nivel de
tostado
ajustando
la
perilla
a
Light (bajo),
MED (medio),
DARK
(Alto).
Para
probar
o
ensayar cual
de
los
niveles
es
el mas
apropiado
recomendamos
iniciar
en
la
posición
de
MED,
ya
que
el
punto del pan varia de acuerdo a la textura, la humedad y el aspecto.
1. Cuando el ciclo haya terminado, usted escuchara un timbre y el
p
od
er
eléctrico se apagara automáticamente.
2. Para parar el ciclo en cualquier momento, gire la perilla a la posición
Apagado. Escuchara un timbre.
3.
4 Tajadas de pan se tostaran mas suave que una sola. Aplique la ley
de la proporción.
Summary of Contents for CP43539
Page 1: ...MODEL CP43539 INSTRUCTION MANUAL TOASTER OVEN ...
Page 2: ...Cua incl P A n S d li q a T e E p e d S c A o E A d E f i p d T C a n ...
Page 3: ...3 BROILING cooking book dial multi use pan ...
Page 4: ...1 2 3 4 5 6 7 8 V P C M P A N p ol d d 1 2 3 ...
Page 6: ... ...
Page 8: ...and re e it ays hen his er ...
Page 10: ...MODEL CP43539 MANUAL DE INSTRUCCIONES HORNO TOSTADOR ...
Page 12: ...3 BRO ...

