background image

9

8

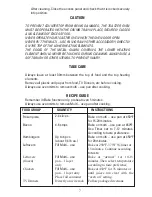
NOTE

-The Recipe Guide is for suggestion only. Temperatures may vary

depending on the size and consistency of the food

Frozen food will take longer to cook than thawed food.

TROUBLESHOOTING GUIDE

Problem                                


Solution

Unit smokes during bake function            Initial  start  up  operation  may  result 

in  minimal  smell  and  smoke  (about 

15 min.). This is normal. It is due to 

the protective substance on heating. 

Elements which protects them from 

salt  effects  during  shipping  from 

factory.


Smoke  in  baking  functions  often 

means the multi – use pan or Interior 

is dirty. 


Smoke  almost  always  appears  in 

baking and is normal. Cut off excess 

fat prior to baking to reduce smoke


Stop  using  appliance  if  smoke 

source is the power cord. Unplug.

The wire rack is stuck and oven             Remove wire rack  and clean inside 


y

l

h

t

o

o

m

s


e

t

a

r

e

p

o

 t

o

n


s

e

o

d

 r

o

o

d


e

h

t

Wire  Rack  grooves  inside  oven 

chamber. Also clean inside of Crumb 

tray. Check that hooks on oven door 

are properly aligned into wire rack.

Toast black and smoking or too light      Choose  a  lighter  or  darker  crust 

setting

QUICK START GUIDE

PLEASE READ THE IMPORTANT SAFEGUARDS FIRST!

The toaster Oven is equipped with all the options of a full – size oven in a 

countertop appliance; appliance; it toasts and bakes, Please follow these step 

instructions.

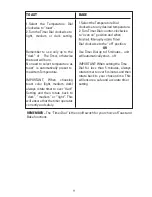
REMEMBER –

 The “Timer Dial” is the on/off switch for your choice of Toast and 

Bake functions.

TOAST                                           


1.Select  the  Temperature  Dial 

clockwise to “toast”.           

2.Turn the Timer Dial clockwise to 

          .

g

n

it

t

e

s


k

r

a

d

 r

o


m

u

i

d

e

m

 ,

t

h

g

il


Remember  to  use  only  up  to  the 

“dark”  of      The  Timer,  otherwise 

the toast will burn.                

No need to select temperature as 

toast”  is  automatically  preset  to 

maximum Temperature. 

IMPORTANT;  When  choosing 

toast  color  (light,  medium,  dark) 

always rotate timer to over “dark” 

Setting  and  then  rotate  back  to 

“dark”,  ”medium”  or  “light”.  This 

will ensure that the timer operates 

correctly and safely.

BAKE


1.Select the Temperature Dial 

clockwise to any desired temperature.

2. Turn Timer Dial counter-clockwise 

to “oven on” position and when 

Dial clockwise to the “off” position.

OR

Use Timer Dial up to 15 minutes – unit

will automatically shut – off.

IMPORTANT: When setting the Time

Dial  for  less  than  5  minutes,  always 

rotate timer to over 5 minutes and then 

rotate back to your chosen time. This 

will ensure a safe and accurate timer 

setting.

Summary of Contents for CP43539

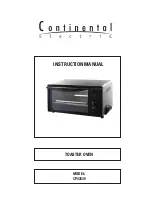
Page 1: ...MODEL CP43539 INSTRUCTION MANUAL TOASTER OVEN ...

Page 2: ...Cua incl P A n S d li q a T e E p e d S c A o E A d E f i p d T C a n ...

Page 3: ...3 BROILING cooking book dial multi use pan ...

Page 4: ...1 2 3 4 5 6 7 8 V P C M P A N p ol d d 1 2 3 ...

Page 5: ... Do not preheat Cook until thawed Timing varies according to food type and size NOTE To avoid contamination thawed food should be refrigerated or fully cooked SLOW COOK 1 Slide in the Multi use Pan under the wire rack Place the food on the wire rack and close the oven door For food with liquids you may choose to place food directly on Multi use Pan and place on top of the wire rack 2 Rotate the Te...

Page 6: ... ...

Page 7: ...ng Always use oven mitts to remove multi use pan after cooking RECIPE GUIDE Remember in Bake function only preheat oven 5 minutes Always use oven mitts to remove Multi use pan after cooking Frozen pizza Bacon Hamburgers Leftovers Leftovers frozen Chicken TV Dinners 2 4 slices 4 6 strips Up to 4 pcs about 1 4 lb ea Fill Multi use Fill Multi use pan 1 layer only Fill Multi use pan 1 layer only Place...

Page 8: ...and re e it ays hen his er ...

Page 9: ...osing toast color light medium dark always rotate timer to over dark Setting and then rotate back to dark medium or light This will ensure that the timer operates correctly and safely BAKE 1 Select the Temperature Dial clockwise to any desired temperature 2 Turn Timer Dial counter clockwise to oven on position and when Dial clockwise to the off position OR Use Timer Dial up to 15 minutes unit will...

Page 10: ...MODEL CP43539 MANUAL DE INSTRUCCIONES HORNO TOSTADOR ...

Page 11: ...el borde de la mesa o del mostrador ni que entre en contacto con superficies calientes No coloque el tostador sobre ni cerca de una hornilla de gas o eléctrica ni cerca de un horno caliente Se debe ejercer mucha prudencia al transportar un aparato con aceite u otros líquidos calientes Ajuste todos los controles a la posición de apagado OFF antes de enchufar o desconectar el aparato Este aparato se...

Page 12: ...3 BRO ...
Page 13: ...n de la fabrica a su hogar PARA TOSTAR Rote la perilla re temperatura a la posición TOSTADO Abra la puerta y coloque el pan dentro del horno sobre las parrillas hasta cuatro pedazos de pan Recuerde que debe retirar la bandeja multiusos primero El pan debe ser colocado justo sobre las parrillas El Reloj de tiempo de cocción es el botón de Encendido Apagado Escoja su temperatura y nivel de tostado a...

Page 14: ...o cierre la puerta Rote la perilla de temperatura a la posición de 160º F Rote la perilla de tiempo a la posición deseada No PRECALIENTE Cocine hasta que el hielo haya sido derretido El tiempo varia de acuerdo a la comida y al tamaño del alimento Recuerde que para prevenir la contaminación la comida descongelada debe ser CONSUMIDA EL TIEMPO EN QUE SE DESCONGELO NO DEBE SER REFRIGERADA O GUARDADA P...

Page 15: ...ón puede ser removida para limpiarla de manera fácil y asegurarse que ningún tipo de exceso de grasa se Acumule en las partes principales de la misma Nunca limpie los elementos del horno que se encargan de calentar Ellos poseen un sistema de auto limpieza Limpie la parte inferior de la bandeja o receptáculo de moronas Este aparato posee una bandeja o receptáculo de morones como se indico en el pun...

Page 16: ...aje de su horno NUNCA DEJE QUE EL CABLE CUELGUE DE LAS SUPERFICIE DONDE EL HORNO ESTA APOYADO CUIDE DE SU HORNO TOSTADOR con el horno para que haya la ventilación necesaria Límpielo al menos cada dos veces que lo use Remueva siempre todo tipo de materiales no comestibles Siempre utilice los utensilios proveídos para retirar las parrillas o las bandejas del horno y prevenir quemaduras o arruinamien...

Reviews: