background image

IMPORTANT:


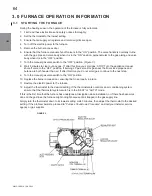
If you intend to be away from home for lengthy periods of time during the non-heating season, 
it is advisable to follow the furnace shut down procedure.

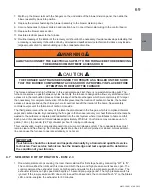
1.  Set the thermostat to its lowest setting.

2.  Shut off electric power to the furnace.

3.  Turn the furnace manual shut-off valve to the “OFF” position.

4.  Remove the burner access door, turn the manual gas valve switch to the “OFF” position, then re-install the 

burner access door.

3.2  SHUTTING DOWN THE FURNACE

IMPORTANT:


NEVER ATTEMPT TO OPERATE THE FURNACE WITHOUT THE BLOWER DOOR AND 
COMBUSTION COMPARTMENT DOOR IN PLACE OR WHEN THE BLOWER HAS FAILED.

3.3 OPERATING 

TIPS

1. Clean 

air 

fi lters maximize effi ciency, and reduce heating costs.

2.  During the heating season, keep windows and doors closed to reduce the heating load on the system.
3.  Avoid excessive use of kitchen exhaust hoods and other exhaust fans to reduce the heating load on the 

system.

4.  Arrange the furniture and drapes so that the supply air registers and return air grills are unobstructed.
5.  If you have a perimeter duct system, ideally, the warm air should bathe the interior walls. Avoid the use of 

plastic defl ectors on the supply air registers which tend to short circuit the warm air straight into the return 
air grills.

6.  Avoid placing heat producing appliances such as televisions, radios, lamps, etc. in a location to infl uence 

the thermostat.

7.  Keep combustible articles at least 3 feet (.91 m) away from the furnace. Do not block access for servicing 

the furnace Do not use the combustion air or exhaust piping as a hanger for clothes or anything else.

W415-1080 / A / 08.28.13

UM

 65

Summary of Contents for C97 Series

Page 1: ...e or use gasoline or other flammable vapors and liquids in the vicinity of this or any other appliance WHAT TO DO IF YOU SMELL GAS Do not try to light any appliance Do not touch any electrical switch do not use any phone in your building Leave the building immediately Immediately call your gas supplier from a neighbour s phone Follow the gas supplier s instructions If you cannot reach your gas sup...

Page 2: ... VENTING INSTALLATIONS 23 9 4 1 NON DIRECT VENT INSTALLATION USING INDOOR COMBUSTION AIR ONE PIPE SYSTEM 23 9 4 2 DIRECT VENT INSTALLATION USING OUTDOOR COMBUSTION AIR TWO PIPE SYSTEM 23 9 4 3 COMBUSTION AIR 23 10 0 TERMINATIONS 24 10 1 COMBUSTION AIR 24 10 2 EXHAUST 24 10 3 CONCENTRIC VENTING KIT 24 10 4 CONCENTRIC VENT TERMINATION INSTALLATION INSTRUCTIONS 24 10 5 LOCATION 25 10 6 MULTIPLE VENTI...

Page 3: ...43 15 3 THERMOSTAT LOCATION 43 16 0 OPTIONAL ACCESSORIES FIELD SUPPLIED INSTALLED 44 16 1 ELECTRIC AIR CLEANER 44 16 2 POWER HUMIDIFIER 44 16 3 EMERGENCY HEAT MODE 44 17 0 INITIAL STARTUP PROCEDURES 45 17 1 TO START THE FURNACE 45 17 2 TO SHUT DOWN THE FURNACE 45 17 3 SEQUENCE OF OPERATION 46 17 4 PROGRAMMABLE THERMOSTAT OPTION 46 18 0 AIR FLOW 47 18 1 TEMPERATURE RISE CHECK 47 18 2 CALCULATING AI...

Page 4: ...CTIONS IS NOT FOLLOWED EXACTLY A FIRE OR EXPLOSION MAY RESULT CAUSING PROPERTY DAMAGE PERSONAL INJURY OR LOSS OF LIFE FOR YOUR SAFETY DO NOT STORE OR USE GASOLINE OR OTHER FLAMMABLE VAPORS AND LIQUIDS OR OTHER COMBUSTIBLE MATERIALS IN THE VICINITY OF THIS OR ANY OTHER APPLIANCE WHAT TO DO IF YOU SMELL GAS DO NOT TRY TO LIGHT ANYAPPLIANCE DO NOT TOUCH ANY ELECTRICAL SWITCH DO NOT USE ANY PHONE IN Y...

Page 5: ...l also be handled by duct s sealed to the furnace casing and terminating outside the space containing the furnace Furnace for heating the home located in the attached garage for example 8 A gas fired furnace for installation in a residential garage must be installed so that the burners and ignitor are no less than 18 457 mm above the floor The furnace must be located or protected to avoid physical...

Page 6: ...ES FIRE EXPLOSION OR CARBON MONOXIDE POISONING HAZARD FAILURE TO REPLACE WITH PROPER CONTROL COULD RESULT IN FIRE EXPLOSION OR CARBON MONOXIDE POISONING REPLACE GAS VALVE ONLY WITH THE SAME MODEL NUMBER OR AS SPECIFIED BY THE MANUFACTURER WARNING 1 This furnace must be installed a In accordance with all local codes by laws and regulations by those authorities having jurisdiction b In Canada this f...

Page 7: ...E 19 625 498 475 MM 23 0 584 200 MM 0 625 15 875 MM SIDE CUTOUT CONDENSATE DRAIN TRAP WITH 1 2 CPVC DISCHARGE LEFT RIGHT SIDE 2 PVC VENT OUTLET A 32 875 835 025 MM 0 625 15 875 MM B ALT UPFLOW DRAIN HOLE ALT AIR INLET ALT VENT OUTLET ALT HIGH VOLTAGE IN SIDE CUTOUT ALT GAS LINE IN ALT LOW VOLTAGE IN WITNESS MARKS FOR SIDE CUTOUTS TABLE 1 RANGE OF TEMPERATURE RISE Furnace Models Temperature Rise AL...

Page 8: ...age Gas Valve 16 PFC Choke Coil used on and 1 Hp units only 5 Air High Temperature Limit supply air 17 Door Switch and Junction Box 6 Vent and Drain Assembly Coupling 18 Blower Motor not shown located on right side of 7 Drain for Recovery Coil 3 blower 8 Condensate Trap 19 Circulating Air Blower 9 Two Stage Integrated Furnace Control IFC 20 UV Light Ballast Optional 10 Transformer for 24 VAC 40 VA...

Page 9: ...belt drive blower systems operating at low RPM s If re placing an existing furnace be sure that the existing ductwork can handle the amount of airflow necessary for a reasonable temperature rise Most older gas furnaces operated with a system temperature rise of 70 100 F 39 56 C This furnace is designed to be operated with a system temperature rise T of High Fire 35 65 F 20 36 C Low Fire 20 50 F 11...

Page 10: ...nd in swimming pool chemicals laundry detergents etc use outdoor air for combustion These compounds when exposed to flame form acids which attack the heat exchanger and other components Exposure to the following substances in the combustion air supply but not limited to the following will also require OUTDOOR AIR for combustion Aerosols particularly CFC based or propelled aerosols Air fresheners A...

Page 11: ...r servicing or the removal of other appliances installed in the room hot water heater for example It is not permissible to use a rear return on this appliance Use only side and bottom returns 4 3 INSTALLATION IN UPFLOW POSITION 4 4 AIR CONDITIONING This furnace may be used as part of an air conditioning system The furnace wiring and control system is air conditioning ready There are the following ...

Page 12: ...O COMBUSTIBLES THIS FURNACE IS CERTIFIED FOR INSTALLATION ON COMBUSTIBLE FLOORS THIS SHALL BE INTERPRETED AS A WOOD FLOOR ONLY THE FURNACE MUST NOT BE INSTALLED DIRECTLY ON CARPETING OR OTHER COMBUSTIBLE MATERIAL EXCEPT WOOD INSTALLATION ON COMBUSTIBLE MATERIAL CAN RESULT IN FIRE CAUSING PROPERTY DAMAGE PERSONAL INJURY OR DEATH THE AREA AROUND THE FURNACE MUST BE KEPT CLEAR AND FREE OF ALL COMBUST...

Page 13: ...ble The total static pressure drop of the air distribution system including filters should not exceed 1 0 w c DO NOT ALLOW GAS PIPING TO BE ROUTED THROUGH JOIST SPACES THAT ARE USED FOR RETURN AIR PURPOSES DO NOT USE JOIST SPACES FOR RETURN AIR PURPOSES IF THE JOIST SPACE ALREADY CONTAINS PLUMBING STACKS CHIMNEY COMPONENTS ETC UNLESS THE PORTION USED FOR RETURN AIR PURPOSES CAN BE COMPLETELY ISOLA...

Page 14: ... F 13 C MIN RETURN AIR TEMPERATURE SOME HEATING AIR FLOW VALUES MAY BE HIGHER THAN THOSE REQUIRED FOR COOLING BE SURE TO SIZE DUCT SYSTEM FOR HIGHEST POSSIBLE VALUES WARNING 3 Connect the return air duct or filter fitting to the furnace The connection should be sealed air tight to prevent entraining combustion gases from an adjacent fuel burning appliance or entraining combustion air for this furn...

Page 15: ...ther vent systems or unlisted pipe and or fittings Follow the venting manufacturers instructions on installation cutting de burring cementing curing and supporting of the venting system This furnace must be vented with ULC S636 certified PVC Polyvinyl Chloride OR PPE Polypropylene material with a minimum rating of 149 F 65º C or more The combustion air piping does not have flue gases traveling thr...

Page 16: ...IR for com bustion because of chemical exposures Commercial buildings Buildings with indoor swimming pools Furnaces installed in laundry rooms Furnaces in hobby or craft rooms Furnaces installed near chemical storage areas Exposure to the following substances in the combustion air supply but not limited to the following will also require OUTDOOR AIR for combustion Aerosols particularly CFC based o...

Page 17: ...on kitchen range hood on etc 8 1 DETERMINING COMBUSTION AIR 8 1 1 CASE 1 FURNACE LOCATED IN A UNCONFINED SPACE 8 1 2 CASE 2 FURNACE LOCATED IN A CONFINED SPACE A confined space any space smaller than the minimums discussed in Case 1 must have two air openings one within 12 305 mm of the ceiling and the other within 12 305 mm of the floor The air openings must be sized based on whether the combusti...

Page 18: ... the furnace IMPORTANT IF AN EXHAUST FAN FIREPLACE CLOTHES DRYER OR ANY SIMILAR DEVICE IS PRESENT IN THE INDOORAREAFROM WHICH THE COMBUSTIONAND VENTILATIONAIR WILL BE DRAWN NEGATIVE PRESSURE COULD BE A PROBLEM IF NATURAL INFILTRATION FROM THE OUTDOORS DOES NOT MATCH THE RATE AT WHICH AIR IS EXHAUSTED 8 1 3 CASE 3 FURNACE LOCATED IN A CONFINED SPACE OUTDOOR AIR FROM ATTIC OR CRAWL SPACE FIGURE 5 OU...

Page 19: ...T CONFIGURATION THE COMBUSTION AIR INLET TO THE FURNACE MUST BE PROTECTED FROM BLOCKAGE USE A DOUBLE ELBOW ARRANGEMENT IF SUPPLYING COM BUSTION AIR THROUGH THE TOP OR A DOWNWARD POINTING SINGLE ELBOW IF SUPPLYING COMBUSTION AIR THROUGH THE SIDE FIGURE 7 TABLE 3 HORIZONTAL AIR SUPPLY CASE 4 Input K Btu hr Free Area Ea Opening Round Pipe Size 60 30 in2 194 cm2 7 in 178 mm 80 40 in2 258 cm2 8 in 203 ...

Page 20: ...ENT FOR THE DISSIMILAR MATERIALS Venting may be vertical or horizontal Minimum vent length 15 total equivalent feet See Venting Table Horizontal piping must slope back towards the furnace at a minimum rate of 6 4 mm to the foot 305 mm so that condensate drains towards the furnace Horizontal runs must be supported at least every 3 feet 914 mm Horizontal sections must not dip or sag All vent runs th...

Page 21: ...gths This table lists the maximum allowable length of pipe with respect to the number of 90 elbows used For the purposes of this calculation one 90 elbow is equivalent to two 45 elbows Avoid locating the terminal in locations where dripping condensate may cause problems such as sidewalks patios above planters near windows where exhaust gases may cause fogging etc Avoid locating the termination too...

Page 22: ... dwellings Less than 7 feet 2 1 m above a paved sidewalk or paved driveway located on public property Within 6 feet 1 8 m of a mechanical air supply inlet to any building Above a meter regulator assembly within 3 feet 91 m horizontally of the center line of the regulator Within 6 feet 1 8 m of any service regulator vent outlet Less than 12 305 mm above grade level or anticipated snow level Within ...

Page 23: ...RMINING COMBUSTION AIR Locate the vent terminal 3 feet 91 m above any forced air inlet located within 10 feet 3 m Any fresh air or make up air inlet such as for a dryer or furnace area is considered a forced air inlet The vent terminal should be located no fewer than 6 feet 1 8 m from an inside corner formed by two exterior walls a 10 foot 3 m distance is recommended Recommended clearance from ove...

Page 24: ...tion air intake piping The combustion air inlet must be located a minimum of 12 305 mm above grade and 12 305 mm below the exhaust outlet Figure 11 12 305mm MIN 3 76mm MIN 18 457mm MIN 12 305mm MIN ROOF TERMINATION EXHAUST FIGURE 11 STANDARD VERTICAL VENTING DETAIL HORIZONTAL The exhaust termination is normally a 45 elbow or a medium or long sweep 90 elbow point ing within 45 of the downward posit...

Page 25: ...tunt or kill them Caulk all cracks seams or joints within a 6 foot 1 8 m radius of the termination Do not terminate under a deck unless there is adequate clearance to prevent damage from the flue gases A termination may be located at the end of a patio deck Piping running beneath the deck must be suitably insu lated and suspended in a manner to prevent condensate from collecting and freezing When ...

Page 26: ...HER OPERATION IF THE VENTING SYSTEM IS NOT INSTALLED PER THESE GUIDELINES WARNING If more than two furnaces are being installed in close proximity each additional combustion air intake and exhaust termination set shall not terminate less than 12 in 305 mm apart Note Canadian installations of 120000 Btu hr require 3 ft 915 mm ...

Page 27: ...W415 1080 B 08 28 13 27 IOM FIGURE 14A DIRECT VENT TERMINAL CLEARANCES ...

Page 28: ...W415 1080 A 08 28 13 28 IOM IOM FIGURE 14B NON DIRECT VENT TERMINAL CLEARANCES ...

Page 29: ...ening not in use 7 Reinstall the exhauster and the pressure switch assembly in the correct orientation with the 3 exhauster screws removed in step 2 Reinstall the pressure switches so that they are above the heat exchanger drain to eliminate the chance of condensate draining into the pressure switch sensing hose causing erratic furnace operation See Figure 22 for reference DO NOT USE POWER TOOL 8 ...

Page 30: ...le to the unit and on a vertical section 4 Connect 2 air intake pipe field supplied The exhaust vent must be supported appropriately prior to it being fitted to the exhauster Under no circumstances shall the exhauster bear any weight of the venting system 5 Install appropriate gaskets on condensate trap and remove the two plastic caps attached to the blower division and the one attached to the sid...

Page 31: ...NT IS UNDER GREATER SUCTION THAN THE COMBUSTION COMPARTMENT AND CAN PULL COMBUSTION AIR FROM THE BURNERS AND CAUSE INCOMPLETE COMBUSTION AND ERRATIC FURNACE OPERATION WARNING THE TWO INLETS TO THE DRAIN TRAP ARE FOR VENT PIPE AND CONDENSATE COLLECTION THE VENT PIPE INLET IS SMALLER THAN THE CONDENSATE COLLECTION INLET ENSURE THAT THE DRAIN HOSES ARE PROPERLY CUT TO THE REQUIRED LENGTH CONNECTED AN...

Page 32: ...OPTION LEFT VENT INSTALLATION TOP VENT INSTALLATION RIGHT VENT INSTALLATION NOTE Upflow Vent Right condensate trap must be installed on left side IMPORTANT PRIME CONDENSATE TRAP WITH WATER AND CUT DRAIN HOSES TO PROPER LENGTH CUT PRESSURE SWITCH TUBING TO PROPER LENGTH ...

Page 33: ...must slope towards the condensate trap ensuring that the drain hoses do not create traps or kinks in the hose prior to the condensate trap assembly NOTE It is recommended that the condensate drain assembly not be cemented to the condensate trap outlet if removal of the condensate trap is required in the future Use a piece of the provided 1 2 drain hose if removal of the condensate trap is anticipa...

Page 34: ...UTE OF THE DRAIN TUBE TO CREATE A VAPOR LOCK WHICH WILL PREVENT CONDENSATE FROM DRAINING AWAY FREELY AND RESULT IN ERRATIC FURNACE OPERATION The supplied parts bag includes a length of and 5 8 rubber hose and the condensate trap Install the con densate trap according to instructions included in this manual FIGURE 17 FIGURE 18 11 4 2 PRIMING CONDENSATE TRAP 11 5 ALTERNATE CONDENSATE DRAIN PIPING IN...

Page 35: ...t is advisable to install it with an overflow bypass tube A PVC coupling or bushing will fit snug over the rubber hose A CPVC coupling or bushing will fit snug over the 5 8 rubber hose This method ensures a water tight seal and also allows the condensate trap to be easily removed for service If extra security is desired it is recommended to secure a strip of strapping around the drain Utilize the ...

Page 36: ...stic cap if necessary and install on other panel and install the grommet within the hole NOTE We recommend a union between the gas valve and the side panel to allow easy removal of the burner for service purposes FIGURE 28 FURNACE GAS PIPE CONNECTIONS NOTE RUBBER GROMMET THIS FURNACE IS FACTORY EQUIPPED TO BURN NATURAL GAS ONLY CONVERSION TO LP GAS REQUIRES A NATURAL GAS TO LP CONVERSION KIT W370 ...

Page 37: ... installations should be pressure tested as specified by CAN CSA B149 1 2 or NFPA 54 ANSI Z223 1 or ANSI NFPA 58 Standard for the Storage and Handling of Liquefied Petroleum Gases Gas piping that has not been pressure tested from the manual shut off valve to the furnace gas valve for example should be leak tested using an electronic combustible gas detector a commercially prepared leak detector or...

Page 38: ... must have a scale range of at least 0 to 15 of water column 3 Turn ON the gas and electrical supply and operate the furnace and all other gas consuming appliances on the same gas supply line Using a leak detection solution check for leaks around the gas valve manifold connection and the burner orifices Repair any leaks before continuing 4 Measure furnace gas inlet pressure with burners firing Inl...

Page 39: ...ply before proceeding 2 Back outlet pressure test screw outlet pressure boss see fig 31 counterclockwise out one more turn maximum with a 3 32 Allen wrench Attach a hose and calibrated U tube or digital manometer to the outlet pressure boss Hose should overlap boss 3 8 The manometer must have a scale range of at least 0 to 15 of water column 3 Turn on the gas supply and electrical power to the fur...

Page 40: ...OMETER MEASURING GAS MANIFOLD PRESSURE IMPORTANT NEVER ADJUST THE INPUT OF THE FURNACE TO EXCEED THE INPUT SHOWN ON THE RATING PLATE Input Heating Value of Gas x 3600 Time in Sec for 1 cu ft where input is expressed in Btu hr heating value of the gas is expressed in Btu ft3 and time is the number of seconds required for the test dial to indicate 1 cubic foot If using a gas meter with SI metric uni...

Page 41: ...LTING IN PERSONAL INJURY OR LOSS OF LIFE THE FURNACE CABINET MUST HAVE AN UNINTERRUPTED GROUND A GROUND WIRE IS PROVIDED IN THE ELECTRICAL JUNCTION BOX DO NOT USE GAS PIPING AS A GROUND FAILING TO GROUND THE FURNACE PROPERLY CAN RESULT IN ELECTRIC SHOCK RESULTING IN PERSONAL INJURY OR DEATH WARNING In Canada all electrical work must be in accordance with the latest edition of CSA C22 1 Canadian El...

Page 42: ...ER DOOR SAFETY SWITCH DO NOT DISABLE THIS SWITCH FAILURE TO FOLLOW THIS WARNING CAN RESULT IN ELECTRICAL SHOCK PERSONAL INJURY OR LOSS OF LIFE WARNING 5A FUSE 24 VAC MOLEX ICM INTERFACE THERMOSTAT TERMINALS FAULT CODE BUTTON RED STATUS LED HEAT STAGING JUMPER P5 120 VAC NEUTRAL CONNECTIONS 120 VAC MOLEX POWER HUMIDIFIER ELECTRONIC AIR CLEANER PARK TERMINALS FIGURE 36 INTEGRATED FURNACE IGNITION CO...

Page 43: ...mand for high heat remains until the heat call is satisfied Factory Setting 15 2 TWO STAGE THERMOSTAT When connecting a two stage thermostat the jumper P5 must be in the NONE position The control runs high heat from the thermostat W2 demand 15 3 THERMOSTAT LOCATION The thermostat and control wiring should be a minimum of 18 AWG copper Excessive lengths of wire may result in enough voltage drop to ...

Page 44: ... conventional fractional horsepower PSC blower motor Connect the neutral wire to a neutral NEUTRAL connection terminal on the furnace control board and the hot LINE leg to the EAC terminal The EAC terminal is powered during any heating or cooling demand and the blower will operate until a new ECM motor can be obtained 16 3 EMERGENCY HEAT MODE 16 0 OPTIONAL ACCESSORIES FIELD SUPPLIED INSTALLED 16 1...

Page 45: ... electrical power to the furnace and set the room thermostat to its lowest setting IMPORTANT ENSURE THAT THE MANUAL GAS VALVE SWITCH HAS BEEN IN THE OFF POSITION FOR AT LEAST 5 MINUTES DO NOT ATTEMPT TO MANUALLY LIGHT THE MAIN BURN ERS 3 Turn the gas valve switch to the ON position 4 Replace the burner compartment access door 5 Turn on furnace appliance shut off valve 6 Restore electrical power to...

Page 46: ...ure switch is open the Green LED will flash If the high pressure switch is closed the Green LED will be on High gas valve drops out while High pressure switch is open because it is directly in series with the high pressure switch 5 When the thermostat W2 call ends and W1 remains two stage thermostat the control de energizes the high gas output and immediately changes exhauster speed from high to l...

Page 47: ...w Fire 4 When the two thermometers have stabilized usually within 5 8 minutes compare the two readings Sub tract the return air temperature from the supply air temperature The difference is the temperature rise also called T 5 Compare the measured T to the temperature rise range shown on the rating plate Unless stated differently on the rating plate the temperature rise should normally range betwe...

Page 48: ...eds require adjustment follow these steps 1 Remove the blower compartment door 2 Locate the 4 position movable HEAT jumper to adjust heat speed 3 Remove the jumper from position A and place it on the corre sponding letter B C or D as required Refer to TABLE 8 HEAT ING SPEEDS 4 To adjust the cooling airflow ECM 2 3 remove the COOL jumper from position A and place it on the corresponding letter B C ...

Page 49: ...midity control is a problem a dehumidification feature has been built into the variable speed motor At the start of each cooling cycle the variable speed motor will run at 82 of the rated airflow for 7 5 minutes After 7 5 minutes has elapsed the motor will increase to 100 of the rated airflow There are three jumper wires in front of the thermostat input terminal block that are used in different ap...

Page 50: ...OF THE MOTORS AND WILL ATTRACT THE BUILDUP OF DUST AND DIRT The air filter should be inspected frequently and cleaned or replaced as necessary We recommend a monthly inspection at first perhaps coinciding with the arrival of the monthly fuel bill as a reminder The frequency may be increased or decreased depending on experience and conditions Dirty filters result in higher than normal operating tem...

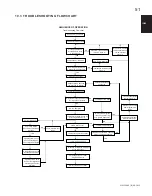
Page 51: ...WLQJ LU DQ 2Q IWHU 3URJUDPPHG HOD ODPH 6HQVH RVW 7KHUPRVWDW DOO RU HDW QGV RZ 0DLQ 9DOYH ORVHV RPEXVWLRQ LU ORZHU 2II IWHU 3RVW 3XUJH 6HFRQGV LUFXODWLQJ LU DQ 2II IWHU 3URJUDPPHG HOD DLW RU 1H W DOO RU HDW RZ 0DLQ 9DOYH ORVHV ODPH 6HQFH RVW 0RUH 7KDQ RXU 7LPHV Q 7KLV DOO RU HDW RPEXVWLRQ LU ORZHU 2II IWHU 3RVW 3XUJH LUFXODWLQJ LU DQ 2II IWHU 3URJUDPPHG HOD RXU RFNRXW 5HVHW HOD ODVK DOO RU LJK HDW ...

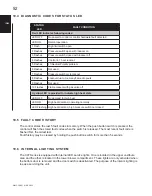
Page 52: ... bottom door is removed and the door switch is deactivated The purpose of the interior lighting is to ease servicing the unit STATUS FAULT CONDITION LED Red LED indicates following codes LED OFF No power to control or control hardware fault detected LED ON Normal operation 1 Flash High limit switch open 2 Flashes Pressure switch open with inducer on 3 Flashes Pressure switch closed with inducer of...

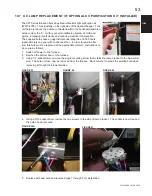
Page 53: ...imately one year with continuous fan In order to remain effec tive this bulb must be replaced at the appropriate interval Instructions to do so are as follows 1 Switch off power to the furnace 2 Remove the bottom door of the furnace 3 Using 1 4 socket driver remove the single mounting screw that retains the lamp bracket to the blower divi sion The bulb unit can now be removed from the furnace Be c...

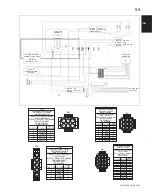
Page 54: ...QUIRED POSITION COLOUR LEAD NUMBER BLACK WHITE RED BLACK WHITE EMPTY 1 2 3 4 5 6 1 2 3 4 5 C1 3 7 1 6 5 C2 HOUSING VIEW FROM OPPOSITE OF WIRE INSERTION END PLASTIC 9 PIN HOUSING AMP 1 480707 0 METAL CONTACT TERMINAL MALE PIN AMP 350218 1 9 REQUIRED POSITION COLOUR LEAD NUMBER GREY YELLOW YELLOW RED RED RED 1 2 3 4 5 6 6 7 8 9 10 8 4 2 9 WHITE GREEN VIOLET 7 8 9 12 13 14 11 C2 C3 HOUSING VIEW FROM ...

Page 55: ...OPPOSITE OF WIRE INSERTION END PLASTIC 5 PIN HOUSING AMP 350809 1 METAL CONTACT TERMINAL FEMALE SOCKET AMP 350536 1 5 REQUIRED POSITION COLOUR LEAD NUMBER BLACK BLACK RED 1 2 3 4 1 3 3 2 1 C6 WHITE WHITE 4 5 2 5 5 4 1 9 3 4 5 C7 HOUSING VIEW FROM OPPOSITE OF WIRE INSERTION END PLASTIC 9 PIN HOUSING AMP 1 480706 0 METAL CONTACT TERMINAL FEMALE SOCKET AMP 350536 1 9 REQUIRED POSITION COLOUR LEAD NUM...

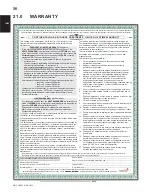
Page 56: ...ilures caused by installation that is not performed in compliance with all applicable federal provincial state laws or regulations and Installation Operating Manual 4 Damage as a result of vandalism freight damage floods fires winds lightning and accidents or any acts of nature Atmospheres contaminated by compounds of chlorine halogenated hydrocarbons or other damaging chemicals causing deteriorat...

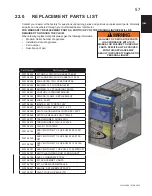
Page 57: ...LL FMC WITH GASKETS 60 80 W010 2535 KIT LARGE FMC WITH GASKETS 100 120 W010 2558 EXHAUSTER TWO SPEED GENTEK W010 2559 BLOWER 12 7T HOUSING 60 80 W010 2560 BLOWER 12 10T HOUSING 100 120 W010 2561 CONTROL INTERGRATED ECM W010 2562 SENSOR FLAME REPLACEMENT W010 2563 FUSE 5 AMP W010 2564 IGNITER 601 TYPE TB 120V W010 2567 SWITCH HEAT LIMIT 140 F 20 F W010 2568 SWITCH BURNER ROLLOUTS REPL 350 F W010 25...

Page 58: ...W415 1080 A 08 28 13 58 IOM IOM 23 0 SERVICE HISTORY ...

Page 59: ...e or other flammable vapors and liquids in the vicinity of this or any other appliance WHAT TO DO IF YOU SMELL GAS Do not try to light any appliance Do not touch any electrical switch do not use any phone in your building Leave the building immediately Immediately call your gas supplier from a neighbour s phone Follow the gas supplier s instructions If you cannot reach your gas supplier call the f...

Page 60: ... 4 9 TERMINATIONS 70 5 0 HOMEOWNER S REFERENCE 71 1 0 SAFETY SYMBOLS AND WARNINGS DANGER INDICATES AN IMMINENTLY HAZARDOUS SITUATION WHICH IF NOT AVOIDED WILL RESULT IN DEATH OR SERIOUS INJURY INDICATES A POTENTIALLY HAZARDOUS SITUATION WHICH IF NOT AVOIDED COULD RESULT IN DEATH OR SERIOUS INJURY INDICATES A POTENTIAL HAZARDOUS SITUATION WHICH IF NOT AVOIDED MAY RESULT IN MINOR OR MODERATE INJURY ...

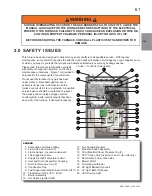
Page 61: ...any part has been under water A flood damaged furnace is extremely dangerous Attempts to use the furnace can result in fire or explosion A qualified service agency should be contacted to inspect the furnace and to replace all gas controls control system parts electrical parts that have been wet or the furnace if deemed necessary 1 2 11 12 4 5 6 7 9 16 18 19 17 10 8 15 13 14 3 20 22 21 FIGURE 1 FUR...

Page 62: ...R SER VICE AGENCY OR THE GAS SUPPLIER DEVICES ATTACHED TO EITHER THE VENT OR COMBUSTION AIR INTAKE FOR THE PUR POSES OF EXCEEDING THE LIMITATIONS DESCRIBED IN THE INSTALLATION MANUAL INCLUDING FIELD INSTALLED INDUCED BLOWER FANS HAVE NOT BEEN TESTED AND ARE NOT INCLUDED IN THE DESIGN CERTIFICATION OF THE FURNACE THE MANUFACTURER CANNOT AND WILL NOT SPECULATE ON THE EFFECTS OF SUCH MODIFICATIONS AN...

Page 63: ...f renovations are done be sure that air supply openings are not inadvertently covered over with insulation vapor barrier or similar construction material 3 All doors and panels must be in place during normal furnace operation Attempting to operate the furnace with missing doors or panels could lead to the creation of carbon monoxide gas 4 If the furnace is installed in a confined space or if you i...

Page 64: ...ning LP gas smell for gas near the floor since propane and butane are both heavier than air If after this time you do not smell gas continue to the next step 9 Turn the manual gas valve switch to the ON position 10 Replace the burner access door ensuring that it is properly in place 11 Restore the electric power to the furnace 12 Adjust the thermostat to the desired setting If the thermostat also ...

Page 65: ...g the heating season keep windows and doors closed to reduce the heating load on the system 3 Avoid excessive use of kitchen exhaust hoods and other exhaust fans to reduce the heating load on the system 4 Arrange the furniture and drapes so that the supply air registers and return air grills are unobstructed 5 If you have a perimeter duct system ideally the warm air should bathe the interior walls...

Page 66: ... AIRFLOW DIRECTION IDENTICAL TO ITS PREVIOUS USE REVERSING THE FILTER WILL CAUSE DUST TRAPPED WITHIN THE FILTER TO BREAK FREE AND RECIRCULATE WITHIN THE DUCT SYSTEM CAUTION 4 2 LUBRICATION The circulating air blower and exhauster motors have sealed bearings The bearings contain permanent special purpose lubricants Attempting to force common oil into the circulating and exhauster assembly motor bea...

Page 67: ...N WORKING ON THE BURNER ASSEMBLY THE HOT SURFACE IGNITER IS FRAGILE AND CAN BREAK EASILY CAUTION The flame sensor should be inspected and cleaned with fine steel wool or Scotch Brite scrubbing pad The wiring connection should be checked to ensure that it is tight and corrosion free DRAINAGE The condensate drainage system should be inspected and cleaned if necessary If the drain trap assembly or an...

Page 68: ...may become coated with dust To clean the recovery coil 1 Disconnect electrical power to the furnace 2 Remove the blower access door 3 Remove the screws fastening the blower assembly to the blower division panel 4 Unplug harness from blower division junction box and remove thermostat wires label wires to correct position 5 Pull the blower assembly out LABEL ALL WIRES PRIOR TO DISCONNECTION WHEN SER...

Page 69: ...lowing Do not allow plastic drain lines to become pinched or kinked A blocked drain line can cause the furnace to operate erratically or not at all IMPORTANT Your furnace should be cleaned and inspected annually by a trained and qualified service technician Your service technician has the knowledge and test equipment to determine the condition of your furnace WARNING 4 7 SEQUENCE OF OPERATION ECM ...

Page 70: ...ops out while high pressure switch is open because it is directly in series with the high pressure switch 5 When the thermostat W2 call ends and W1 remains two stage thermostat the control de energizes the high gas output and immediately changes inducer speed from high to low With the thermostat heating contacts open single stage thermostat the flames extinguish immediately and the induced blower ...

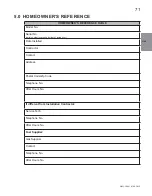
Page 71: ...ted on bottom of inside door Date Installed Contractor Contact Address Postal Code Zip Code Telephone No After Hours No If different from Installation Contractor Service Tech Telephone No After Hours No Fuel Supplier Gas Supplier Contact Telephone No After Hours No W415 1080 A 08 28 13 UM 71 ...

Page 72: ...W415 1080 A 08 28 13 ...

Reviews: