Teledyne Continental Motors, Inc.
TM
Standard
Practices
IOF-240 Series Engine Maintenance Manual
C-13
29 November 2006
C-7.
Stud Replacement
Studs that are damaged or broken must be replaced. Rosan
®
ring-locked studs are
installed in the cylinder exhaust ports. These studs are either “size-on-size” or “step
type.”
The step type captive lock ring studs have a larger lock ring than the size-on-size type.
The size-on-size captive lock ring studs utilize a small external diameter lock ring for
applications where edge distance is a factor. The lock ring is so small in diameter that the
use of a typical Rosan
®
“SM” or “BT” series-milling tool is impractical and could cause
unwanted removal of cylinder head material in the lock ring area.
C-7.1. Stud Removal
Procedure
1.
Place a stud extractor tool on the stud to be removed and turn the tool slowly to avoid
heating the casting.
2.
To remove a stud which cannot be removed with a standard stud extractor tool, drill a
hole matching the diameter of a splined stud extractor tool through the center of the
stud. Insert the splined stud extractor through the drilled center of the stud and
unscrew the stud.
3.
Examine the course thread end of the damaged stud before discarding it to determine
the correct stud size for oversize replacement stud.
C-7.2. Stud Installation
Procedure
1.
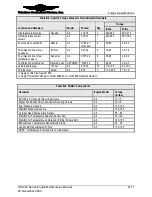
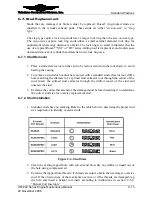
Standard studs have no marking. Refer to the table below to determine the proper stud
size required or to identify oversize studs.
Figure C-6.
Stud Sizes
2.
Clean the casting tapped hole with solvent and blow dry any debris or liquid out of
the hole using compressed air.
3.
Examine the tapped hole threads; if threads are intact, obtain the next larger oversize
stud. If the old stud was of the maximum oversize or if the threads are damaged, tap
the hole and insert a helical coil insert according to instructions in section C-6.2,
“Helical Coil Insertion.”

