Non-Overhaul Removal and Replacement
Teledyne Continental Motors, Inc.
TM
10-46
IOF-240 Series Engine Maintenance Manual
Change 1
31 August 2007
10-10.2. EGT Sensor and Lead Wire Replacement
Equipment Required:
•
Crimp tool
•
EGT Sensor/Wire Splice Kit
•
Utility or razor knife
•
Scissors
•
A variable intensity heat gun with a small tip
Prerequisites:
Before proceeding, review Sections 10-1, “Parts Replacement” and 10-10, “Engine Low
Voltage Harness Lead Wire Repair and Sensor Replacement.”
Procedure
1.
Turn the Aircraft Master Power Switch and FADEC Enable Switches to the OFF
position and disconnect engine electrical power.
CAUTION: Failure to use the correct splice kit for sensors or lead
wires will result in abnormal engine operation and may cause
engine damage.
2.
Obtain the appropriate EGT Sensor/Wire Splice kit from TCM. The EGT splice kit
will not work for non-EGT sensors and the non-EGT splice kit will work for EGT
sensor wiring.
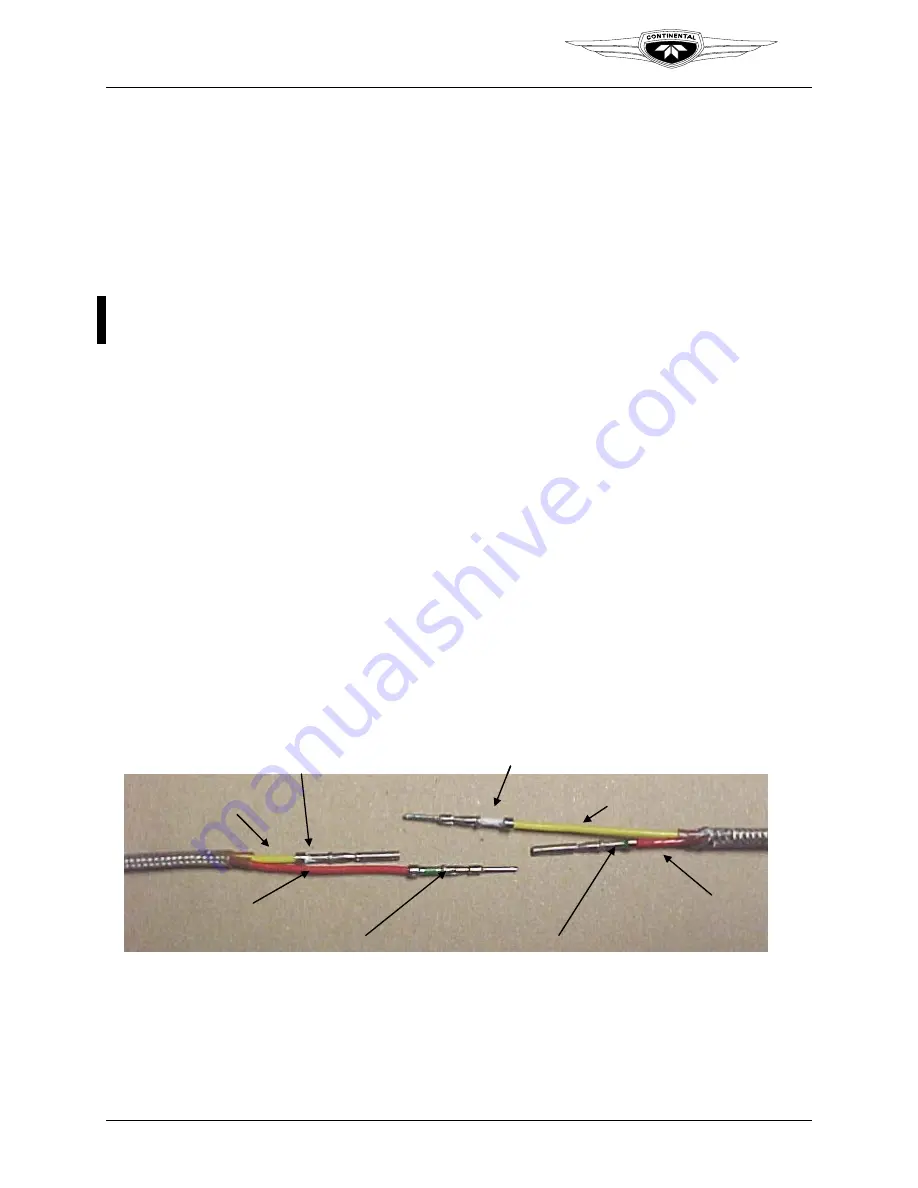
NOTE: Refer to Figure 10-25. The EGT wires are alumel (red) and
chromel (yellow). To maintain signal integrity, all segments of the
wire must be the same material. The EGT splice kit contains an
alumel (green band) pin and socket and a chromel (white) pin and
socket. Splices must be installed as directed for proper system
operation after repairs.
Yellow wire
Yellow wire
Red wire
Red wire
White pin
White socket
Green socket
Green pin
Yellow wire
Yellow wire
Red wire
Red wire
White pin
White socket
Green socket
Green pin
Figure 10-25.
EGT wire repair pins mated to wires
3.
Cut and remove all cable ties supporting the affected sensor or damaged wire section.
4.
Remove the faulty sensor or damaged wires.
5.
Cut the leads to be replaced two inches longer than the replacement leads, yielding a
four inch overlap.


