Maintenance Inspections
Teledyne Continental Motors, Inc.
TM
7-3.8.2.2. Differential Pressure Tester E2A setup
To
establish the acceptable pressure leakage limit for a Model E2A Differential Pressure
Tester and Master Orifice Tool (Figure 7-4), perform the following procedure:
Procedure
1.
Make sure the Regulator Pressure Valve is backed all the way OUT.
2.
Make sure the Cylinder Pressure Valve is OFF or Closed.
3.
Remove the protective caps from both ends of the Master Orifice Tool and install the
Master Orifice Tool onto the threaded end of the cylinder adapter and hand tighten it.
4.
Connect the cylinder adapter with the Master Orifice Tool attached to the female
quick connection on the supply hose from the Differential Pressure Tester.
5.
Connect the air source to the tester at the male quick connection fitting.
6.
Adjust the pressure regulator so that the regulator pressure gauge reads 80 psi.
7.
Turn the cylinder pressure valve to the ON or OPEN
position.
8.
If necessary, adjust the pressure regulator to maintain a reading of 80 psi on the
regulator pressure gauge.
9.
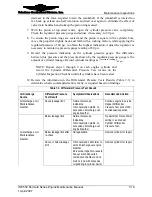
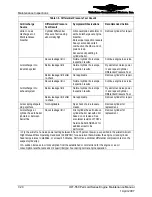
Record the cylinder pressure gauge reading on Table 7-11, the “Cylinder Inspection
Checklist.” This reading is the Minimum Acceptable Pressure Leakage Limit.
10.
Turn the cylinder pressure valve to the CLOSED or OFF position.
11.
Remove the cylinder adapter and Master Orifice Tool from the female quick
connection on the supply hose from the differential test unit.
12.
Remove the Master Orifice Tool from the cylinder adapter.
13.
Proceed to Section “7-3.8.2.4, “Cylinder Differential Pressure Test.”
Figure 7-3.
Model E2A Differential Pressure Tester
7-16
IOF-550 Permold Series Engine Maintenance Manual
1 April 2007


