07
06
Action Camera Installation
Our drone can carry and support a wide arrange of Action Cameras. To
install a camera, we have provided a Installation kit.
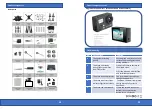
1. Take inventory of your installation kit. You should have (a) one alum.
bracket, (b) a ¼ in. Allen head bolt, (c) a camera mount with a ¼ in.
female end , (d) a action camera mount, (e) a mount screw, and (f) a
wrench
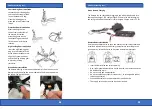
2. Carefully open the top cover of the drone and install the alum bracket
in the slot. Insert the ¼ in. bolt through the bracket.
3. Next, fasten the camera mount on to the bolt using the supplied allen
wrench. Fasten the camera mount to the ¼ in. bolt so that it is secure
and facing forward like in the picture below.
4. Once the mount is secured tightly, place the top cover back on the
drone. Do not make a habit of removing the top cover as it will
eventually weaken and can come off during flight.
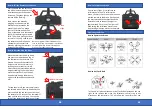
Major Parts Of The Drone
1.
Front Light
2.
Brushless Motor
3.
High Landing Gear
4.
Propeller
5.
Protection Guard
6.
Camera Mount
7.
Battery Compartment
8.
Bottom Landing Gear
9.
Front Indicator Light
10. Antenna
11. Rear Indicator Light
Remote Controller
1.
Start (short press)/ Stop (long press)
2.
Speed/ Light button (short press for speed control) (long press for light
control)
3.
Throttle Stick
4.
Trimmer (left/ right turn)
5.
Power Switch
6.
Power Indicator
7.
3D Flips and rolls button
8.
Directional Stick
9.
Trimmer (left/ right)
10. Trimmer (forward/ backward)
[3]
[4]
[5]
[10]
[2]
[1]
[6]
[7]
[8]
[9]
(a) (b) (c) (d) (e) (f)


