Pr
od
uct Asse
mbl
y (c
o
n
�
nue
d
)
Pr
op
e
ll
er Insta
ll
a
�o
n
/
Re
mo
va
l
Front
Rear
A
A
A
A
B
B
B
B
Pr
od
uct Asse
mbl
y (c
o
n
�
nue
d
)
Powering On the Drone
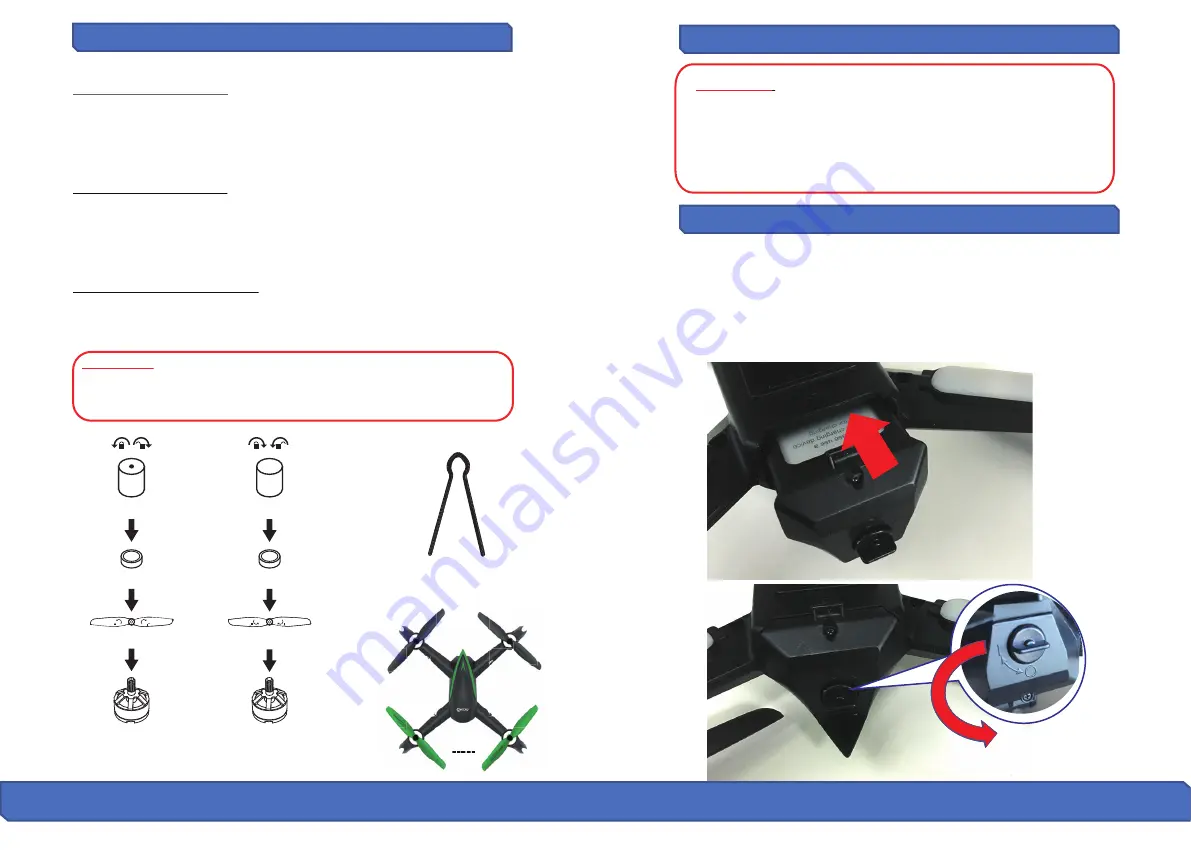
How To Install Propeller A:
Put the propeller with marking “A” into the clockwise rota�ng motor sha�
(the side marked “A” should face upwards). Next, put the so� pad into the
center bore of the propeller. Then, using the propeller screw with the dot,
put it onto the motor sha�; �ghten the screw by turning counter-clock
-
wise.
How To Install Propeller B:
Put the propeller with marking “B” into the counter-clockwise rota�ng
motor sha� (the side marked “B” should face upwards). Next, put the so�
pad into the center bore of the propeller. Then, install the propeller screw
with no dot and put it onto the motor sha�; �ghten the screw by turning
clockwise.
How To Remove The Propellers:
Hold the drone’s brushless motor in place and rotate the screw cap marked
"A" clockwise
,
rotate the screw cap marked "B" counterclockwise. (please
refer to the diagram below)
ATTENTION:
Please follow the diagram below step-by-step. Be sure to
keep in mind that the propellers are dis�nguishable by “A” & “B”
markings and the propeller screws are dis�nguishable by a “dot”
indenta�on. Please pay a�en�on to prevent stripping the screws.
●
IMPORTANT:
Propellers must be properly installed on corresponding
motors to avoid drone malfunc�on.
● Use cau�on when installing the propellers (as they are sharp).
● Please use Con�xo propellers only for this drone. Extra propellers can
be ordered through Con�xo by calling 1-833-CONTIXO (266-8496) to
order addi�onal spare parts.
6 7
Screw with indentation
Propeller B (counter-clockwise)
Counter-clockwise
rotating motor is
marked without dot.
Silicone rubber ring
Step 3
Step 2
Step 1
B
B
Clockwise rotating
motor is marked
with dot.
Propeller A (clockwise)
Silicone rubber ring
Screw without indentation
Step 3
Step 2
Step 1
A
A
Propeller changing tool
How to Power On the Drone
Exer�ng mild pressure, slide ba�ery into ba�ery compartment. Listen for a
quick “3 beeping sound.” Immediately, the LED lights in front of the drone
turns bright and the bo�om indicator lights start to blink. This indicates
that the drone power has been turned on. Next, locate the “Lock” near the
end of the drone ba�ery and turn it 90 degrees to the “O” posi�on to lock
the ba�ery. This prevents the drone ba�ery from falling off during flight.


