07
06
Dr
o
ne Ba
�
ery Insta
ll
a
�o
n
(
c
o
n
�
nue
d)
L
u
b
rica
�
n
g
Oi
l
in t
h
e S
p
in
dl
e Tu
b
e Wa
ll
(
Refer t
o
Fi
g
ure f
o
r Eac
h
Ste
p)
L
u
b
rica
�
n
g
Oi
l
in t
h
e S
p
in
dl
e Tu
b
e Wa
ll
(
c
o
n
�
nue
d)
Re
mo
te C
o
ntr
oll
er
Ad
j
ust Le
�
Ad
j
ust Right
Ad
j
ust Back
Ad
j
ust Forward
Thro
�
le Rocker
Direc
�
on Rocker
Boat Ba
�
er
y
Le
v
el Indicator
Power Switch
Remote Controller
Ba
�
er
y
Le
v
el Indicator
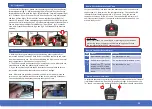
1. Pull out the motor wire. (see fig.1)
2. Pull out the cooling rubber hose. (see fig.2)
3. Unscrew the “motor seat” screw. (see fig.3)
4. Remove the “motor seat” module. (see fig.4)
5. Hold down the main rubber sha�. Hold the spindle and the propeller
with a wrench. (see fig.5)
6. Pull the spindle forward a bit. (see fig.6)
7. Use a moderate amount of lubrica�on oil for the tail of the spindle tube
(see fig.7)
8. Rotate the “spindle” forward and back. Pull slowly and let the lubrica�on
oil on the spindle tube wall distribute evenly. (see fig.8)
9. Hold down the main rubber sha�. Using a wrench, �ghten the screw and
propeller down. (see fig.9)
10. Load the motor seat module. (see the fig.10)
11. Lock the motor seat screw. (see fig.11)
12. Reconnect the cooling rubber hose(see fig.12)
13. Reconnect the motor wire. (see fig.13)
1. The ba�ery line should be placed on the side of the ship to prevent it
from being stuck or broken by the steering wheel.
2. Next, please ensure that all plugs are firmly inserted.
3. Lastly, please make sure the cabin cover is closed �ghtly to prevent
any leakage.
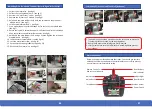
Below is the diagram of the Remote Controller. You should get comfort-
able and familiar with the Remote Controller before every sail to prevent
any accidents or incidents while sailing .


