13
12
180°Flip
(Mod
e 2
)
Maintenance
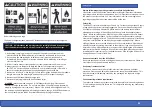
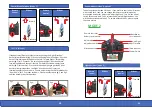
If the boat turns (flips) over, please start by pushing the Le� “Direc�on Rocker”
forward/upwards (fig.1). While con�nuing to hold the Le� “Direc�on Rocker”
forward/upwards, also push the Right “Thro�le Rocker” forward/upwards (fig.2)
for 2-3 seconds. Be sure to keep the Le� “Direc�on Rocker” forward/upwards
and then pull the Right “Thro�le Rocker” downwards/backwards (fig.3) for
another 2-3 seconds. When a�emp�ng to get the RC boat back into its original
posi�on, the Le� “Direc�on Rocker” is pressed forward/upwards the en�re �me.
You are only moving the Right Thro�le Rocker “Up or Down” for 2-3 seconds
each �me. Please repeat steps in fig. 2 and fig. 3 un�l the boat flips back into
posi�on.
fi
g.2
fi
g.1
fi
g.3
1. Before performing maintenance and the cleaning of parts, please first
remove the ba�ery from the RC Boat. Ba�ery should be kept away and apart
from boat when not in use. Store boat and ba�ery in a dry area and in normal
room temperature. Please do not let it over-heat.
2. The RC boat should be kept dry at all �mes while not in use. A�er each use,
please be sure to wipe the boat dry with a clean cloth.
3. If you do not plan to operate the RC Boat any�me soon, please be sure to
remove the ba�eries from the remote to prevent any leakage.
Note - A�er each use (and a�er the ba�ery and parts cool down), please be
sure to use a dry cloth to wipe the exterior and interior moisture of the boat.
You can also add some desiccant to ensure that the hull is dry.
13
12
P
r
od
uct Asse
mbl
y c
o
nt
.
Re
mo
te C
o
ntr
oll
er Status In
d
icat
o
r
N
o.
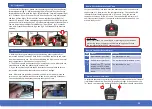
Status
M
eanin
g
1
Blue Indicator lights
fl
ash.
The boat ba
�
er
y
is low.
2
Red Indicator lights
fl
ash.
The remote controller ba
�
er
y
is low.
3
Ba
�
er
y
icon “ ” on LCD
displa
y
is as shown (with
stead
y
beep...beep...beep)
sound.
The boat ba
�
er
y
is low.
H
ow
t
o
P
air t
h
e Re
mo
te t
o
t
h
e RC B
o
at
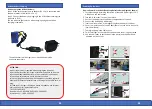
First, put the RC Boat into the water (the boat needs to be in the water to
conduct power ). Next, turn on the remote controller. The controller LED
indicator will start flashing and make a “Di” sound. Then, the remote
controller will make a “di-do-di” sound. The controller LED indicator will
now stay constant (it means it has paired with the remote controller). You
are now ready to sail!
ATTENTION:
● Any interrup�on (i.e. powering off or pressing any other bu�ons,
etc.) during the pairing process will disrupt pairing and will cause
the remote controller and RC boat not to pair.
Re
mo
te C
o
ntr
oll
er Ca
l
i
b
ra
�o
n
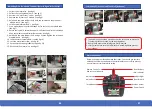
To calibrate the remote controller, simultaneously press and hold the “Thro�le”
(Le�) Rocker le� and the “Direc�on” (Right) Rocker right. When you hear the
“di” sound, that means the Remote Controller Calibra�on is paired successfully.


