background image

8

9

C

ontour

®

n

ext

 GEN blood glucose monitoring system

TESTING

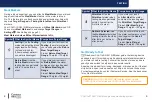
Meal Markers

During a blood sugar test, you can attach a Meal Marker to your blood 

sugar result when the Meal Marker feature in the meter is turned 

On. This feature lets you track your blood sugar levels over time with 

separate Target Ranges for Fasting/Before Meal and After Meal 

markers.

Your 

C

ontour

 n

ext

 GEN meter comes with Meal Markers turned Off. 

You can turn Meal Markers On and change Target Ranges in  

Settings  . See Settings on page 31.
Meal Marker choices if Meal Marker feature is On

Symbol What the Symbol Means Comparison/Target Range

Fasting: Use the Fasting 

marker when testing blood 

sugar levels after fasting 

(no food or drink for 

8 hours, except water or 

non-caloric beverages).

If you mark your test result as 

Fasting, the meter compares 

your result against the Before 

Meal Target Range.

Pre-set Before Meal Target 

Range: 70 mg/dL–130 mg/dL

Before Meal: Use the 

Before Meal marker when 

testing blood sugar levels 

within 1 hour before a 

meal.

If you mark your test result 

as Before Meal, the meter 

compares your result against 

the Before Meal Target 

Range.

Pre-set Before Meal Target 

Range: 70 mg/dL–130 mg/dL

Symbol What the Symbol Means Comparison/Target Range

After Meal: Use the 

After Meal marker when 

testing blood sugar levels 

within 2 hours after the 

first bite of a meal.

If you mark your result 

as After Meal, the meter 

compares the result against 

the After Meal Target Range.

Pre-set After Meal Target 

Range: 70 mg/dL–180 mg/dL

No Mark Selected: Use 

the No Mark symbol when 

testing at times other than 

after fasting or before or 

after a meal.

If you do not mark the result, 

the meter compares your test 

result against the Overall 

Target Range.

Pre-set Overall Target 

Range: 70 mg/dL–180 mg/dL

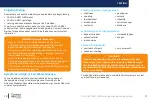
Get Ready to Test

 Read your 

C

ontour

 n

ext

 GEN user guide, the lancing device 

package insert, if provided, and all instructional materials provided in 

your meter kit before testing. Follow all instructions for use and care 

exactly as described to help avoid inaccurate results.

Examine the product for missing, damaged, or broken parts. If the test 

strip bottle is open inside a new box of strips, do not use those strips. 

For replacement parts, contact Customer Service. See the back cover 

for contact information.

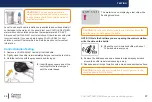
CAUTION: Your 

C

ontour

 n

ext

 GEN meter works only with 

C

ontour

 n

ext

 test strips and 

C

ontour

 n

ext

 control solution.

Summary of Contents for Next GEN 7383

Page 1: ...45 4 12 22 93 USER GUIDE Uses only Contour Next blood glucose test strips Works with the Contour Diabetes app available for download from the App Store or on Google PlayTM Blood Glucose Monitoring Sys...

Page 2: ...teries Contour Next GEN user guide Contour Next GEN quick reference guide Contour Next test strips Contour Next control solution Microlet Next lancing device Microlet lancets Carrying case Web registr...

Page 3: ...Always dispose of used test strips and lancets as medical waste or as advised by your health care professional All products that come in contact with human blood should be handled as if capable of tr...

Page 4: ...nded for use in healthcare or assisted use settings such as hospitals physician offices or long term care facilities because it has not been cleared by FDA for use in these settings including for rout...

Page 5: ...ver have a decimal point Results in mmol L will always have a decimal point Example 93 or 52 Check your display screen to be sure the results are shown correctly mg dL If not contact Customer Service...

Page 6: ...trademark SM service mark All other trademarks are properties of their respective owners and are used solely for informative purposes No relationship or endorsement should be inferred or implied Table...

Page 7: ...n to scroll continuously through a list Press the OK button to accept a selection To exit from the Logbook or Averages and return to the Home screen press the OK button NOTE When a symbol is blinking...

Page 8: ...esult is below 20 mg dL Your Logbook Meter Settings Fasting marker Symbol What the Symbol Means Before Meal marker After Meal marker No marker selected A Target Range or Target Range setting smartLIGH...

Page 9: ...ht from the test strip port is visible If there are missing characters or if the strip port light is a color other than white contact Customer Service This may affect the way you see your results NOTE...

Page 10: ...gainst the Before Meal Target Range Pre set Before Meal Target Range 70 mg dL 130 mg dL Symbol What the Symbol Means Comparison Target Range After Meal Use the After Meal marker when testing blood sug...

Page 11: ...our hands with antibacterial soap and water and dry them well before and after testing or handling the meter lancing device or test strips If your meter is being operated by a second person who is pro...

Page 12: ...ld not be used for assisted blood draws by health care providers or at health care provision sites and should never be shared with anyone else even a family member due to risk of infection Do not reus...

Page 13: ...est strip and reinsert it to begin a test CAUTION Do not use expired materials Using expired material can cause inaccurate results Always check the expiration dates on your test materials Get the Bloo...

Page 14: ...ps twice and the screen displays a blinking blood drop with a plus sign the test strip does not have enough blood 2 Apply more blood to the same test strip within 60 seconds NOTE If the screen display...

Page 15: ...al Marker press the or button on the meter to scroll between markers 118 Example If you scroll up to Before Meal the Before Meal marker blinks 118 Example If you scroll down to After Meal the After Me...

Page 16: ...sult with the units time date meal marker if selected and target range symbol Above Target In Target or Below Target Example Blood test result with Meal Marker selected and a Reminder set 10 45 4 12 2...

Page 17: ...care professional s advice immediately Expected Test Result Values Blood sugar values will vary depending on food intake medication dosages health stress or activity Nondiabetic plasma glucose concent...

Page 18: ...reuse lancets Used lancets are not sterile Use a new lancet each time you test Always wash your hands with antibacterial soap and water and dry them well before and after testing or handling the mete...

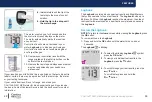
Page 19: ...p from the bottle 2 Tightly close the bottle lid immediately after you remove the test strip 3 Hold the test strip with the grey square end facing up 4 Insert the grey square end of the test strip int...

Page 20: ...a problem with the test strips the meter or your testing technique If your control test result is out of range do not use your Contour Next GEN meter for blood sugar testing until you resolve the issu...

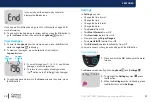
Page 21: ...Averages press the button 4 To return to your Logbook readings press the button on the 7 d Avg 7 day Average 5 To exit Averages and return to the Home screen at any time press the OK button Settings...

Page 22: ...turns on The Home screen has 2 options Logbook and Settings 10 45 4 12 22 2 To highlight the Settings symbol press the button 3 When the Settings symbol is blinking press the OK button to enter Setti...

Page 23: ...m d or d m is blinking 5 To select Month Day Year m d or Day Month Year d m press the or button then press the OK button 4 12 22 22 6 To change the year blinking press the or button then press the OK...

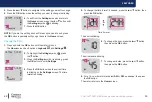
Page 24: ...f for a below target blood sugar reading turn the smartLIGHT feature to Off The meter returns to the Home screen Set Meal Markers 1 Press and hold the OK button until the meter turns on The Home scree...

Page 25: ...Press the OK button The meter returns to the Home screen Change Overall Target Range When the Meal Marker feature is Off your meter provides a pre set Overall Target Range A Target Range has a low li...

Page 26: ...until the Target symbol is blinking then press the OK button The meter displays the Low Target screen WARNING Discuss your Target Range settings with your health care professional NOTE There is only...

Page 27: ...l is blinking then press the OK button On or Off smartLIGHT Symbol 5 To turn the smartLIGHT feature On or Off press the or button to display the option you want 6 Press the OK button Set Bluetooth Wir...

Page 28: ...est results as they compare with your targets When your Contour Next GEN meter is paired with the Contour Diabetes app You can set or change a Meal Marker in the meter Logbook from the app The app wil...

Page 29: ...Meter Care Caring for your meter Store the meter in the carrying case provided whenever possible Wash and dry hands well before handling to keep the meter and test strips free of water oils and other...

Page 30: ...is providing testing assistance to you the meter and lancing device should be disinfected prior to use by the second person Evaluate your device after performing cleaning and disinfection to ensure th...

Page 31: ...lancing device for cleaning and disinfection Transfer Results to the Contour Diabetes app You can automatically transfer results from your Contour Next GEN meter wirelessly to your compatible smartpho...

Page 32: ...TION Use only approved equipment e g USB cable from the manufacturer or certified body such as UL CSA TUV or CE Replace the Batteries 1 Before replacing your batteries turn off your meter 2 Turn the m...

Page 33: ...Repeat the test with a new strip If the error persists contact Customer Service WARNING Keep batteries away from children Many types of batteries are poisonous If swallowed immediately contact your p...

Page 34: ...range between the actual blood glucose level and the Contour Next GEN meter result Within 5 Within 10 Within 15 Within 20 Percent and number of samples within specified range 64 96 241 371 93 53 347 3...

Page 35: ...rence will not occur in a particular installation If this equipment does cause harmful interference to radio or television reception which can be determined by turning the equipment off and on the use...

Page 36: ...GEN meter complies with the electromagnetic requirements specified in IEC 60601 1 2 Edition 4 0 Electromagnetic emissions are low and unlikely to interfere with other nearby electronic equipment nor...

Page 37: ...rtant cautionary information such as warnings and precautions that cannot for a variety of reasons be presented on the medical device itself ISO 15223 1 Clause 5 4 4 IEC 61010 1 Table 1 Symbol 14 Do n...

Page 38: ...abetes 1986 3 2 100 4 Atkin SH et al Fingerstick glucose determination in shock Annals of Internal Medicine 1991 114 12 1020 1024 5 American Diabetes Association 2 Classification and diagnosis of diab...

Page 39: ...previously manufactured instruments 4 Ascensia Diabetes Care has no knowledge of the performance of the Contour Next GEN blood glucose meter when used with any test strips other than Contour Next test...

Page 40: ...ure 20 38 Second Chance sampling viii 17 Settings 20 31 32 34 35 37 38 42 43 Bluetooth wireless functionality 43 Date 34 Meal Markers 37 Reminder Feature 20 38 smartLIGHT target range indicator 42 Sou...

Page 41: ...supplier of this product is authorized to grant such a license Ascensia the Ascensia Diabetes Care logo Contour Microlet the No Coding logo Second Chance the Second Chance sampling logo Smartcolor and...

Reviews: