background image

SETTING LIMITS

11

6.2 SETTING TRAVEL LIMITS

NOTE:

The opener is factory preset for installation on the

RIGHT HAND SIDE

. When the opener is mounted on the

left side of the door the opener will travel in reverse.

1.

Press Minus (-) button, the door will start closing. If the

door starts to open - press the Operate button (

Fig. 10

within two seconds. Press Minus (-) button again - the door

should now close. Release the button once you have reached

your desired closed limit position.

2.

Press Set button to store the closed limit position into

memory.

3.

Press Plus (+) button, the door will start opening. Release

the button once you have reached your desired open limit

position.

IMPORTANT WARNING:  Please be aware that the garage

door will start closing automatically once step 4 is

performed. The door will also automatically re-open after

fully closing with a short pause between the cycles.

4.

Press Set button to store the open limit position into

memory.

The door will now automatically close to its limit position then

fully open to calculate the safety obstruction forces. Please be

aware of the above warning.

7. RESETTING DOOR LIMITS POSITIONS

The door limit positions can be deleted for new positions by

following the steps below:

1.

Press and hold the Minus button (

Fig. 10

) for six (6) seconds

until you hear three beeps and the red Close Limit LED

starts to flash. Release the button.

2.

Follow STEP 6.2 above to set new travel limit positions.

Important: Their is no need to re-code the transmitter used

for setting the limit positions. After the limits are set the

transmitter will automatically reset to normal operation.

Go to STEP 8 and test the Safety Obstruction Force.

FIG. 10

©Copyright 2006 B&D Doors

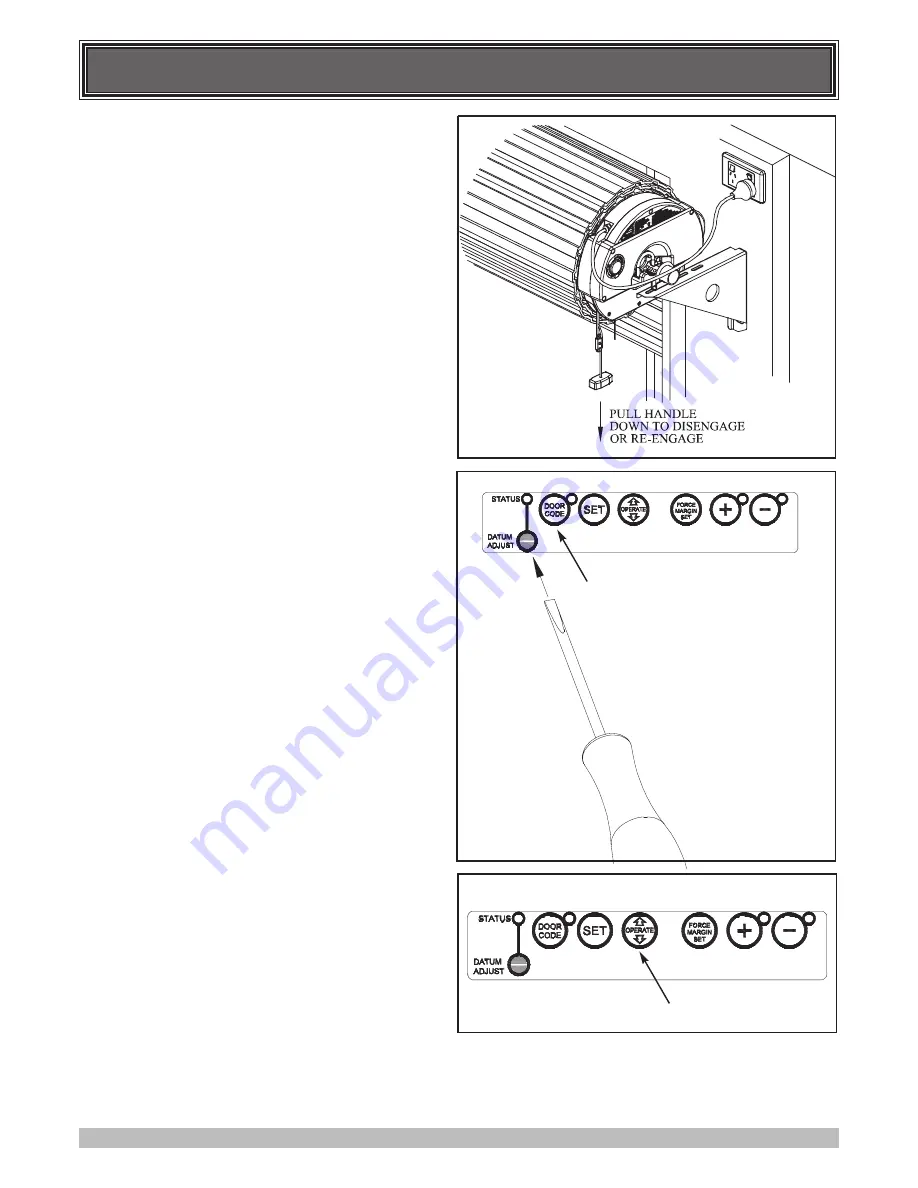
6. SETTING DOOR TRAVEL LIMITS

IMPORTANT NOTE: The OPERATE button will not

function until the open and close limits positions are set.

6.1 SETTING DATUM POSITION

1.

Switch the opener into manual mode (

2.

Move the door by hand to an approximately mid open

position.

3.

Re-engage the opener.

4.

Using a small blade screw driver turn the datum adjust

screw slowly until the yellow status LED just illuminates.

Note:

If the status LED is already illuminated when power is

connected then turn the datum adjust screw until the LED goes

off then turn back one notch to illuminate again.

FIG. 8

FIG. 9

WARNING! DO NOT adjust datum screw after setting

limits, as this will affect the opener’s operation, and 

potentially damage both door and opener.  .

Summary of Contents for Controll-A-Door ShedMaster

Page 1: ...s to follow all instructions Failure to comply with the installation instructions and the safety warnings may result in serious personal injury and or property and remote control opener damage Please...

Page 2: ...4 15 16 17 18 19 20 B D Doors to the extent that such may be lawfully excluded hereby expressly disclaims all conditions or warranties statutory or otherwise which may be implied by laws as conditions...

Page 3: ...s vital for the safety of persons to follow all instructions Failure to comply with the following Safety Rules may result in serious personal injury and or property damage The unit is rated to IP24 ho...

Page 4: ...should be checked at least once a month See installation manual for instructions LOCKABLE CONTROL PANEL The control panel can be locked and disabled to prevent tampering This is useful if the opener i...

Page 5: ...factors wind etc affect the operations of the door opener PLUS button green can be used during installation to set the open limit position Pressing this button will move the door in the open direction...

Page 6: ...DE BUTTON BLACK 5 CODING LED RED 6 SET BUTTON ORANGE 7 OPERATE BUTTON BLUE 8 FORCE MARGIN SET BUTTON 9 PLUS BUTTON FOR LIMITS SETTING FORCE MARGIN 10 OPEN LIMIT LED GREEN 11 MINUS BUTTON FOR LIMITS SE...

Page 7: ...N FLAT WASHER I D 3 16 x 1 2 2 2 S R E V O C R A B G N I K C O L 1 L A U N A M N O I T A L L A T S N I Copyright 2006 B D Doors TRANSMITTER B D CONTROLL A DOOR SHEDMASTER DRIVE UNIT COLLAR KIT 1 SELF...

Page 8: ...ck or bind in the guide tracks The ideal operational effort in raising or lowering the door should not exceed a force of 10kg 22 lbs Make sure that all door locks ropes chains etc are either released...

Page 9: ...hand door mounting bracket from wall 6 Remove the drive assembly from the packaging Try to rotate the drive gear by pushing on the fork If the gear does not rotate the manual mode has to be selected T...

Page 10: ...cure the curtain to drum wheel using self drilling screws two on each end The screws should be at least 90 degrees apart FIG 7 Copyright 2006 B D Doors DRUM WHEEL 5 1 MOUNTING THE TRANSMITTER BRACKET...

Page 11: ...OOR LIMITS POSITIONS The door limit positions can be deleted for new positions by following the steps below 1 Press and hold the Minus button Fig 10 for six 6 seconds until you hear three beeps and th...

Page 12: ...1 Press and hold the Force Margin Set button Fig 11 2 While holding down the Force Margin button press the Plus button Each press increases the force margin in both directions The Open Limit LED will...

Page 13: ...ter the code is now set 10 1 SETTING ENTRY KEYPAD TRANSMITTER CODE 1 Make sure that the battery is set in the Keypad Transmitter 2 Press the Code Set button on the opener the Code Set LED will illumin...

Page 14: ...e The door may move uncontrollably if the spring tension is weak or not set properly or the door is unbalanced If this occurs do not use the door and contact your installer for service The manual rele...

Page 15: ...de Codes a transmitter button for OPERATE function Force Margin Set Plus Increases the obstruction force margin setting Force Margin Set Minus Decreases the obstruction force margin setting Force Marg...

Page 16: ...No of CODE COMBINATIONS Over 3 86 Billion Codes TRANSMITTER BATTERY 2 x 3V Type 2032 Button Cell DEFAULT SETTINGS AND SPECIFICATIONS 16 Note 1 The maximum continuous curtain residential roll up door...

Page 17: ...tracks Possible obstruction in the doorway Increase force margin setting See Step 8 3 on page 13 Or re calculate force margin See Step 8 6 on page 13 Remove obstruction Door operates from drive unit O...

Page 18: ...ORMER TDB 72 01 KIT 72VA 62079 RATCHET TIMING ASSY 62078 POWER CORD A S 1 5M 2P1R 62081 FELT 21 X 29 TERMINAL BLOCK 500 02DS 2 POS CAP POLYFILM 0 1UF K X2 275 VAC HEX SERRATION HEAD SCREW M8X16 TAPTIT...

Page 19: ...for any service call made by B D or an Authorised Distributor where such a call is made for the purpose of adjustment as described in the Manufacturers Written Instruction Manual and not for rectifica...

Page 20: ...difications or repairs made or attempted to be made by any unauthorised person vii Faulty electrical wiring of structures to which the Opener is affixed viii Radio or other electronic interference inc...

Reviews: