background image

14

INSTALLATION

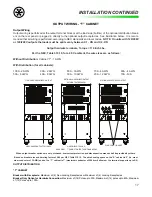
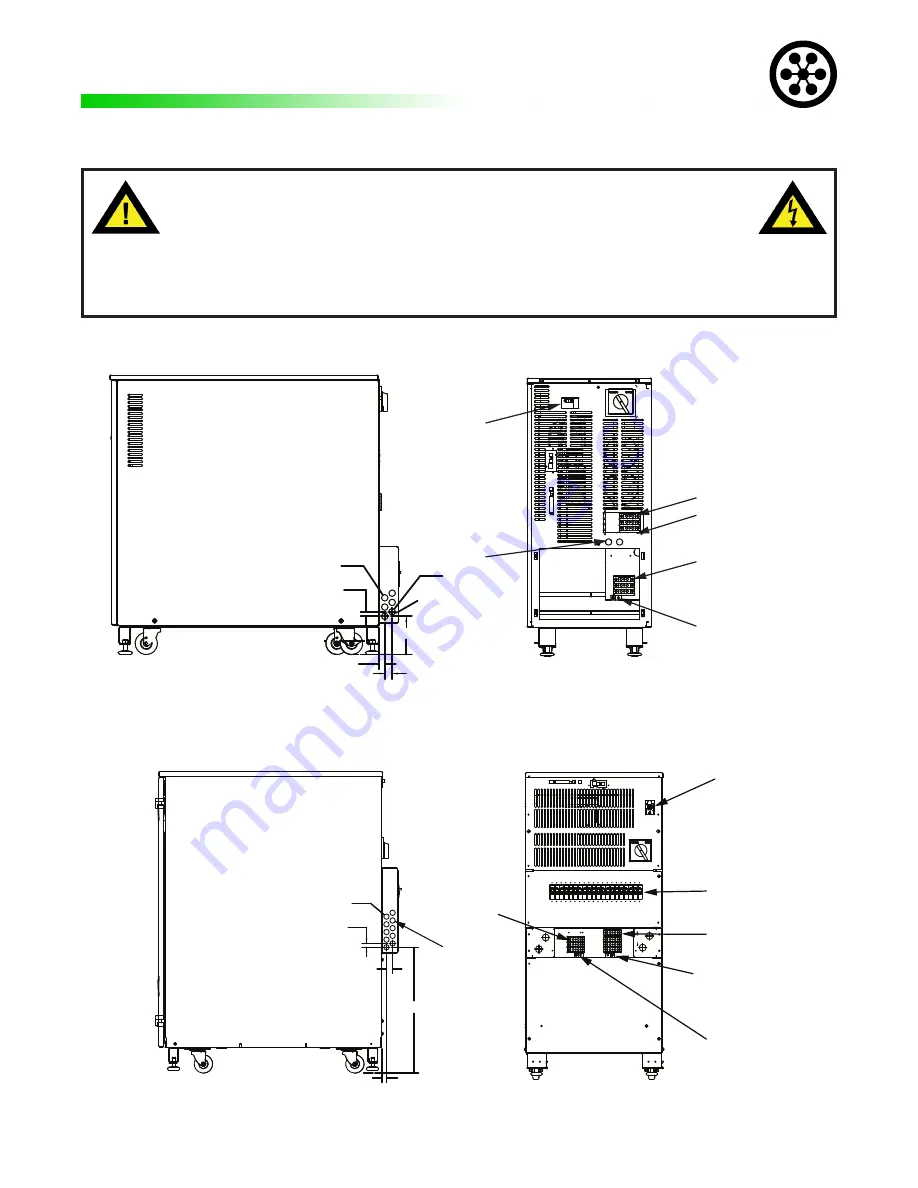
INPUT AND OUTPUT CONDUIT ENTRY POINTS AND TERMINAL LOCATIONS

INPUT/OUTPUT

CONDUIT

LOCATION

INPUT

BREAKER

REAR VIEW

INPUT TERMINALS

OUTPUT TERMINALS

“S” CABINET

OUTPUT GROUND

TERMINAL

INPUT GROUND TERMINAL

OPTIONAL

INPUT/OUTPUT
CONDUIT

LOCATION

“T” CABINET

REAR VIEW

INPUT

BREAKER

OPTIONAL

OUTPUT

BREAKER

(HARDWIRE)

OUTPUT TERMINALS

OUTPUT GROUND

TERMINAL

INPUT GROUND

TERMINAL

INPUT TERMINALS

5.160

.625

TYPICAL

.761

1.000

Ø .875

Ø.875

OPTIONAL OUTPUT
CONDUIT
LOCATIONS

SIDE VIEW

TYPICAL

BOTH SIDES

20.518

.625

TYP.

1.000

.761

Ø.875

SIDE VIEW

A

A

N

G

X1

X2

L1

L2

X3

XN

G

*** WARNING *** 

RISK OF ELECTRICAL SHOCK   

THE UPS RECEIVES POWER FROM MORE THAN ONE SOURCE.

BE SURE ALL UTILITY CIRCUIT BREAKERS ARE IN THE OFF POSITION AND

 THE BATTERY CONNECTOR IS UNPLUGGED BEFORE INSTALLATION OR SERVICING.

Summary of Contents for MODEL ES

Page 1: ...TROY MICHIGAN 4 5KVA 15 5KVA UNINTERRUPTIBLE POWER SUPPLY 112259 Rev 20 08 24 2020 MODEL ES OWNERS MANUAL IMPORTANT SAVE THESE INSTRUCTIONS PLEASE READ THIS MANUAL BEFORE USING EQUIPMENT ...

Page 2: ...icking any blue text will take you to that section of our website Click on the at the top of each page to return to the Table of Contents The following symbol indicates that caution should be taken when performing the process required in this manual Damage to the unit or personal harm could hap pen if proper precautions are not taken The following symbol indicates that there is a risk of electrica...

Page 3: ...E ANNUNCIATOR INSTALLATION 24 OPTIONAL REMOTE COMMUNICATIONS 26 OPTION INTERCONNECTION DIAGRAM 27 START UP PROCEDURE 28 OPERATION 29 MAINTENANCE PROCEDURES 43 BATTERY MAINTENANCE 44 MANUAL BATTERY TESTING 45 AUTOMATIC MONTHLY BATTERY TESTING 46 AUTOMATIC ANNUAL BATTERY TESTING 47 SPECIFICATIONS 48 WARRANTY 49 CUSTOMER SUPPORT 50 APPENDIX A 51 CABINET OUTLINE 52 BATTERY REQUIREMENTS 55 BATTERY INST...

Page 4: ...mmunications the Model ES includes a hardwired terminal strip interface for remote indication of UPS on battery low battery warning on static bypass and general alarm conditions Relay contacts are potential free user selectable normally open or normally closed and rated for 120 VAC 0 5 amps These status and alarm contacts may be wired to a factory provided Remote Annunciator panel with status LEDs...

Page 5: ... regardless of input voltage distortion Secure Maintenance Bypass System Maintenance bypass systems ensure that critical loads are never disrupted during maintenance or in an emergency Traditionally maintenance bypass switches are activated manually connecting the critical load directly to an alter nate power source without synchronization Activating an out of sync bypass may drop or damage the lo...

Page 6: ...arged for more than 6 months Battery storage temperature when not in use is 25 C for 6 months For each 9 C rise reduce storage time by half IMPORTANT NOTICE This shipment has been carefully inspected checked and properly packaged at our company When it was delivered to the carrier it was in good condition and technically it became your property at that time Thus any damage whether obvious or hidde...

Page 7: ...ecuring the UPS cabinet to the pallet and remove the piece of wood in the front and back of the UPS that blocks fork lift entry 3 Using a forklift place the forks securely under the UPS as shown below 4 Carefully lift the UPS from the skid 5 Set the UPS down until you are ready for installation REMOVING THE UPS FROM THE PALLET SHOCK HAZARD DO NOT SHORT BATTERY TERMINALS LIFT UNIT FROM SKID HERE CA...

Page 8: ...NALS IMPORTANT SAFEGUARDS READ AND FOLLOW ALL SAFETY INSTRUCTIONS SAVE THESE INSTRUCTIONS FOLLOW ALL STANDARD AND LOCAL ELECTRICAL CODES BE SURE INPUT POWER TO UPS IS PROPERLY GROUNDED DO NOT ALLOW WATER OR FOREIGN OBJECTS TO GET INSIDE UPS DO NOT PLACE OBJECTS OR LIQUIDS ON TOP OF THE UPS DO NOT LOCATE UPS NEAR RUNNING WATER OR WHERE THERE IS EXCESSIVE HUMIDITY DO NOT USE OUTDOORS DO NOT MOUNT NE...

Page 9: ... 20A 21A 25A 25A 30A 28A 35A 30A 35A 33A 40A 380V 50Hz 17A 20A 20A 25A 22A 30A 25A 30A 28A 40A 30A 35A 400V 50Hz 16A 20A 19A 25A 21A 25A 24A 30A 26A 35A 28A 35A 415V 50Hz 15A 20A 18A 20A 21A 25A 23A 30A 25A 35A 27A 35A 480V 13A 15A 15A 20A 18A 20A 20A 25A 22A 30A 23A 30A 600V 11A 15A 12A 15A 14A 20A 16A 20A 18A 20A 19A 25A 120V 208V 59A 70A 65A 80A 70A 90A 78A 100A 83A 125A 89A 125A 208 120V 52A 7...

Page 10: ...RRENT OUTPUT CURRENT OUTPUT VOLTAGE OUTPUT VOLTAGE OUTPUT MATRIX KVA OUTPUT MATRIX KVA OUTPUT CURRENT OUTPUT CURRENT OUTPUT CURRENT OUTPUT CURRENT OUTPUT CURRENT OUTPUT CURRENT When output breaker options are not purchased overcurrent protection and disconnection means shall be provided by others Based on breaker size and derating factor of 0 88 per NEC Table 310 16 The wire bending space on the S...

Page 11: ...temperature controlled indoor area free of conductive contaminants PRELIMINARY INSTALLATION CONTINUED 2 CLEARANCE REQUIRED FOR VENTILATION REAR 2 CLEARANCE REQUIRED FOR VENTILATION FRONT 2 CLEARANCE REQUIRED FOR VENTILATION LEFTSIDE 2 CLEARANCE REQUIRED FOR VENTILATION RIGHT SIDE 24 CLEARANCE REQUIRED FOR SERVICE LEFT SIDE 24 CLEARANCE REQUIRED FOR SERVICE RIGHT SIDE 36 CLEARANCE RECOMMENDED FOR A...

Page 12: ...temperature controlled indoor area free of conductive contaminants PRELIMINARY INSTALLATION CONTINUED FRONT VIEW REAR VIEW 4 062 45 005 49 067 AIR INLETS RIGHT SIDE VIEW 2 934 36 574 22 656 TOP VIEW NO CLEARANCE REQUIRED LEFT SIDE 2 CLEARANCE REQUIRED FOR VENTILATION FRONT NO CLEARANCE REQUIRED RIGHT SIDE EXIT AIR VENTS 36 CLEARANCE REQUIRED FOR SERVICE FRONT 36 MINIMUM CLEARANCE REQUIRED FOR SERV...

Page 13: ...LIMINARY INSTALLATION CONTINUED FRONT VIEW REAR VIEW 4 062 45 005 49 067 AIR INLETS INVERTER CABINET BATTERY CABINET RIGHT SIDE VIEW 22 656 22 656 45 312 3 005 36 574 TOP VIEW INVERTER CABINET EXTERNAL BATTERY CABINET NO CLEARANCE REQUIRED LEFT SIDE NO CLEARANCE REQUIRED RIGHT SIDE 2 CLEARANCE REQUIRED FOR VENTILATION FRONT 36 CLEARANCE REQUIRED FOR SERVICE FRONT 36 MINIMUM CLEARANCE REQUIRED FOR ...

Page 14: ...TIONAL OUTPUT BREAKER HARDWIRE OUTPUT TERMINALS OUTPUT GROUND TERMINAL INPUT GROUND TERMINAL INPUT TERMINALS 5 160 625 TYPICAL 761 1 000 Ø 875 Ø 875 OPTIONAL OUTPUT CONDUIT LOCATIONS SIDE VIEW TYPICAL BOTH SIDES 20 518 625 TYP 1 000 761 Ø 875 SIDE VIEW A A N G X1 X2 L1 L2 X3 XN G WARNING RISK OF ELECTRICAL SHOCK THE UPS RECEIVES POWER FROM MORE THAN ONE SOURCE BE SURE ALL UTILITY CIRCUIT BREAKERS ...

Page 15: ...ORE THAN ONE SOURCE BE SURE ALL UTILITY CIRCUIT BREAKERS ARE IN THE OFF POSITION AND THE BATTERY CONNECTOR IS UNPLUGGED BEFORE INSTALLATION OR SERVICING Input hardwire terminals Torque 110 Inch Lbs REAR VIEW INPUT TERMINALS S CABINET INPUT GROUND TERMINAL T CABINET REAR VIEW INPUT GROUND TERMINAL INPUT TERMINALS A N G X1 X2 L1 L2 X3 XN G NOTE 240 120V or 208 120V input MUST have 2 hots neutral and...

Page 16: ...to 60A Maximum of 12 poles up to 100A When output breaker options are not purchased overcurrent protection and disconnection means shall be provided by others Based on breaker size and derating factor of 0 88 per NEC Table 310 16 The wire bending space on the S cabinet is 2 i e maxi mum conductor of 3 AWG and on the T cabinet is 7 maximum conductor of 500 kcmil allowed the terminal supports up to ...

Page 17: ... When output breaker options are not purchased overcurrent protection and disconnection means shall be provided by others Based on breaker size and derating factor of 0 88 per NEC Table 310 16 The wire bending space on the S cabinet is 2 i e maxi mum conductor of 3 AWG and on the T cabinet is 7 maximum conductor of 500 kcmil allowed the terminal supports up to 2 0 Per the NEC Table 310 16 for a 40...

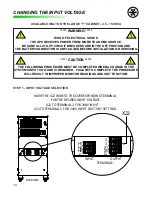
Page 18: ...IN THE SYSTEMS INPUT VOLTAGE IS REQUIRED FAILURE TO COMPLETE THE PROCEDURE WILL RESULT IN IMPROPER MONITOR READINGS AND UNIT FUNCTION STEP 1 INPUT VOLTAGE SELECTION X22 X22 TO TERMINAL 2 FOR 208V INPUT X22 TO TERMINAL 3 FOR 240V INPUT FACTORY SETTING X1 3 G HN H2 H1 HN H2 H1 REAR VIEW G INPUT OUTPUT XN G G TERMINALS 2 3 2 X1 XN MOVE THE X22 WIRE TO THE CORRESPONDING TERMINAL FOR THE DESIRED INPUT ...

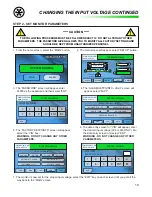
Page 19: ...8 RATED WATTS 10000 AH 100 X1 120 X2 120 UNIT OPTIONS 3 6 The data entry screen for VIN will appear enter the desired input voltage 208 or 240 ONLY into the data entry screen and select ENT WARNING DO NOT CHANGE ANY OTHER PARAMETERS 4 The ALARM SETPOINTS HIGH screen will appear select FACT SYSTEM NORMAL TIME 07 58 17 AM DATE 03 31 10 EXIT HIGH LOW MAIN FACT ALARM SETPOINTS HIGH AC VOLTS X1 N 132 A...

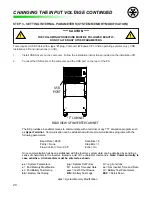
Page 20: ...characters to the Inverter Below is a list of the character commands Note Command entry is case sensitive All characters must be entered as shown ss System Parameters pp System Set Points ll Log Functions e End Memory Modification tt Inverter Time and Date cc Set Inverter Time and Date e End Battery Test Setup ww Last 5 Shut Downs rr Battery Test Parameters bb Battery Test Setup BB Battery Test Lo...

Page 21: ... unit you have chosen 6 Repeat step 5 for the Change Output X1 X2 parameter and enter the same voltage again as in step 5 DO NOT ENTER THE UNITS OUTPUT VOLTAGE THESE CHANGES PERTAIN TO THE UNITS INTERNAL CIRCUITRY NOT THE INPUT OR OUTPUT VOLTAGES TO THE UNIT ITSELF 7 Hit the escape key again until you get to the System Input Voltage parameter Enter a 1 for 208V or enter a 2 for 240V this value mus...

Page 22: ... intervention CLOSED Automatic restart active Default automatic restart allows the inverter to automatically restart following a long term power outage When the outage exceeds the back up time provided by the batteries the Inverter will shut down to preserve the long term life of the battery When utility power is restored the Inverter will deliver power to the load and automatically recharge the b...

Page 23: ...L BOARD NO NC C NO NC C NO NC C NO NC C J9 J10 J8 J7 Customer supplied Normally Open Dry Contact Input R E P O TEST ACTIVE LOW BATTERY ON BATTERY GENERAL ALARM 5 5VDC COMMON Normally Open Dry Contact Output Normally Open Dry Contact Output Normally Open Dry Contact Output Normally Open Dry Contact Output CHASSIS GROUND Normally Open Dry Contact Output Normally Open Dry Contact Output Normally Open...

Page 24: ...n in Fig 3 Use standard 1 2 box connector clamps to anchor the wire to the box not supplied REMOTE ANNUNCIATOR Controlled Power Company s Remote Annunciator is capable of displaying status conditions of an Uninterruptible Power Supply and alarming under critical conditions The following installation instructions include operation wir ing and mounting your Remote Annunciator OPERATION During normal...

Page 25: ...PS output Power must be present in event of utility failure 6 Connector on other end of communication cable to be factory wired After all cable routing and connector wiring is complete plug Remote Annunciator connector into the terminal header Plug prewired connector into the Alarm Terminal Strip in the UPS MOUNTING The Remote Annunciator is designed to be wall mounted with wiring inputs through t...

Page 26: ...ia SNMP e mail and network broadcast messaging Temperature and humidity sensing interface are also available NetMinder RCCMD Shutdown Software The NetMinder RCCMD is a client side application that performs the orderly unattended shutdown of your critical computers or servers NetMinder UNMS II UPS Network Management System The NetMinder UNMS II is a Windows based server side application that allows...

Page 27: ...E NORMALLY OPEN OR NORMALLY CLOSED BY MEANS OF JUMPERS ON CONTROL BOARD LOCATED JUST BELOW THE TERMINALS AS SHOWN ABOVE THESE JUMPERS CAN BE ACCESSED BEHIND INNER DOOR BEHIND CONTROL MODULE CLOSEOUT PANEL ON THE CONTROL BOARD NO NC C NO NC C NO NC C NO NC C J9 J10 J8 J7 Customer supplied Normally Open Dry Contact Input R E P O TEST ACTIVE LOW BATTERY ON BATTERY GENERAL ALARM 5 5VDC COMMON Normally...

Page 28: ...system on battery power 10 Turn ON the breaker and verify the system returns to normal power BEFORE TURNING LOADS ON 11 Turn the bypass switch to Bypass Mode See Bypass Switch Operation DO NOT SWITCH WHILE IN BATTERY MODE NOTE The module will switch to static bypass This is normal wait until the unit returns from static bypass BEFORE proceeding This can be verified by checking the display 12 Once ...

Page 29: ...nt Output Percent Load Output Frequency Battery Voltage ADVANCED DIGITAL MONITORING The user friendly Intellistat TS TM monitor provides quick full access to all of the monitor features and also allows all programming to be done directly from the monitor An easy to read LCD indicates all the electrical parameters as well as the functional status of the inverter A virtual keypad allows the entry of...

Page 30: ...S X2 N VA X1 N VA X2 N CHARGING DC AMPS MAIN ALARM SAME AS MAIN ALARMS EXIT ON OFF BUTTONS ON OFF INPUT OUTPUT BATT USAGE EXIT TST LOG REFRSH EXIT EXIT ALARMS ALM LOG HIGH MAIN FACT LOW PERIOD PARAM ALARMS SETUP TEST DISPLAYS ALARM AND TEST INFO DISPLAYS SYSTEM INFO NOT USER ACCESSIBLE VIN AH TEST BUTTON HIGH TEST DURATION TIME DATE HOME UNIT OPTIONS PERIOD DC VOLTS BAUD RATE PUSH TO ENABLE MANUAL...

Page 31: ...TS X1 TO N WATTS X1 N OUTPUT VA X1 TO N VA X1 N OUTPUT LOAD X1 TO N LOAD X1 N OUTPUT VOLTAGE X2 TO N AC VOLTS X2 N OUTPUT CURRENT X2 TO N AC AMPS X2 N OUTPUT WATTS X2 TO N WATTS X2 N OUTPUT VA X2 TO N VA X2 N OUTPUT LOAD X2 TO N LOAD X2 N TOTAL POWER FACTOR P F TOTAL LOAD PERCENTAGE TOTAL LOAD TOTAL VA TOTAL VA TOTAL WATTS TOTAL WATTS OUTPUT FREQUENCY FREQ BATT BATTERY VOLTAGE DC VOLTS BATT BATTER...

Page 32: ...ESSIBLE THE AH RATING OF THE BATTERIES ON THE UNIT AH THE OUTPUT VOLTAGE RATING X1 N X1 THE OUTPUT VOLTAGE RATING X2 N X2 THE WATT RATING OF THE UNIT UNIT RATED WATTS FACTORY PASSWORD FACTORY PASSWORD THE VA RATING OF THE UNIT UNIT RATED VA TEST PERIOD THE TEST IS ENABLED OR DISABLED ENABLED DISABLED DURATION OF TEST AUTOMATIC TEST DURATION START TIME AND DATE OF NEXT TEST TIME DATE TIME BETWEEN T...

Page 33: ... PARAM ALARMS SETUP TEST ON OFF SYSTEM NORMAL TIME 07 58 17 AM DATE 04 16 10 EXIT ALARMS ALM LOG TST LOG REFRSH HOME SCREEN Touch the SYSTEM NORMAL box to return to the HOME screen Only active from the MAIN screen Touch the EXIT button to return to the HOME screen On other screens touching EXIT will return to the previous screen Touching REFRSH will update any alarm or test data GENERAL The system...

Page 34: ...07 58 17 AM DATE 03 31 10 EXIT ENTER PASSWORD 2 3 4 5 6 7 8 9 0 ENT BS 1 Passwords are required to access certain screens A typical password screen is shown below Enter the desired number using the key pad The number selected will appear next to the Enter Password area When the numbers desired are fully entered select ENT to execute the entry and move to the next screen BS Back Space Exit will ret...

Page 35: ...ollowing conditions 1 Battery Test Fail 2 A low battery condition or 3 a weak battery is present ON BATTERY 1 4 min TIME 07 58 17 AM DATE 03 31 10 X1 X2 LOW BATTERY CHARGE LOAD MANUAL BYPASS STATIC BYPASS BATTERY STATUS INPUT OUTPUT PFC LINK INVERTER L PARAM ALARMS SETUP TEST ON OFF MAIN SCREEN ON INVERTER Displays elapsed time on battery All inverter events are time stamped and stored in the alar...

Page 36: ...ypass condition is cleared by the user The screen will return to the SYSTEM NORMAL screen when the bypass condition is corrected BYPASS SWITCH SWITCHING THE INVERTER TO BYPASS MODE system active 1 Push the knob in all the way and wait until the On Static Bypass message appears on the display 2 Then turn the knob clockwise to the Bypass position On Manual Bypass will then be displayed on the monito...

Page 37: ...m and 30 s The timer will count down until the test is complete and then terminate the test automatically Test results can be found in the TST LOG Menu TIME 07 58 20 AM DATE 04 16 10 EXIT PERIOD MANUAL ANNUAL FACTORY BATTERY TST 00 00 07 ABORT MANUAL BATTERY TEST TEST DURATION 0 m and 30 s While testing the button will change from TESTING to ABORT Press the ABORT button should you want to terminat...

Page 38: ...PRD 30 DAYS TIME DATE 10 00 PM 05 15 10 PERIODIC BATTERY TEST SETPOINTS BATTERY TEST 00 00 10 DISABLED PUSH TO ENABLE The timer will count down until the test is complete and then terminate the test automatically Test results can be found in the TST LOG Menu While testing the button will change from TESTING to ABORT Press the ABORT button should you want to terminate the test immediately T h e b u...

Page 39: ...ntil the test is complete and then terminate the test automatically Test results can be found in the TST LOG Menu While testing the button will change from TESTING to ABORT Press the ABORT button should you want to terminate the test immediately T h e b u t t o n w i l l t h e n c h a n g e t o ABORTING then again back to the original green TEST button Test results can be found in the TST LOG Menu...

Page 40: ...F 25 06 20 AM 04 16 10 TYPICAL ALARM LOG SCREEN SYSTEM NORMAL TIME 07 58 17 AM DATE 03 31 10 PREVIOUS NEXT DELETE DEL ALL EXIT ALARMS ALM LOG TST LOG REFRSH 24 OF 25 10 00 AM 01 15 10 PERIODIC TEST PASS TYPICAL TEST LOG SCREEN STORES UP TO 25 EVENTS If the ALM LOG register is full the system will delete the oldest entry to make room for the new entry automatically ALARMS CLEAR AUTOMATICALLY AFTER ...

Page 41: ...HE OUTPUT VOLTAGE LOW SETPOINT TOTAL ALARM 01 OUTPUT FREQUENCY LOW 54 3 THE OUTPUT FREQUENCY IS BELOW 57 5 HZ TOTAL ALARM 01 BATTERY DC VOLTS LOW 113 2 THE BATTERY VOLTAGE IS BELOW THE BATTERY VOLTAGE LOW SETPOINT TOTAL ALARM 01 AC INPUT VOLTS L1 N HIGH 134 2 THE INPUT VOLTAGE IS 9 ABOVE THE RATED INPUT VOLTAGE TOTAL ALARM 01 AC INPUT VOLTS L1 N LOW 99 2 THE INPUT VOLTAGE IS 12 BELOW THE RATED INP...

Page 42: ...PPLICABLE WHEN THE SYSTEM IS ACTIVE THE BYPASS MAY BE SWITCHED AT ANYTIME ONLY IF THE SYSTEM IS COMPLETELY SHUT DOWN ON MANUAL BYPASS TIME 07 58 17 AM DATE 03 31 10 X1 X2 LOW BATTERY CHARGE LOAD MANUAL BYPASS STATIC BYPASS BATTERY STATUS INPUT OUTPUT PFC LINK INVERTER PARAM ALARMS SETUP TEST ON OFF ON STATIC BYPASS TIME 07 58 17 AM DATE 03 31 10 X1 X2 LOW BATTERY CHARGE LOAD MANUAL BYPASS STATIC B...

Page 43: ... 2 Turn the AC input breaker off the UPS will go into inverter mode 3 Turn the AC input breaker back on and the unit will return to normal mode VISUAL INSPECTION 1 Remove top front panel or open door and remove side panels 2 Turn the unit off by means of the monitor and disconnect the battery connector Then turn off the main input breaker on the unit and the main feed breaker 3 Check for burnt fra...

Page 44: ...S WARNING DANGER HIGH VOLTAGE Optimum battery performance and life is at 25 C Warranty does not cover batteries used and operated above 40 C for any length of time Warranty does not cover any defects or damages caused by failure to properly store the Product before in stallation including the charge of batteries if not in use charged for more than 6 months Battery storage temperature when not in u...

Page 45: ...m the Main Menu Enter the required password to continue Select MANUAL from the menu and when the next screen appears push the green TEST button This will force the inverter into battery mode for the programmed duration 30 seconds 2 The unit will stay in battery mode for the pre programmed duration and then return to normal mode You will have the option to abort the test if required See Operation I...

Page 46: ... TEST button will automatically change the date and time of the Periodic Test to the date and time that the test button is pushed The auto test will commence exactly 30 days depending on the period set later on the same date and time the test button was initially pushed if enabled To force a periodic test 1 On the Intellistat TS TM Monitor select Test from the Main Menu Enter the required password...

Page 47: ...y change the date and time of the annual test to the date and time that the test button is pushed The auto test will commence exactly one year depending on the period set later on the same date and time the test button was initially pushed if enabled To force an annual test 1 On the Intellistat TS TM Monitor select Test from the Main Menu Enter the required password to continue Select ANNUAL from ...

Page 48: ...er linear load Output Frequency 60 Hz 0 5 under full load during battery mode of operation Voltage Regulation 1 5 no load to full load Output Power Rating VA at 0 90 power factor VA x PF Watts Battery Time Battery run times are specified at full rated output watts Battery Type Integral valve regulated sealed lead calcium maintenance free with 10 year design life Charger Type Integral 4 stage tempe...

Page 49: ...s Monday through Friday 8am 4PM During this same 90 day period CPC will cover the shipping cost of replacement parts The Warranty period on the UPS s electronics and controls shall not exceed thirty six 36 months from the date of product shipment from the factory The Warranty period on the batteries supplied by CPC with the UPS shall not exceed twenty four 24 months from the date of shipment from ...

Page 50: ...ormal business hours Warranty begins from date of shipment unless a factory start up is purchased then the warranty begins from date of Start Up or 90 days from ship date whichever comes first Start up includes all travel and living expenses Start up description Testing all emergency circuitry Calibration Inspection Exercising all circuit breakers Cooling fan check Input and out put parameter chec...

Page 51: ...51 APPENDIX A RELATIVE DRAWINGS SCHEMATICS APPENDIX A ...

Page 52: ...5 5115 5626 5 3 795 33 944 37 738 DISPLAY AIR INLET FRONT VIEW 5 160 625 TYPICAL 761 1 000 Ø 875 Ø 875 OPTIONAL OUTPUT CONDUIT LOCATIONS SIDE VIEW AIR INLET TYPICAL BOTH SIDES INPUT OUTPUT CONDUIT LOCATION BY PASS OPTIONAL SLOT CARD CS121 INPUT BREAKER OUTPUT TERMINALS EXIT AIR VENTS REAR VIEW ALARM TERMINALS INPUT TERMINALS 2 950 36 378 17 000 TOP VIEW 36 CLEARANCE RECOMMENDED FOR ACCESS TO OUTPU...

Page 53: ...ONT 36 CLEARANCE RECOMMENDED FOR ACCESS TO OUTPUT BREAKERS RECEPTACLES AND BYPASS SWITCH WHERE APPLICABLE REAR 4 CLEARANCE REQUIRED FOR VENTILATION REAR OUTLINE ES 4500 15500 WITH INTERNAL BATTERY WEIGHT LBS CABINET ASM ES 8 24 09 4 4 TJS 036 20GA 075 14GA 048 18GA 105 12GA 060 16GA 135 10GA VA 4500 5500 6500 7500 8300 9000 10000 11000 12000 13500 14500 15500 BTU HR 2301 75 2813 25 3324 75 3836 25...

Page 54: ...5115 5626 5 6138 6905 25 7416 75 7928 25 4 167 45 005 49 172 DISPLAY AIR INLETS INVERTER CABINET BATTERY CABINET ALARM TERMINALS INSIDE DOOR 20 529 Ø 875 1 000 761 625 TYPICAL OPTIONAL INPUT OUTPUT CONDUIT LOCATION TYPICAL BOTH SIDES 36 MINIMUM CLEARANCE REQUIRED FOR SERVICE TOP ALARM TERMINALS OPTIONAL SLOT CARD CS121 BY PASS INPUT BREAKER OPTIONAL OUTPUT BREAKER HARDWIRE EXIT AIR VENTS EXTERNAL ...

Page 55: ...V170 F C D Technologies S12V285 F C D Technologies UPS12 150MR C D Technologies UPS12 210MR C D Technologies UPS12 300MR C D Technologies UPS12 350MR C D Technologies UPS12 400MR Northstar NSB 40 Northstar NSB 75 CAUTION HIGH VOLTAGE EXISTS CAUTION MUST BE TAKEN WHEN WORKING NEAR THE BATTERY TERMINALS POWER IS SUPPLIED BY MORE THAN ONE SOURCE MAKE SURE AC CIRCUIT BREAKER IS OFF AND THE INPUT PLUG ...

Page 56: ...al burn if mistreated Do not disassemble puncture modify drop throw or cause other unnecessary shocks to batteries Do not dispose of batteries in a fire or trash incinerator or leave batteries in hot places such as a automobile under direct sunlight Do not store batteries near an oven stove or other heat source Do not connect batteries directly to an electrical source such as a building outlet or ...

Page 57: ...57 NOTES ...

Reviews: