background image

9

CONVAID USER’S GUIDE

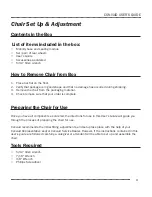
How to Remove Chair from Box


1. 

Place box flat on the floor.

2.  Verify that package is in good shape and that no damage has occurred during shipping.

3.  Remove the chair from the packaging material.

4.  Check to make sure that your order is complete.

Preparing the Chair for Use


Once you have all components as ordered, the directions for use in this User’s Guide will guide you 

through the process of preparing the chair for use.

Convaid recommends the initial fitting, adjustments, and setup take place with the help of your 

Convaid Representative and/or Convaid Service Dealer. However, if the instructions contained in this 

user’s guide are followed carefully, a caregiver or attendant will be able to set up and assemble the 

chair.

Tools Required

Chair Set Up & Adjustment

Contents in the Box


List of items included in the box:

•  Mobility base and seating module

•  Set (pair) of rear wheels

•  User’s Guide

•  Accessories as ordered

•  5/32” Allen wrench

•  5/32” Allen wrench

•  7/16” Wrench

•  3/8” Wrench

•  Phillips Screwdriver

Summary of Contents for EZ Rider 12

Page 1: ...ENGLISH User s Guide EZ Rider Upright Wheelchair SAVE THIS BOOK FOR FUTURE REFERENCE READ INSTRUCTIONS BEFORE USING Europe...

Page 2: ...guage or computer language in any form or by any means electronic mechanical magnetic optical chemical manual or otherwise without the prior written consent of Convaid Use only Convaid accessories and...

Page 3: ...Seat 15 Wheels Wheel Options 16 Quick Release Wheels 17 Anti Shimmy Adjustment 17 Locking and Unlocking 18 Operating Instructions Three Point Positioning Belt 19 H Harness with Padded Covers 20 Depth...

Page 4: ...bes 36 Utility Bag 37 Transit Models Transit Option 38 Transit Mode Instructions 39 Recommended Clear Zones In Vehicle 41 Providing Clear Space Padding 41 Proper Use of Equipment 42 Restraining the Wh...

Page 5: ...anation is necessary please contact your Convaid provider If you do not follow all instructions and warnings damage to the chair or serious injury may occur The latest version of all instructions and...

Page 6: ...everal options available to meet the needs of the wheelchair user Make sure that your and your health care provider s choice of chair and other added options takes into account the user s comfort posi...

Page 7: ...oid tipping do not hang items from the push handle WARNING To reduce the risk of an accident ALWAYS carefully read the User s Guide and become comfortable with operating the chair ALWAYS watch for obs...

Page 8: ...r tip over WARNING Positioning belts should never be used as a safety restraint device in a motor vehicle when transporting chair with occupant An additional WC19 ISO 7176 19 compliant automotive type...

Page 9: ...ave user unattended Do not strap user too tight Straps should not interfere with breathing or circulation Always apply wheel locks before letting go of the chair If front edge of seat is at or forward...

Page 10: ...191 mm x 51mm Front Solid Wheels Self Tensio Seat Support Never leave occupant unattended Failure to read and follow user guide instructions could result in serious injury To obtain a replacement use...

Page 11: ...h 1130 1168 1219 1156 Folded Width 356 343 356 368 Folded Height 445 457 432 394 Pivot Width 1295 1372 1430 1374 Maximum Slope 10 10 10 10 for use of parking brake Seat to Footplate 76 508 76 533 76 5...

Page 12: ...8 CONVAID USER S GUIDE EZ Rider Product Line EZ Rider EZ Rider 18...

Page 13: ...process of preparing the chair for use Convaid recommends the initial fitting adjustments and setup take place with the help of your Convaid Representative and or Convaid Service Dealer However if the...

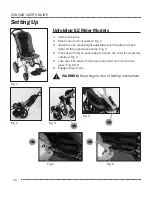
Page 14: ...casters Fig 2 3 Grasp the one piece height adjustable push handle and push down on the opposite seat tube Fig 3 4 Press down firmly on seat tubes to ensure the chair is completely unfolded Fig 4 5 Loc...

Page 15: ...p the one piece height adjustable push handle and pull up on the center of the seat Fig 9 6 Lay chair flat with seat facing upward Push on seat tubes to complete fold Folding WARNING To prevent injury...

Page 16: ...ing both hands 2 When chair is folded and locked with one hand hold by leg tube and with the other hold by seat back tube Fig 11 3 When chair is open hold leg tube with one hand and seat back tube wit...

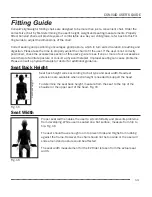
Page 17: ...acilitate posture or consult a physical therapist Improper seating can cause problems Please consult a physical therapist or doctor for additional guidance Seat back height varies according to chair t...

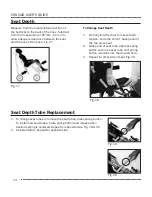
Page 18: ...ew seat tubes press spring button and release when desired setting is achieved Repeat for opposite side Fig 19 20 2 Reinstall fabric Repeat for opposite side To Change Seat Depth 1 Partially fold the...

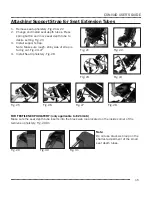
Page 19: ...Make sure rough shiny side of strap is facing out Fig 24 27 4 Install Seat Upholstery Fig 28 Fig 21 Fig 23 Fig 25 Fig 29 Fig 30 Fig 31 Fig 26 Fig 27 Fig 28 Fig 22 Fig 24 FOR TEXTILENE UPHOLSTERY only...

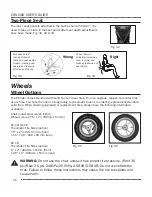
Page 20: ...e the tire to explode and cause harm Fig 35 Fig 36 Fig 33 Fig 34 Fig 32 Two Piece Seat Fig 15 Excessive Velcro overlap lifts seat fabric and pushes hips forward creating poor posture and reducing effe...

Page 21: ...l Fig 37 38 2 No tools are required to remove tire Fig 39 Rear Wheel Locking Pin WARNING Ensure the wheels are installed properly You will hear a click when wheel locks into place Tire Installation 1...

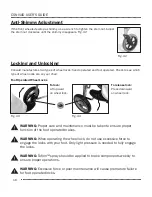
Page 22: ...n of the foot operated brakes WARNING When operating the wheel lock do not use excessive force to engage the locks with your foot Only light pressure is needed to fully engage the locks WARNING Teflon...

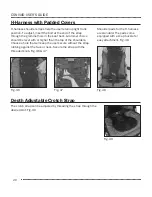
Page 23: ...ached to the crotch strap and joins the crotch strap to both belts To Buckle Slip the metal clasps on the belt strap into the sides of the buckle Fig 45 To Release Press the grey button on the buckle...

Page 24: ...mmet choice should be level with or higher than the top of the shoulders Choose a hole that will keep the user secure without the strap rubbing against the face or neck Secure the strap with the threa...

Page 25: ...n place Move footplate up or down realign holes and replace pin through holes in tube Fig 51 Additional Footplate Height Adjustment In the event that the footplate height adjustment described above is...

Page 26: ...6 5 Return the footplate extension tube to the housing bracket and secure with detent pin Fig 57 Fig 55 Fig 58 Fig 61 Fig 62 Fig 56 Fig 59 Fig 57 Fig 60 Angle Adjustable Footplates Angle adjustable fo...

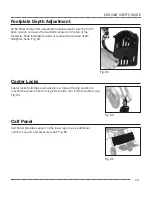
Page 27: ...f the footplate Slide footplate forward or rearward to desired depth Retighten bolts Fig 63 Caster Locks Calf Panel Caster locks hold the swivel wheels in a forward facing position to prevent the whee...

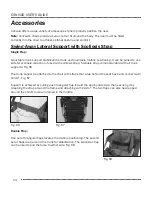
Page 28: ...strap Scoliosis strap comes standard with all trunk supports Fig 66 The trunk support is attached to the chair with straps that wrap behind the seat back and connect with Velcro Fig 67 Support is ach...

Page 29: ...rap across the chest thread it through the plastic loop on opposite flap and fasten with Velcro Note The Lateral Trunk Support Single Flap can be used to support either the left or right side of the t...

Page 30: ...he left hand outer flap around the side tubing of the frame and secure with Velcro 3 Thread the strap on the left hand inner flap into the plastic loop on the outer flap working from front to back 4 A...

Page 31: ...k attach the Support to the chair with the double sided Velcro strap on the right To support the left side of the trunk attach the Support to the chair with the double sided Velcro strap on the left F...

Page 32: ...oving hip alignment and stabilizing seating position The degree of adduction can be varied and can favor one side Fold the adductor flaps over the thighs wrap the straps under and around the armrest t...

Page 33: ...chair Secure headwings by tying laces through the grommet holes in the back of the seat fabric or headrest extension Fig 93 Fig 92 Fig 93 Headrest Extension The headrest extension fits easily into the...

Page 34: ...Allen wrench adjust the bracket to the desired height and reinsert the screws Fig 97 Fig 96 Fig 97 Occi Headwing Occi Headwing supports and positions the head at the occipital area This headrest provi...

Page 35: ...ton on the Rear Lock Brace Fig 100 101 3 Pull the lock brace off of the housing Fig 102 4 Pull shoulder strap through the upholstery reposition to the desired height and reinsert it back through the s...

Page 36: ...n Loosen the pelvic belt strap by pushing the gray button on the Strap Adjustment Lock B and pulling on the end of the strap closest to the buckle Fig 109 To Tighten Tighten the Crotch Strap by pullin...

Page 37: ...at the back of the knees Medial thigh support helps position the legs out of adduction and into better alignment which can provide for improved weight bearing balance and stability When used with a l...

Page 38: ...otrest height so that the user s leg rest firmly but comfortably on the cushion Proper footrest adjustment will enhance sitting comfort and help lower peak sitting pressures If applicable readjust arm...

Page 39: ...eiving patch on the edge of the Canopy Hood Fig 121 6 To fold repeat above steps in reverse order Fig 122 Fig 115 Fig 116 Fig 117 Fig 120 Fig 118 Fig 121 Fig 119 Fig 122 WARNING Keep fingers away from...

Page 40: ...e the seat width 51 mm and the seat depth 25 mm The ribbed surface provides comfort and promotes airflow Fig 124 See diagram below for how to configure anti tip tube for your specific size 1 To instal...

Page 41: ...IDE Fig 130 Utility Bag The Utility Bag attaches to the back of the chair but can be removed and converted to a tote bag Fig 131 132 Fig 131 Fig 132 WARNING Do not overload bag To attach 1 Hook clasps...

Page 42: ...EZ18T 170lbs 77kg Transit Option WARNING Convaid belts and shoulder straps are for positioning only and are not to be used as a vehicle restraint To reduce possibility of injury the headrest extensio...

Page 43: ...elt restraints The letter designation reflects the overall rating of the lap and shoulder belt position Using the EZ Rider Chair for Transportation in Motor Vehicles The OPTIONAL Transit Version EZ Ri...

Page 44: ...t the wheelchair user transfer into the vehicle s manufacturer s seat and use a federally approved crash tested seat WARNING Whenever possible auxiliary wheelchair equipment should be removed from the...

Page 45: ...pant and other passengers RECOMMENDED CLEAR ZONES IN VEHICLE Providing Clear Space Padding Side View Top View The rear clear zone is measured from the rearmost point on an occupant s head The front cl...

Page 46: ...can be easily secured by four point strap type tiedowns by attaching the hook end fittings of the tiedown straps to the four red securement point brackets located on the four tubular legs of the whee...

Page 47: ...IEDOWN STRAPS Fig 140 AND PREFERRED LOCATIONS OF FLOOR ANCHOR POINTS Fig 139 Fig 139 Fig 140 Fig 141 Fig 142 FIG 141 FRONT TIEDOWN STRAPS ANGLED AWAY FROM SIDES OF WHEELCHAIR FIG 142 CORRECT POSITIONS...

Page 48: ...E STANDARD METAL CLIP FIG 143 AT LOWER END OF SHOULDER BELT AND AT END OF OPTIONAL WHEELCHAIR ANCHORED LAP BELT USED TO CONNECT TO PIN BUSHING FIG 144 ON LAP BELT OR ON WHEELCHAIR SECUREMENT POINT BRA...

Page 49: ...located on the wheelchair s rear securement point brackets Fig 144 Before loading the wheelchair onto the vehicle lift fasten the lap belt over the wheelchair user s pelvis The wheelchair user should...

Page 50: ...nder the user s elbows and pull the belt snug against the pelvis Ensure that belt webbing is not twisted as this may compromise safety It is best for EZ Rider to be transported with the seat in a rela...

Page 51: ...ry may result during a crash Convaid is a wheelchair manufacturer and does not offer wheelchair tiedown and occupant restraint systems WTORS However products that comply with current WTORS standards c...

Page 52: ...Press grey detent pin at the end of the seat extension and take off upholstery Fig 146 147 To remove the top portion of the seat remove the Velcro straps that attach the seat upholstery to the frame...

Page 53: ...the Tension Back unfasten the Velcro Straps and pull to desired firmness Fig 149 2 After adjustments are made refasten Velcro straps Repeat steps 1 and 2 on each set of straps Fig 150 151 Adjustable T...

Page 54: ...Other paper packaging waste should be set aside for recycling For disposition of replaced parts or the complete chair the materials should be separated into plastic rubber steel aluminum etc and set...

Page 55: ...rakes regularly and adjust as needed When going up a curb or step face the chair forward and tilt back to lift the front wheels over the curb Move forward and lift the rear wheels over the curb If and...

Page 56: ...should be conducted on a regular basis Examine your Convaid product visually from time to time for possible wear and tear Lubricant should be applied to frame and moving parts to maintain easy folding...

Page 57: ...ting areas with disinfectant wipes regularly Keep frame dry and apply a non toxic hypoallergenic and biodegradable lubricant to all moving parts After longer storage periods and before further use the...

Page 58: ...e down disinfection before reuse Please use a non toxic biodegradable disinfectant solution suitable for surface disinfection Please check the following components for intactness before operation see...

Page 59: ...uld fold unfold smoothly without undue effort All fasteners should be secure Fasteners on moving joints should not be overtight Seat fabric should not be wide stretched or sagging Positioning accessor...

Page 60: ...TATES DO NOT ALLOW THE EXCLUSION OR LIMITATIONS OF INCIDENTAL OR CONSEQUENTIAL DAMAGES OR LIMITATIONS ON HOW LONG AN IMPLIED WARRANTY LASTS SO THE ABOVE LIMITATIONS OR EXCLUSIONS MAY NOT APPLY TO THE...

Reviews: