20
CONVAID USER’S GUIDE
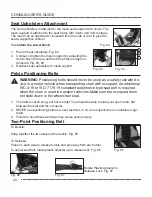
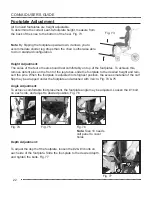
To adjust seat belt, rotate plastic adjuster up to release lock. Fig. 66
Rotate Plastic Adjuster to
Release Lock. Fig. 67
Pelvic Positioning Belts
WARNING:
Positioning belts should never be used as a safety restraint de-
vice in a motor vehicle when transporting chair with occupant. An additional
WC-4-19 or ISO 7176-19 compliant automotive type seat belt is required
when the chair is used in transport vehicles.Make sure the occupant does
not slide down in the wheelchair seat.
1.
The belts must be snug, but not too tight. You should be able to slide your open hand, flat
between the belt and the occupant.
2. NEVER use positioning belts as a user restraint, or on an occupant who is comatose or agi-
tated.
3. Failure to heed these warnings may cause serious injury.
Two-Point Positioning Belt
Fig. 65
Fig. 66
Fig. 67
To Buckle:
Snap together the two straps at the buckle. Fig. 65
To Release:
Press on each side to release buckle and pull away from each other.
The seat upholstery is attached to the mesh seat support with Velcro. The
mesh support is attached to the seat frame with Velcro and Velcro straps.
The mesh can be tightened or loosened from the side or rear to give the
seat a supportive contour.
Fig. 62
Fig. 63
Fig. 64
Seat Upholstery Attachment
To contour the Lower Back:
1. Peel off seat upholstery. Fig. 62
2. Contour or tighten the mesh support by adjusting the
Velcro flap in the rear and the three Velcro straps un
-
derneath. Fig. 63, 64
3. Reattach seat upholstery to mesh support.
3
2
1
3
2
1

