background image

Operation Controls
and Functions

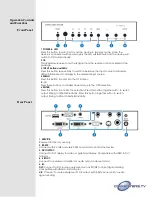
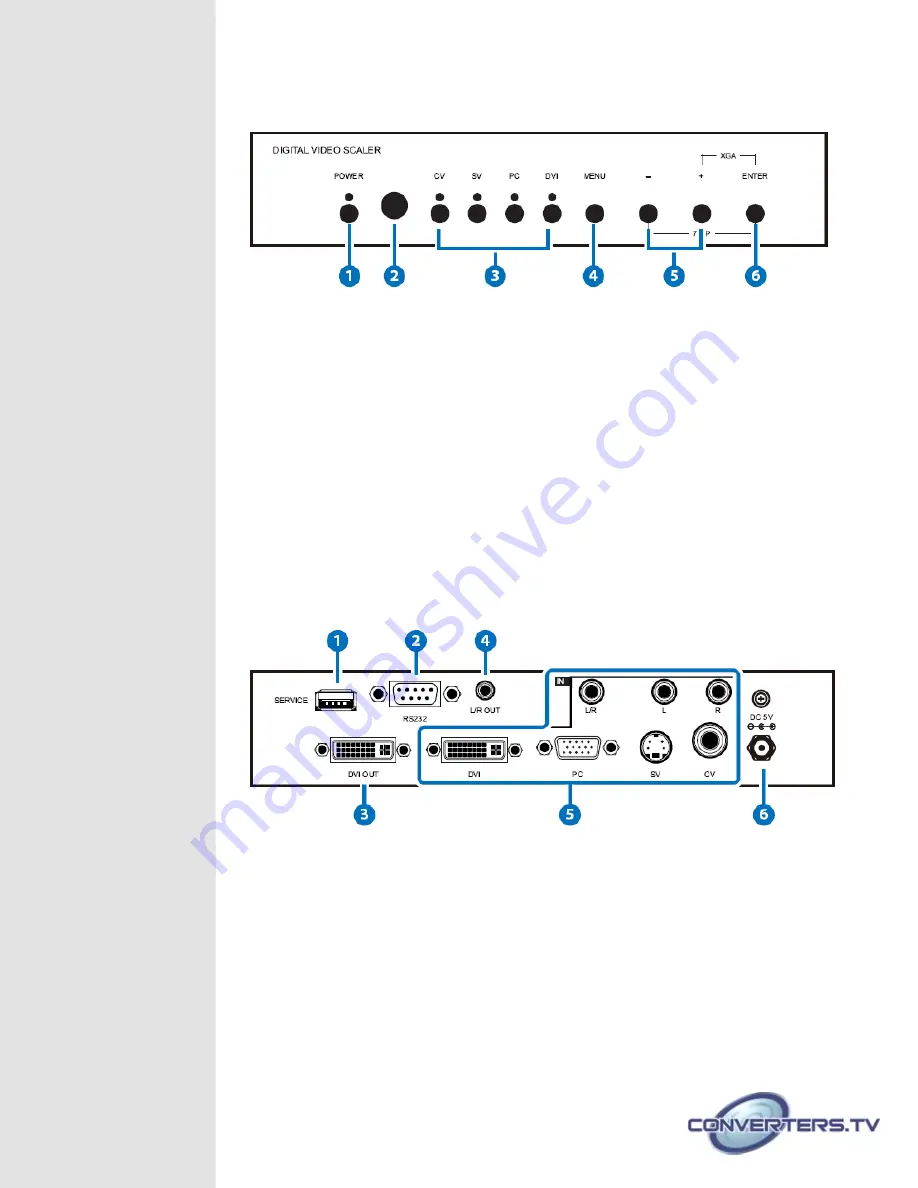
Front Panel

1. 

POWER & LED: 

Press this button to switch ON or set the device to standby mode. Once the 
device is connected with power supply the LED will illuminate and the device will 
switch to ON automatically.

2. 

IR: 

This IR window receives only the IR signal from the remote control included in the 
package.

3. 

INPUT button and LEDs: 

Press this button sequentially to switch in between the input sources rotationally. 
LED will illuminate accordingly to the selected input source.

4. 

MENU: 

Press this button to enter into the OSD menu.

5. 

-/+: 

Press these buttons to scrolled down and up in the OSD selection.

6. 

ENTER: 

Press this button to confirm the selection. Press this button together with – to switch 
output timing to 720p@60 instantly. Press this button together with + to switch 
output timing to XGA (1024x768) instantly.

Rear Panel

1. 

SERVICE: 

Reserved for factory use only.

2. 

RS-232: 

Connect with PC/NB and use RS-232 command to control the device.

3. 

DVI OUTPUT: 

Connect to DVI display for video or graphical display. Compatible with HDMI to DVI 
adaptor.

4. 

L/R OUT: 

Connect to speaker or amplifier for audio output in stereo format.

5. 

IN: 

DVI: 

Connect to DVI source equipment such as PC/NB for input signal sending. 

Compatible with HDMI to DVI adaptor. 

L/R: 

Connect to source equipment’s L/R output with 3.5Ø phone jack for audio 

signal sending. 

Summary of Contents for 15108

Page 1: ...DVI Digital Video Scaler ID 15108 Operation Manual ...

Page 2: ...nge of output resolutions up to 1080p for HDTV timing and WUXGA RB for PC timing Features Supports multiple formats of video and audio inputs to be converted to DVI Supports synchronized output for input video and output audio signals Supports 3D de interlace noise reduction and Comb filter Supports frame rate conversion Supports RS 232 IR Remote and on panel controls System Requirements Input sou...

Page 3: ...buttons to scrolled down and up in the OSD selection 6 ENTER Press this button to confirm the selection Press this button together with to switch output timing to 720p 60 instantly Press this button together with to switch output timing to XGA 1024x768 instantly Rear Panel 1 SERVICE Reserved for factory use only 2 RS 232 Connect with PC NB and use RS 232 command to control the device 3 DVI OUTPUT ...

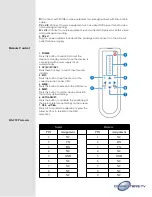
Page 4: ...vice is connected with power supply it is on automatically 2 CV SV PC DVI Press these hot keys to switch input source instantly 3 EXIT Press this button to exit the menu or the current selection under OSD 4 MENU Press this button to enter into the OSD menu 5 RESET Press this button to set the device back into the factory default setting 6 AUTO ADJUST Press the button to optimize the positioning of...

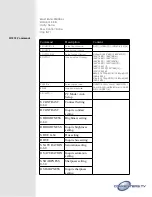
Page 5: ...0p 17 720p 60 18 1080p 60 19 1080i 60 20 576p 22 720p 50 23 1080p 50 24 1080i 50 25 R OUTPUT Inquire output timing S SIZE 0 6 Select output size OVERSCAN 0 FULL 1 BEST FIT 2 PAN SCAN 3 LETTER BOX 4 UNDER 2 5 UNDER 1 6 R SIZE Inquire output size S PCAUTO I PC Mode Auto Setup S CONTRAST 0 60 Contrast Setting R CONTRAST Inquire contrast setting S BRIGHTNESS 0 60 Brightness setting R BRIGHTNESS Inquir...

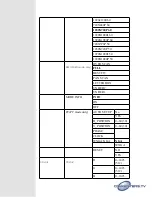
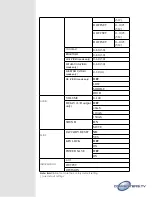
Page 6: ...1 Key lock setting ENABLE 0 DISABLE 1 R KEY LOCK Inquire key lock setting FW Firmware checking S RESET 1 Pre reset S POWER 0 1 Power On Off OFF 0 ON 1 R POWER Power Status Note All the RS 232 commands will be not executed unless followed with a carriage return and LF Commands are case insensitive OSD MENU 1st Layer 2nd layer 3rd Layer DISPLAY OUTPUT Native 640X480 60 800x600 60 1024x768 60 1360x76...

Page 7: ...1920X1080I 50 1920X1080P 50 SIZE VIDEO mode only OVER SCAN FULL BEST FIT PAN SCAN LETTER BOX UNDER 2 UNDER 1 MODE INFO INFO ON OFF PC PC mode only AUTO SETUP No YES H_POSITION 0 60 30 V_POSITION 0 60 30 PHASE CLOCK WXGA XGA XGA WXGA RESET NO YES COLOR COLOR R 0 1023 512 G 0 1023 512 B 0 1023 ...

Page 8: ...IDEO mode only 0 60 30 SHARPNESS VIDEO mode only 0 30 0 NR VIDEO mode only OFF LOW MIDDLE HIGH AUDIO VOLUME 0 100 DELAY L R output only OFF 40mS 110mS 150mS SOUND ON MUTE SETUP FACTORY RESET NO YES KEY LOCK OFF ON POWER SAVE OFF ON INFORMATION INPUT OUTPUT REVISION Note Bold Italian fonts are the Factory default setting are default settings ...

Page 9: ...ied Dimensions mm 215mm W x 165mm D x 47mm H Weight g 970g Chassis Material Metal Silkscreen Color Black Operating Temperature 0 C 40 C 32 F 104 F Storage Temperature 20 C 60 C 4 F 140 F Relative Humidity 20 90 RH non condensing Power Consumption 5 7w Input Resolution PC DVI HDMI CV SV NTSC PAL VGA640 480 60 72 75Hz SVGA800 600 56 60 72 75Hz XGA1024 768 60 70 75Hz XGA 1152 864 75Hz 1280 720 60Hz 1...

Page 10: ...I 50 60Hz 1080P 24 30 50 60Hz DVI HDMI output Resolution Native 640 480 60Hz 800 600 60Hz 1024 768 60Hz 1360 768 60Hz 1280 720 60Hz 1280 800 60Hz 1280 1024 60Hz 1440 900 60Hz 1400 1050 60Hz 1680 1050 60Hz 1600 1200 60Hz 1920 1080 60Hz 1920 1200 60Hz 480P 576P 720P 50 60Hz 1080I 50 60Hz 1080P 50 60Hz ...

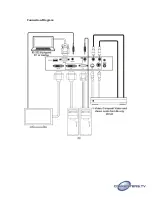
Page 11: ...Connection Diagram ...

Reviews: